What You Need to Build Plastic Model Aircraft
The working area
When building models, you will often work with different chemicals so it is important that your working area is easily cleaned and not too sensitive for some spill. Working directly on your precious rosewood desk is, for instance, a very bad idea. Myself, I just use the kitchen table after having covered it up with some discarded newspapers.
In any way, try to find some space where you can work for several hours without being bothered, as you may have to leave glued or painted parts in place overnight without moving them.
Your workspace should be a flat, dry and dust-free place. A good light source is essential: you will be working with a number of teensy parts made of greyish plastic. Joysticks, missile fins and landing gear struts are not very visible, especially when they disappear under the table – and trust me, they will. A high-intensity desk light with a builtin magnifier glass is great, but I strongly recommend using low energy light bulbs – they will be able to illuminate your workspace without melting the surface of your model.
Also, make sure that you have a couple of glass or plastic jars with a closable lid at hand – they can be used to contain tiny parts and subassemblies, making sure that they will not disappear.
Glue and paint do smell – good or bad is up to your personal taste – and can be pretty hazardous to inhale. When working extensively with an airbrush, you will unavoidably create a fine mist of paint that will quickly be disposed by the air all over your working area.
Proper model spray booths are the best choice to prevent this, but cardboard boxes (such as the one the model kit was packed in) are very good for catching the worst overspray. Otherwise, you may have a hard time convincing your spouse that the camouflage colours of the Third Reich is a tasteful colour selection for the kitchen walls.
If you’re working with toxic paints and thinners, you should never work with your models in your living space, such as your bedroom. Not only because of the smell, but you have only this many brain cells – and they will not regenerate.
But even if you’re using non-toxic paints, good ventilation is necessary. Make sure that you can open the window and create a good draft. Avoid working with your paints and glues for a very long time – take a break, stretch out and go and get some fresh air!
[iframe src=”https://www.youtube.com/embed/501bmHBi2ME” width=”900″ height=”600″ frameborder=”0″ allowfullscreen=”allowfullscreen”]
The toolbox
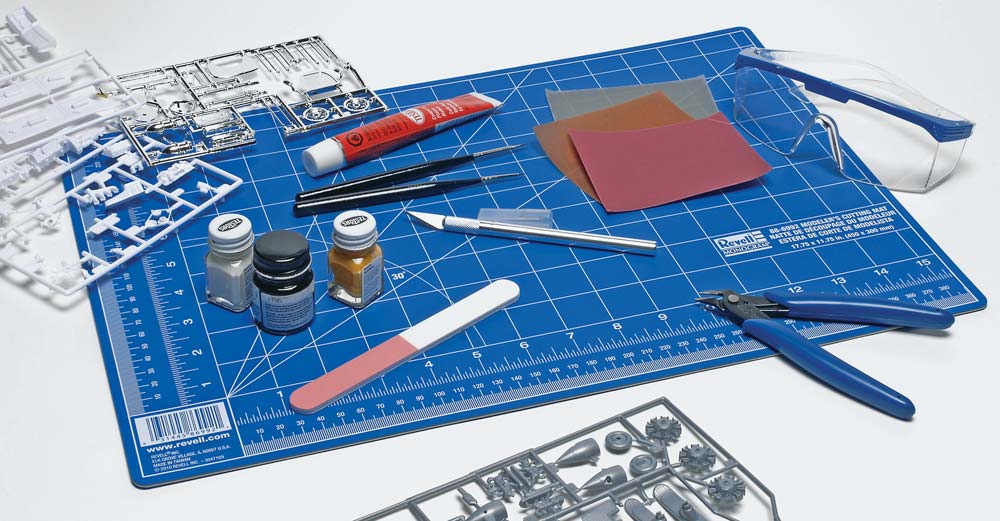
The basic toolkit consists of the following items:
- A hobby knife with changeable blades (like X-Acto knives)
- A couple of sheets of wet-and-dry sandpaper (starting from like 600 grit down to at least 1500 grit)
- A pair of pliers or tweezers
- Paint brushes (#00 and #1 size)
- Modelling cement (styrene cement)
- Superglue (cyanoacrylate glue)
- Masking tape (8 – 15 mm)
- Model paints
For the more ambitious modeller, this setup should be completed with a dual action airbrush with compressor and even a small Dremel power tool – great for those of you who want to drill up cannon barrels and exhaust pipes.
There are many other household items that you can use as well – pliers, tweezers and scissors, but even regular household items can be used as tools, such as toothpicks, ice-cream sticks, straws, clothespins, rubber bands and blue-tak.
Just put on your McGyver hat and be inventive! Here are some basic tips:
- Blue-tak is a viscoelastic polymer pad material, normally used for suspending light objects, such as pictures onto walls without nails or scotch tape. The material resembles children play-doh and is blue in colour – hence the name. In some countries, Blue-tak is called Stick-tak.
- A toothpick with a foot of blue-tak is great for holding aircraft wheels while painting the tires.
- Clothespins and rubber bands are good for holding parts together while the glue cures. Don’t use regular scotch tape, because it might leave a sticky glue residue on the parts.
- Straws are excellent for transferring small amounts of paint from your paint jar into your airbrush cup. Don’t use your mouth to suck up the liquid, or you may end up with a real foul taste in your mouth and also funny looking teeth. Instead, immerse one end of the straw deep into the paint and then put your finger to the other opening of the straw. This will keep the paint inside the straw until you release your finger.
- Sawing needles or medical syringes can be used to represent scale-correct pitot tubes on aircraft.
- A piece of scrap plastic sprue can be heated over a candle and stretched out to a thin wire to form a whip antenna or brake wires for landing gears.
Cleaning up
When you have done your basic research and gathered your tool collection, it is time to start working on some plastic.
While all the parts are still attached to the sprues, you should wash the parts with a mild dish-washing detergent and tepid water. The plastic is usually quite greasy from the moulding process. This grease will cause the paint to adhere poorly to the parts, so as a final preparation. If you feel that the parts are still very oily, you may even scrub them gently with a toothbrush. Just make sure that you don’t accidentally break off and flush minor parts down the drain.
When detaching the parts from the moulding trees, always cut them off with a pair of scissors, cutters or at least with a hobby knife. Never break them off, because even if they most often will break off at the right place, sometimes you will end up with nasty and hard-to-repair cracks and holes.
This applies even to a higher degree to clear parts, which tend to break and crack more easily, resulting in a more ugly hole – sometimes very hard, or almost impossible to repair.
Don’t remove all the parts at once, only the parts that are required for one sub-assembly and the parts you want to paint. Before using a part, it must be carefully trimmed, and all excess plastic from the moulding process should be cut and sanded off. This excess plastic is called flash, and if you ignore it, it will ruin the appearance of your final model.
By the way: X-Acto knives and blades are very sharp and therefore good at many things, among others at making deep cuts in your thumb – I have tried it myself so I should know.
I know it sounds like fun, but try to avoid it anyway. Never cut against your fingers, and try to point the blade away from your hand.
Essential Model Aircraft Tools & Materials
Next to a well-done finish, construction is equally important in the overall appearance of a model aircraft. To most, this subject is the least favorite aspect of modeling. This is certainly the case for me. Nonetheless, I try to do the best job I can and consider it a challenge.
When I begin this process, I tell myself to allow the time needed to reach my expectations. The two major components needed are time and patience. Learning to glue, fill and sand will come quickly with each build. In this section, I will discuss some tools and materials that are useful for any type of modeling.
Here are the basics that will get you started.
- Sprue cutters – removes parts from the “trees” safely
- Xacto knife – for cutting, scraping and cleaning up styrene
- Sanding paper and sticks (from 150 to 4000 grit)
- Razor saw – cleanly cuts thicker styrene
- Tweezers (fine tip and regular)
- Assorted clamps – for clamping parts together to dry
- Pin vise – for drilling small holes in styrene
- Scribing tool – for etching lines and detail into styrene
- Small paint/putty spatula – for applying filler putties
Materials
The market offers many good products for construction and each modeler has their preferences. Below are some products that work well and make the job much easier.
- Medium thickness super glue (CA)
- Filling putty (basic type)
- Mr. Surfacer 1000
- Tenax plastic weld (glue)
- Clear Parts Glue
Super Glue (CA)
Primary uses for this glue is to cement resin parts, photo-etched parts, small parts and to fill small gaps and joints. DO NOT use on clear parts. The fumes will “fog” them and it cannot be removed. If used as a gap filler, keep in mind it dries very quickly. Once dry, It’s impossible to sand down. So, after it’s applied to the area, allow to sit for a minute or so and then sand. If the CA is not fully dry, it will sand properly. I recommend very fine applicator tips anytime CA is used. This will allow control of the amount applied and reach hard to get areas. There are several consistencies available from thick to thin. I find a medium thickness works for most needs. If the CA is thin, it may run into areas where it’s not wanted and create a mess.
Putty
This will allow gaps, sinkholes, joints, and seams to be filled and rendered invisible.
Tamiya offers a basic putty which works great. It dries fairly quick and sands down easily. When sanding, it feathers nicely and does not “pit”. I have tried other types and brands and have stuck with this one. The putty can be applied with a flexible artist spatula and smoothed. To smooth even further, a Q-tip with some nail polish remover will settle the putty. The acetone in the polish remover acts as a putty thinner. Just lightly rub the putty after it’s in place with the Q-tip.
Once the putty dries (I give it 3+ hours), it can be sanded. Use a coarse grit sand stick first to remove most of the putty. Then, use a finer grit to finish off and feather in. Finally, the putty can be polished before priming. I recommend placing tape on each side of the seam/joint when sanding. This will help protect surface detail around the area from being damaged or sanded off.
Keep in mind, this putty does shrink when dried. A second or third application may be necessary to totally fill the area.
Mr. Surfacer 1000
Mr. Surfacer is a very thick, lacquer based primer paint. It can be thinned way down with lacquer thinner and sprayed as a primer coat. Also, it makes a great filler for small, shallow blemishes, seams and joints. It dries very quickly and can be sanded down. Like the putty, it feathers very nicely and gives a smooth finish. I recommend sanding with a
smaller grit (400-500) because it removes easily. Mr. Surfacer can be applied with a
pointed paint brush when used as a filler and cleaned up with lacquer thinner only.
Tenax 7R Plastic Weld
Tenax is a thin, liquid glue that actually melts the plastic together. It’s much more effective and easier to work with than the standard tube glues. It can be applied with a small nylon brush. The plastic pieces should be dry fitted first with a small gap between the pieces. The glue can then be added to the small gap and will “spread” (by capillary action) throughout the gap. Once the pieces are pressed together, the “melted” plastic will ooze in small beads from the seam. This is ideal and will make for a cleaner seam when dried and sanded. Within 30 seconds, the pieces will be set. Allow 24 hours to dry before sanding.
If too much is applied or accidentally gets on other surfaces, the glue will dimple or distort the plastic. These problems can be sanded out or filled. However, to avoid this, simply apply modest amounts. Using a small brush will help with this issue.
Clear Parts Glue
This particular glue is mainly the standard white, crafts glue. It is used for clear parts attachment such as canopies, windows, and light lenses. The bonding is not very strong but will hold. The pros are that is dries clear and will not discolor or “fog” the clear parts. It can be cleaned up with water, alcohol or Windex.


