


Paint creeping under your tape isn’t bad luck — it’s a fixable process problem. Here’s the step-by-step system experienced builders use for zero-bleed, razor-sharp camouflage lines.
Pull the tape too soon, or burnish it too lightly, and a crisp camouflage line turns into a ragged smear the moment you peel it back. Masking model airplanes is the single technique that separates an out-of-the-box paint job from a contest-table finish, and paint creeping under the tape edge is the most common complaint among beginners tackling their first multi-color scheme. The good news: the difficulty is procedural, not artistic. A systematic process — choosing the right masking method for the demarcation line the real aircraft actually wore, prepping the base coat properly, burnishing every tape edge, spraying away from the tape, and pulling it at the right moment — produces zero-bleed, razor-sharp camo lines consistently.
Masking is the gating skill for nearly every multi-color military scheme, from classic Olive Drab/Neutral Gray two-tones to three-tone NATO camouflage on modern USAF fighters. Master it once, and the entire catalog of camouflage subjects opens up. No proprietary tools are required — just tape, a hobby knife, some card stock, and a pair of tweezers, all available at any hobby shop.
 What You’ll Need
The masking toolkit is short, inexpensive, and mostly reusable across every future build:
- Low-tack hobby masking tape — Tamiya tape is the modeling standard, in widths from 1 mm to 20 mm and up; 3M Scotch-Blue 2090 painter’s tape is a budget-friendly fill-tape once the demarcation edge itself is laid with Tamiya tape
- Fine vinyl curve tape (1–3 mm) for compound curves and fuselage contours
- Card stock or file-folder material for feathered or freehand masks
- A hobby knife with fresh No. 11 blades, plus a steel straightedge
- Fine-tip tweezers for lifting and positioning tape and masks
- Liquid masking fluid (Micro Mask or similar) for irregular shapes
- Poster putty — never Silly Putty, which produces a hard edge instead of soft — for propping feathered masks
- Cotton cloth or fine-pore sponge with cut or punched holes, for mottled patterns
- A Plexiglas or glass cutting surface, which doubles as a de-tacking platform
- A burnishing tool or the blunt handle of an old paintbrush
Gather everything before you prime — the masking workflow isn’t the kind of job you want to pause halfway through.
Before You Mask: Getting Your Base Coat Ready
Every camouflage job starts with color order, not tape. Apply the lightest camouflage color first, then layer progressively darker colors on top — light pigments can’t adequately cover dark paint, while dark paint has enough hiding power to cover light colors cleanly. As one modeler working a Spitfire build put it: “It is standard practice on painting camouflage to paint the darker colour on top of the lighter colour” — a sequence that matters even more once soft-edge schemes come into play.
Once the base color is down, the real enemy is impatience. Tape can only go over a base coat that’s fully cured — not merely dry to the touch. Tamiya acrylics need a minimum of 8 hours, ideally 24; enamels need at least 24 hours, 48 preferred; lacquers, including Tamiya’s TS/AS spray cans, need a full 24 hours despite drying to the touch within seconds. Before committing tape to the model, press a scrap of the same tape onto a painted sprue or a hidden surface and peel it off. If any paint lifts, the base isn’t cured enough yet.
Two more insurance moves round out this stage: de-tack the tape on your forearm or a pants leg two or three times before it touches the model, and consider a thin gloss clear coat over any flat or matte base before masking — its micro-rough texture grips tape adhesive far more aggressively than a slick gloss finish does.
Choose the Right Masking Method for the Line You Need
Before cutting a single strip of tape, identify which of two demarcation-line types the actual aircraft wore. Get this wrong, and even flawless technique produces a historically inaccurate finish.
Hard-edge lines show up on most postwar U.S. and modern camouflage schemes — the USAF’s three-tone Southeast Asia camouflage on F-4 Phantoms, the Aggressors’ gray-on-gray schemes, or the A-10 Warthog’s European I three-color paint job. For these, tape goes down pressed flush to the surface and burnished completely, producing a crisp line with zero feather. On very small scales, a truly hard tape edge can occasionally look too crisp compared with the full-size prototype — a judgment call every builder makes for themselves.
Soft or feathered edges belong to most WWII RAF schemes — the disruptive Dark Earth/Dark Green upper surfaces on Spitfires, Hurricanes, and Lancasters — and to many Luftwaffe patterns, including the factory-sprayed RLM splinter camouflage. Those originals were sprayed without any masking at all, so the model version calls for tape or card held slightly off the surface, roughly 1/16 to 1/8 in., letting overspray drift underneath for a graduated fade. Scale matters: even a 1 mm gap reads as a visible soft edge at 1/72 scale, while 1/32 scale needs a more generous lift for the same effect.
To find out which line your subject needs, go to period photographs first — the Smithsonian’s National Air and Space Museum and the Imperial War Museum both maintain photo archives — or Osprey, Squadron/Signal, and Detail & Scale monographs specific to the type. Skip the kit box art as a reference; multiple sources confirm it regularly gets camouflage demarcations wrong.
Step-by-Step: Masking a Hard, Clean Demarcation Line
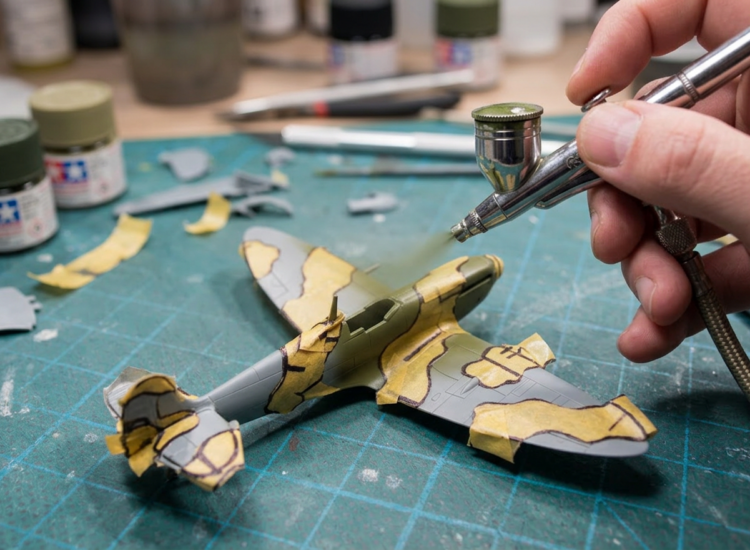
- Cut a fresh, straight tape edge. Lay the tape on a Plexiglas or glass surface and slice it with a new No. 11 blade against a steel straightedge. Plexiglas beats a rubber mat because the cut itself slightly de-tacks the tape right where bleed is most likely to start.
- Tack, sight, then commit. Align the cut edge to the demarcation line, tack one end without pressing fully, pull the tape taut, and tack the opposite end. Sight down the line before pressing it home — your last chance to correct the angle.
- Switch to narrow tape for curves. Fuselages and nacelles need 1–3 mm vinyl curve tape, “walked” around the curve in short 10–15 mm pulls that slightly overlap; fill in behind with wider tape. On tight curves, lay short overlapping straight segments instead; where the tape bridges a raised or recessed detail, slice through it, press both ends flat, and patch the cut.
- Burnish — hard. Run a fingertip, a burnishing tool, or the blunt end of a brush handle firmly along the entire edge until no gap remains. This is the single most important step in the whole process — one r/modelmakers builder credited burnishing “down with a flat-sided edge of a wooden skewer” for finally solving the problem. On a flat or matte base coat, de-tack the tape first so burnishing doesn’t tear the finish.
- Seal off every opening. Pack cockpit openings, wheel wells, intakes, and exhausts with rolled tissue paper or crumpled foil, then cover with a broad strip of tape. One uncovered opening is all it takes to dust the interior with the wrong color.
- Spray away from the tape edge, never toward it. Angle the airbrush so paint moves away from the tape line, not across it. Use thin coats — a single heavy pass builds fluid pressure right at the edge and pushes paint underneath. Dropping air pressure to roughly 10–12 PSI for that first pass near the tape lowers the risk further.
One optional insurance move: mist a whisper-thin coat of the base color along the tape edge before spraying the second color, so any micro-bleed matches the color already there and disappears.
Step-by-Step: Masking a Soft, Feathered Camouflage Edge
- Sketch, then cut the mask. Lightly pencil the camouflage boundary onto the model, then cut card stock — a manila file folder or index card works fine — to that shape. The cut edge becomes the shadow line of the feathered demarcation.
- Prop it off the surface. Roll short pieces of tape back on themselves into small double-sided pillars and press them under the card to lift it 1/16 to 1/8 in. above the model. Poster putty is a common alternative — rolled into a thin snake and pressed under the card, it holds a more even gap than tape pillars do. Consistency here is everything: an uneven gap produces an uneven feather.
- Spray at a consistent angle and distance. Hold the airbrush 3 to 6 in. from the model. Closer to 90 degrees from the surface tightens the feather; angling toward 45 degrees widens and softens it. Test the combination on scrap plastic first.
- Work one color at a time. Move the mask methodically from boundary to boundary, letting each color dry to the touch — roughly 15 to 30 minutes for Tamiya acrylics, longer for enamels — before repositioning for the next.
For NATO and other modern soft-edge schemes, FineScale Modeler recommends a related variation: lay thin snakes of poster putty along the demarcation line, press a paper pattern onto the putty so it floats a millimeter or two above the surface, and spray perpendicular. As FineScale Modeler’s Aaron Skinner explains, “I like poster putty because it’s flexible — you can shape it, and it provides just that soft edge when you spray down across it. I wouldn’t use silly putty because it provides a hard edge.”
No airbrush on hand? A stiff brush stippled with thinned paint, a torn — not cut — sponge dabbed onto the surface, or a punched cotton cloth sprayed through will all approximate a soft, mottled pattern. With a rattle can, hold it 6 to 10 in. from the model, parallel to the mask edge rather than aimed at it, for the widest, softest feather; closing to 4 to 5 in. tightens it up.
Removing Tape Without Losing Paint
Pull the tape while the final coat is dry to the touch but not yet fully cured — about 15 to 30 minutes after the last pass for Tamiya acrylics, 30 to 60 minutes for lacquers, and 1 to 2 hours for enamels. Waiting overnight lets cured paint bond too aggressively to the tape’s edge.
Peel parallel to the model’s surface, not straight up, at an angle of 45 degrees or less, pulling slowly and steadily. Lifting the tape perpendicular to the surface puts maximum tensile stress right at the tape edge — the leading cause of chipped lines. If a little paint does come off on the tape, it’s a normal, correctable outcome; touch it up with a No. 000 brush.
If the tape sat too long and the paint has started to bond past the edge, run a fresh No. 11 blade lightly along the tape line first to score through the paint film and break the seal before peeling. Clean the airbrush immediately once the tape is off, before residue dries in the cup, and inspect the demarcation line under good light while touch-up is still easy to color-match.
Fixing Bleed and Touch-Ups
Four causes account for nearly every bleed problem modelers run into, and each has a specific, repeatable fix.
Tape wasn’t fully burnished. A thin, sharp-edged line of the new color — usually 0.5 to 1 mm wide — appears just inside the tape boundary. Fix: Load a No. 000 or 0000 brush with the base color, thinned slightly, and run a single controlled stroke along the bleed line. Under a clear coat, the touch-up disappears.
Tape went on before the base coat cured. Patches of base paint lift away with the tape, exposing primer or bare plastic. Fix: Let the model dry fully, sand the damaged area with 1200–1500 grit, re-prime, and repaint the patch. Prevention is the real fix — see the cure times above.
Tape was reused or stretched from an earlier attempt. The demarcation line wanders or gaps irregularly instead of showing a uniform bleed. Fix: Never reposition old tape. Remask the section with a fresh strip and touch up as above.
Overly tacky tape tore up a flat or matte finish on removal. The base-color edge shows torn paint rather than a clean lift. Fix: Re-prime and repaint the area, then apply a thin gloss coat over the repair before masking again. De-tacking the tape before it ever touches a flat finish prevents the problem outright.
Even competition-level builders touch up demarcation edges routinely — the standard isn’t zero touch-up, it’s a touch-up nobody can see once the clear coat goes on.
Pro Tips
- One surface, two jobs. A single sheet of Plexiglas doubles as your tape-cutting surface and de-tacking platform — tape applied and peeled from it loses just enough grip for safe use over painted plastic.
- Seal with the color that’s already there. A whisper-thin mist of base color along a freshly burnished tape edge means any micro-bleed matches what’s underneath and disappears.
- Try Parafilm M on compound curves. This laboratory sealing film, available through scientific-supply houses and some hobby retailers, stretches over engine pylons and curved nacelles with almost no gapping and is easy on painted finishes.
FAQ
What’s the best tape to use for masking model airplane camouflage? Tamiya masking tape is the top choice among experienced U.S. scale modelers for masking model airplanes.
- Low-tack washi-paper grips firmly without bonding to fresh paint and removes cleanly.
- Available in widths from 1 mm to 20 mm, covering fine edges and broad fills alike.
- If it isn’t on hand, de-tacked 3M Scotch-Blue 2090 painter’s tape is the next-best option.
How do I stop paint from bleeding under my masking tape? Burnishing the tape edge firmly to the surface before you spray is the single most reliable fix.
- Cut the tape edge fresh with a new No. 11 blade on Plexiglas or glass.
- Burnish with a fingertip or tool until no gap remains between tape and surface.
- Spray thin coats aimed away from the edge, at roughly 10–12 PSI near the line.
How do I mask a soft, feathered camouflage edge on a model plane? Hold a card-stock mask 1/16 to 1/8 in. above the surface — never flat against it — and spray at low pressure.
- Prop the mask with rolled tape pillars or a thin snake of poster putty.
- Set the airbrush to 10–15 PSI with paint thinned to roughly 70% thinner.
- Hold closer to 90 degrees for a tighter feather, closer to 45 degrees for a wider one.
How long should I wait before removing masking tape from a model airplane I’ve just painted? Remove the tape once the paint is dry to the touch but not fully cured.
- Tamiya acrylics: 15–30 minutes after the final coat.
- Lacquers: 30–60 minutes. Enamels: 1–2 hours.
What do I do if paint pulls off with the tape when I remove it? Paint that lifts with the tape means the base coat wasn’t fully cured, or the tape’s adhesive was too aggressive for the finish.
- Let the model dry completely, then remove loose paint with tweezers or a fresh blade.
- Feather the area with 1200–1500 grit, prime, and repaint.
- Next time, wait the full cure — 24 hours minimum for acrylics, 48 for enamels.

Key Takeaways
- Paint light before dark, and let each color fully cure — 8 to 24-plus hours depending on paint type — before masking.
- Burnishing the tape edge firmly is the single most effective way to stop paint bleed.
- Match the method to the demarcation line: tape pressed flush for hard edges, tape or card propped 1/16–1/8 in. for soft ones.
- Pull tape while paint is dry to the touch, not fully cured, at a shallow angle; score with a No. 11 blade if left on too long.
- Every bleed line has a fix — a No. 000 brush and patience solve almost all of them.