


Your finish lives or dies at the masking stage. This guide shows you the exact pro sequence — right material, clean burnish, safe removal — so you get razor-sharp lines with zero bleed every time.
You waited for the paint to dry. You peeled back the tape. And there it was: a fuzzy, feathered line where a knife-sharp color break should have been — or worse, a strip of your first color lifting away with the tape, or a canopy clouded with overspray. If you’ve ever dreaded that moment, this guide to masking model airplanes is written for you. Masking is the step where a paint job is won or lost, and it trips up almost every beginner about to spray a second color.
Here’s the good news: crisp, contest-quality demarcation lines are not luck. They’re a routine. Veteran builders treat masking as its own skill — not an afterthought squeezed between coats — and the leading U.S. modeling press treats it the same way. As Mike Ashey writes in Detailing Scale Model Aircraft (painting techniques chapter): “Careful masking, paint mixing and airbrush technique make all the difference between a mediocre paint finish and a flawless paint finish.”
Over the next several sections, we’ll walk the whole arc: prepping the surface, choosing the right material, laying clean lines around curves and canopies, spraying without bleed, and removing the mask safely. By the end, you’ll have a repeatable routine you can trust.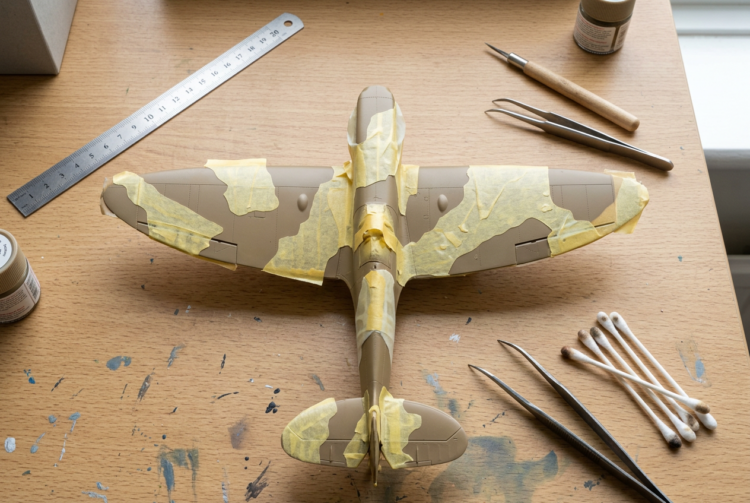
What You’ll Need
Before you lay down a single strip of tape, gather your kit. Having everything within reach means you won’t be hunting for a fresh blade with wet paint on the bench.
Tools and Materials
- Tamiya masking tape — the benchmark standard in the U.S. hobby. It comes in several widths (roughly 1/4″, 3/8″, and 3/4″, matching 6 mm, 10 mm, and 18 mm, plus narrow specialty rolls of 1–3 mm). The 10 mm width handles most general work; the narrow 1–3 mm strips follow panel lines and tight curves. It’s far thinner than hardware-store tape and conforms better to detail.
- 3M/Scotch blue painter’s tape and Frog Tape Delicate Surface — for large flat areas and broad color fields (available up to 2″/51 mm) where Tamiya tape would be cost-prohibitive. De-tack these wider tapes before use; their adhesive can lift fresh paint.
- Liquid mask (Humbrol Maskol, Vallejo Liquid Mask, or equivalent) — a rubber-latex or synthetic fluid you brush on; it dries to a peelable film that protects irregular shapes, riveted surfaces, mottled camouflage edges, and recesses tape can’t reach.
- Parafilm M — a stretchable, wax-like laboratory sealing film that masks compound curves well (cowlings, wing roots, fuselage bulges, pylons). Stretched, it turns nearly transparent, clings with body heat alone (no adhesive needed), and cuts cleanly with a fresh blade.
- Bare-Metal Foil (BMF) — an ultra-thin self-adhesive aluminum foil from Bare-Metal Foil Co., useful for canopies with faint or engraved frame lines, natural-metal finishes, and chip-through weathering. It burnishes very tight for sharp cuts — but keep it on only as long as needed, since it can be hard to remove and may leave residue on clear plastic.
- A burnishing tool — a cocktail stick (toothpick), the rounded handle of a paintbrush, a dedicated dry-transfer burnisher, a child’s thick pencil, or a blunt large-gauge knitting needle. A toothpick’s round tip gives precise pressure along a tape edge without tearing or marring.
- A fresh No. 11 hobby blade — mandatory for every tape and Parafilm cut. Dull blades tear rather than cut, and a ragged tape edge becomes a ragged paint line. Start each masking session with a new blade.
- A sewing-grade steel ruler (6″ or 12″) — as a straight-edge cutting guide and a guide for pulling straight lines.
- Fine-tipped tweezers — for lifting and placing small mask pieces and pre-cut canopy masks.
- Cotton swabs (Q-Tips) — for cleaning up stray paint and lifting liquid-mask residue.
Skill Level and Time
This is beginner-friendly work. It rewards patience and attention to detail, but it asks for no airbrushing skill beyond a basic spray technique — you can pick up every step on a first build. Budget about 2 to 4 hours for a typical two-tone scheme, spread across two sessions: roughly 30–45 minutes for surface prep and marking the line, 45–90 minutes for masking, 30–60 minutes for painting (including flash-off between coats), and 20–30 minutes for removal and cleanup. Multi-color schemes or intricate canopies may need an extra session.
Step-by-Step Instructions
Step 1: Choose the Right Masking Material for the Job
Match the material to the geometry — this single decision prevents most beginner failures. Using the wrong medium for a given surface is the leading cause of bleed-through, lifted tape, and soft edges. Here’s how the pros pair material to shape:
- Tamiya tape, narrow strips (1–3 mm): sharp panel lines, gentle curves, straight demarcation lines, and canopy frames with raised relief. The thinner the strip, the tighter the curve it can follow.
- Wider painter’s tape (3M, Frog Tape): large flat fields, and backing over narrow strips to block overspray from neighboring areas.
- Liquid mask (Maskol, Vallejo): irregular shapes tape can’t follow — rivet lines, mottled camouflage edges, wheel-bay openings, and complex recesses.
- Parafilm M: compound curves — cowlings, engine nacelles, wing roots, fuselage bulges, and pylons. Any surface curving in two planes at once.
- Bare-Metal Foil: canopies with faint or engraved (not raised) frame lines, natural-metal finishes, and chip-through effects.
- Pre-cut canopy masks (Eduard, Tamiya): the most efficient option when they’re made for your kit. Eduard’s are die-cut to exact kit tolerances on adhesive-backed sheets.
| PRO TIP — Low-tack tape saves fresh paint.
If your paint has been on the model less than 24 hours, de-tack Tamiya tape before use: press the adhesive side against the back of your hand or forearm once or twice, then apply. That drops the tack by roughly 30–40% and greatly reduces the risk of peeling paint — without hurting edge quality. |
One hard rule: never put Tamiya tape on a surface that’s been curing for fewer than 8 hours. Even its gentle adhesive can lift paint that hasn’t set.
Step 2: Prep the Surface Before Masking
Clean first. Dust and fingerprints under a tape edge give paint a path to wick underneath, and that’s bleed. Wash your hands before handling painted parts, and make sure the surface is free of grit.
Then confirm the paint is fully cured — not just dry to the touch. Tamiya acrylics (the X/XF range) feel dry in minutes but aren’t cured for 24 to 48 hours. Enamels take longer; some need 24 to 72 hours. Lacquers cure fastest. Lay tape over paint that’s still soft and the tape can grab the paint layer instead of protecting it.
Not sure it’s ready? Run a tape-adhesion test. Press a small piece of Tamiya tape onto an inconspicuous spot and peel it back over itself. If paint lifts onto the tape, wait longer. If nothing transfers, you’re clear to mask.
| PRO TIP — A thin clear gloss coat before masking earns its keep twice.
A coat of Pledge Floor Gloss (formerly Future) or a spray clear gloss over your first color creates a harder, more tape-resistant surface that resists lifting, and it evens out tape adhesion over flat or matte finishes — which can be porous enough to let paint wick under the edge. |
Step 3: Mark the Demarcation Line
Give the tape a line to follow instead of guessing. Before masking, lightly pencil the color break onto the model with a soft (2B or 4B) pencil; the mark disappears under the tape and paint, so it won’t show on the finished model. For a level, waterline-style break, make a simple height gauge — a pencil resting on a stack of sticky notes — and walk it around the model to scribe a consistent line.
For complex camouflage, borrow a trick from Mike Ashey’s documented P-38 Lightning build: the wave olive drab pattern on the engine booms was traced onto card stock, transferred to masking tape, cut out, and applied in matched pairs so both sides stayed symmetrical. And for circles — Ashey replaced large circle decals on the P-38 with airbrushed ones by running a sharp No. 11 blade around a drafting circle template to cut a perfect mask.
Step 4: Mask Straight Lines and Panel Breaks
Cut clean, then seat clean. Always cut fresh tape edges with a sharp No. 11 blade; on the documented P-47D invasion-stripe model, careful blade work is what gave the 3M painter’s tape its clean-cut edges. When you cut strips on the mat, run the blade against a sewing-grade steel ruler (never plastic) to produce parallel-sided strips with perfectly straight edges — the foundation of a razor-sharp line.
Now burnish. Pressing the tape edge down firmly and consistently — with a round toothpick or cocktail stick — is what stops paint from creeping under. Because Tamiya tape is semi-translucent, it visibly darkens along the burnished edge as trapped air is pushed out; that darkening is your reliable signal the edge is fully seated.
| ⚠ WARNING — Don’t overdo the pressure.
Burnishing too hard near raised detail or over freshly cured paint can distort the tape and press its adhesive texture into soft paint, leaving a dimpled mark under the next color. Use firm but moderate pressure, and burnish with the rounded side of the stick — never the pointed tip. |
| PRO TIP — Seal the edge with your first color.
Right after burnishing, mist a light coat of the color already on the model along the masked edge. That seals any microscopic gaps with the original color, so if anything bleeds, it’s invisible. Then spray your second color. |
Step 5: Mask Curves and Compound Surfaces
Narrow beats wide on a curve. Cut Tamiya tape into narrow 1–3 mm strips and apply them in short segments, letting the tape’s natural stretch follow the bend without wrinkling. Lay the narrow “defining” strip along the curve first, then overlap wider tape on its inner edge to block overspray from the second-color zone. For broad, gentle curves like fuselage invasion stripes, ordinary 3M blue painter’s tape works too — its stretch lets it pull around a large radius when you ease it on gently, as the documented P-47D build showed.
For compound curves — surfaces that bend in two planes at once, like cowlings, nacelles, spinners, wing roots, and fairings — reach for Parafilm M. Cut a piece bigger than you need, peel off the backing paper, and stretch it until it turns nearly transparent. Lay it loosely over the surface, then press it down with your fingertips; body heat activates the cling. Trim the excess with a fresh No. 11 blade held at about 45 degrees, following the panel line or your marked break. Work one section at a time — don’t try to wrap a whole compound surface in a single piece.
| PRO TIP — Cut triangles for curves.
Several straight cuts turn a strip of Tamiya tape into a handful of triangles. Lay the longest edge of each triangle along the curved line. Triangles hug a gentle curve better than rectangles because they have no parallel edges fighting each other as the tape bends. |
Step 6: Mask Canopies and Clear Parts
Canopies scare beginners, but you have three good routes.
The easiest is pre-cut adhesive masks. Eduard’s are die-cut to your kit’s exact tolerances on an adhesive sheet, and forum builders report they cut canopy masking time by roughly three-quarters versus hand-cut tape. Lift a corner of the cutout off the backing sheet with a knife tip, peel the whole piece free with fine tweezers, set one edge accurately on the framing, then press down the rest and burnish with a toothpick. If the alignment drifts, lift and reposition before it fully adheres. Save the leftover cutouts between masks — they’re handy for patching gaps.
To hand-mask a raised canopy frame with tape, work one panel at a time: cut small triangles of Tamiya tape, tuck their points into the corners of each frame panel, and build up the panel with more triangles and rectangles, burnishing each with a toothpick. If you need a cutting guide, trace the frame outline lightly under the tape with a soft pencil, then cut along the line with a fresh No. 11 blade.
Don’t forget the inside. To keep overspray off the cockpit, tape the interior of the canopy and windscreen first — that leaves the sticky side facing out, so press more strips onto it, using two layers to seal the opening. Stuff small pieces of tissue into the cockpit to back up the tape.
For frames with irregular contours that tape can’t follow, brush on liquid mask. First coat your brush bristles with liquid dish soap so the latex doesn’t set in the hairs, then apply one or two coats of Vallejo Liquid Mask or Humbrol Maskol and let it dry clear — about 30 to 60 minutes, depending on temperature and humidity — before painting. Peel it away with your fingertips or a toothpick.
| ⚠ WARNING — Two clear-part hazards.
Never leave liquid mask on the model more than a few days; after 24 to 48 hours it bonds tighter and grows hard to remove from recesses. And always cover clear parts with tape before using super glue anywhere nearby — its vapor fogs clear plastic. |
Step 7: Seal the Edges and Spray
Burnish one last time. Right before you spray, run the burnisher along every masked edge again. If the mask has been down more than an hour, plastic memory may have lifted the edges slightly, and this final pass re-seals them.
Then spray light. Don’t chase full coverage on the first pass. Lay down light misting coats at low pressure (10–15 PSI) to build a thin film at the edge without forcing paint underneath by hydraulic pressure; thin successive coats build color without creep. Aim the airbrush at the masked edge, or angle it slightly away from the open second-color area — never spray from the bare side toward the tape, which drives paint under it.
Let each coat flash off before the next. Wet paint hit by another wet coat can flow under the tape edge. A simple test: if a coat still smells like paint, it’s still wet. Conditions help, too — keep humidity at or below 60% (50% is better) and the temperature below 75°F (24°C), and run a water trap on your compressor. High humidity slows drying and widens the window for paint to wick under the tape.
Step 8: Remove the Mask
Timing is everything. Pull the mask while the second color is still fresh — dry enough not to smear, but not yet fully cured, usually 20 minutes to 1–2 hours after the final coat, while the paint is still slightly flexible. At that stage the film hasn’t hardened over the tape edge, so it parts cleanly. Wait until the paint is fully cured (24 hours or more) and it can pull at the edge, leaving a ragged line or lifted flakes. The consensus: remove within 1–2 hours of the final coat, or within 24 hours at the very latest.
Angle matters as much as timing. Pull the tape back over itself at about 45 degrees — not straight up at 90 degrees, which puts maximum stress on the paint edge and risks tearing. If the paint has been on the model 12 hours or more, score along the paint-tape boundary with a fresh No. 11 blade first to break the film cleanly.
For canopy masks, work carefully. Score around the perimeter of a pre-cut mask with a fresh blade tip, then lift each piece with tweezers rather than fingers. For BMF, raise a corner with a blunt toothpick, then peel with tweezers. If BMF or tape leaves adhesive residue on clear plastic, lift it with a cotton swab lightly dampened with Goo Gone — kept well away from painted frames — and follow with a clean swab and water.
On a complex scheme, pull all the masking and inspect the model before you move on, the way Ashey removed all the tape on the P-47D to check the invasion-stripe lines. Catching a problem while your paints and references are still out means you can touch it up in the same session.
Tips and Pro Shortcuts
A few habits separate a clean session from a frustrating one:
- Keep a dedicated tape-cutting ruler. Reserve one steel ruler just for cutting tape. A ruler you also cut against for measuring picks up nicks that turn into irregular strips.
- Use liquid mask for panel-line touch-ups. Run a thin line of liquid mask along a panel line with a 000 brush before your first color coat; peeling the cured mask afterward exposes the line cleanly, faster and more precisely than re-scribing.
- Protect photo-etch with wrapped tweezers. When you’re placing masks near pre-painted photo-etch, wrap the tweezer tips with a scrap of tape so the metal can’t chip the paint.
- Rope out soft-edge camouflage with poster putty. For soft-edged, mottled schemes, roll reusable adhesive putty (Blu-Tack) into a rope, lay it as a raised border, and spray over it at a slight upward angle for a gradient fade.
- Watch the clock on liquid mask. Never leave it on more than a few days; after 24 to 48 hours the latex starts bonding to the paint and turns stubborn in the details.
Troubleshooting: Common Mistakes and How to Fix Them
Every one of these is recoverable. Don’t scrap the model — work the fix.
- Paint bled under the tape edge. Usually the edge wasn’t fully burnished, the paint went on too thick or at too high a pressure, or the first coat wasn’t misted. Re-mask the bled area, cover it with the base color at 10 PSI, then let it cure and re-mask with fresh burnishing before the second color. A soft bleed can sometimes just be re-scribed and retouched.
- Paint lifted with the tape. The surface wasn’t fully cured, the tape wasn’t de-tacked, or it sat on the model too long. Let the area dry, sand it back gently with 600–800 grit, re-prime with a light coat, let it cure fully, and repaint; small spots can be spot-primed and re-sprayed. Prevent it by curing 24-plus hours, de-tacking your tape, and gloss-coating matte surfaces before masking.
- Canopy masks tore or came out imprecise on compound curves. Regular tape on faint frame lines, a dull blade, or too many trimming strokes on Parafilm are the usual causes. Switch to liquid mask for the problem area, use BMF for faint frames, and always start canopy work with a brand-new blade.
- A visible “step” or raised paint edge at the line. Too many coats built up against the tape. After removal, wet-sand the ridge gently with 1200–2000 grit dipped in water, using minimal pressure, then polish and lay a thin clear coat over the repair. Prevent it with very thin coats and early tape removal.
- Liquid mask dried too hard to peel. It sat longer than 24–48 hours. Work it out of recesses with a toothpick, and for water-based masks like Vallejo, dampen it slightly with water to soften the film; tease out any torn fragments with the toothpick. The real fix is scheduling — plan to paint and pull the liquid mask in one session.
- Orange peel at the masked edge. The paint dried before it hit the surface — too far away, too much pressure, or humidity and temperature out of range. Knock it down with a 0000 steel wool pad, blow off the residue with clean compressed air, then re-mask and re-spray at a corrected distance and pressure.
Verification and Conclusion
Check your work under raking light. After you’ve pulled all the masking, hold the model at a low, oblique angle to a light source and study the demarcation lines and color transitions. Raking light reveals soft edges, stray specks, micro-bleed, and orange peel that direct lighting hides completely. Then, before you decal, wipe the whole surface gently with a clean, lint-free cotton or microfiber cloth to clear off handling marks, adhesive residue, and paint dust.
From here, the path is well marked. The next stage is a gloss coat to prep for decals — Ashey routinely lays down two coats of clear gloss after painting and before applying markings — followed by decaling, and then weathering (pin washes, chipping, exhaust stains) if you want to push the realism further. Nail the masking routine once and you’ll reach for it on every build after this one.
Frequently Asked Questions
How do I stop paint from bleeding under masking tape on a model airplane?
Stopping bleed under masking tape on a model airplane comes down to four discipline points, in order:
- Wait 24 hours after painting before you mask.
- De-tack the tape before applying it.
- Burnish every tape edge thoroughly before spraying — use a round toothpick and press until Tamiya tape darkens slightly.
- Start with a thin misting coat of the original color to seal any microscopic gaps, then spray the second color in thin coats at low pressure (10–15 PSI).
What’s the best tape for masking curved surfaces on a model kit?
The best tape for curved surfaces on a model kit is Tamiya masking tape cut into very narrow strips (1–3 mm), because its thinness lets it bend around curves that wider tape would buckle on.
- For compound curves (cowlings, spinner bases, fuselage fairings), use Parafilm M — it stretches to roughly 2 to 3 times its original size, clings with body heat alone, and cuts cleanly with a No. 11 blade.
- For broad, gentle curves like fuselage invasion stripes, 3M blue painter’s tape conforms well thanks to its natural stretch.
How long can I leave liquid mask on a model before it damages the finish?
Liquid mask should come off within the same work session — ideally within 2 to 6 hours of applying it.
- Under about 6 hours on fully cured paint, the risk is minimal.
- Beyond 24 hours, the latex bonds more tightly and gets hard to remove from fine detail.
- Beyond 48 hours, it can become extremely stubborn in recesses.
- For water-based masks like Vallejo, a little re-wetting with water helps loosen it.
What’s the safest way to mask a clear plastic canopy without scratching it?
The safest way to mask a clear plastic canopy without scratching it is to use pre-cut adhesive masks (Eduard or similar), since there’s no cutting on the canopy itself.
- Lift each mask from the backing with a knife tip, position it with tweezers, and burnish with a toothpick.
- If you hand-mask with tape, use Tamiya tape (never aggressive hardware-store tape) and trim only with a fresh No. 11 blade under very light pressure — cut the tape, not the canopy.
- With Bare-Metal Foil, apply it first, burnish until the frame lines show, then cut along them.
- However you remove it, pull the tape back over itself at 45 degrees, never straight up.
How soon can I remove masking tape after spray-painting a model airplane?
Remove masking tape as soon as the final coat is dry to the touch — typically 20 to 60 minutes after the last pass.
- Pulling it while the paint is still slightly flexible lets the edge part cleanly instead of fracturing into a ragged line.
- Don’t wait overnight if you can avoid it.
- If the tape must stay on overnight, press the edges down again right before removal.
- The latest you should wait is 24 hours.

Key Takeaways
- Match the material to the geometry: Tamiya tape for lines and gentle curves, Parafilm M for compound curves, liquid mask for irregular recesses, pre-cut masks for canopies.
- Prep and burnish without shortcuts: cure the paint 24 hours, de-tack tape, and burnish every edge before spraying.
- Spray thin misting coats at 10–15 PSI, aimed toward or across the tape edge — never into it.
- Pull the tape within 1–2 hours of the final coat, while the paint is still flexible, for the sharpest line.
- Every common mistake is fixable — bleed, lifted paint, and raised edges can all be repaired.