You don’t need a $500 resin cockpit to make your model stand out. Here’s the smart, budget-conscious path into superdetailing that every new scale modeler can follow right now.
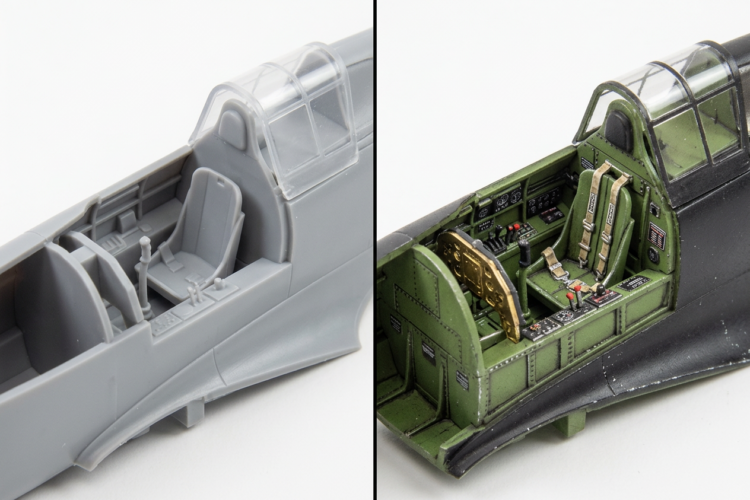 You spent the weekend on it — cleaned up the seams, laid down a clean paint job, settled the decals without a silvered edge, sealed everything under flat. Then you set it on the shelf, stepped back, and the air went out of the room. It looks flat. It looks like a toy. That cockpit you fussed over reads as a shallow gray or green cavity the moment anyone glances through the canopy. You are in good company: this exact letdown is the single most commonly reported frustration among beginner modelers across enthusiast platforms, including the FineScale Modeler forum and the broader modeling community.
That gap is what superdetailing closes. In plain terms, scale model airplane superdetailing for beginners means adding visual complexity and three-dimensional fidelity beyond what the injection-molded plastic kit provides — through aftermarket photoetch (PE) brass, cast resin replacements, scratch-built additions, and painting techniques like panel-line washes, dry-brushing, and color modulation that cost little or nothing. Together they replicate, at scale, the textures, shadows, and mechanical density of a real aircraft. The timing is good, too: the scale modeling hobby has seen a well-documented post-pandemic surge in participation across North America, bringing a large cohort of new builders to the same box-stock wall. Here is the practical, budget-smart roadmap, step by step.
What Is Superdetailing? A Plain-English Definition
Superdetailing is the deliberate enhancement of a scale model aircraft beyond its injection-molded plastic baseline — any technique or component, aftermarket or scratch-built, that adds fidelity, dimensional depth, or visual complexity to match the real aircraft at your chosen scale. The methods fall into three categories, and you need not attempt all three at once.
- Photoetch (PE) brass detail sets are thin brass sheets — or steel, in Eduard’s STEEL seatbelt series — etched photochemically into flat parts you fold and cut into three-dimensional components: instrument panels, seatbelts and harness buckles, sidewall lever arrays, rudder pedals, wheel well bracing, engine face screens. The leading maker is Eduard (Czech Republic), with hundreds of kit-specific sets in 1/32, 1/48, and 1/72 for Tamiya, Hasegawa, Airfix, Revell, and others. Part (Poland) and Reheat (UK) are also respected, but Eduard’s catalog depth and beginner-friendly ZOOM series make it the dominant entry choice.
- Resin aftermarket detail sets are cast from polyurethane resin to replace simplified kit parts with high-fidelity replicas — cockpit tubs, ejection seats, weighted wheels, engine faces, figures. Aires (Czech Republic) is the benchmark for resin cockpits in 1/48 and 1/32. Verlinden Productions, founded in the 1970s by Francois Verlinden, established the category but wound down operations in the early 2020s; its catalog is now a historical reference, with legacy sets on the secondary market.
- Scratch-built and low-cost enhancements use materials from the kit sprue itself — most notably stretched sprue — plus brass or lead wire, masking tape, and styrene, at near-zero cost. Paired with enhanced painting, these offer arguably the highest return for beginners, needing only diluted paint and brushes you already own.
Work in 1/48 scale. It is the recommended entry point: the cockpit opening is large enough that interior detail shows through the closed canopy, PE parts are big enough to handle without specialist magnification, and the aftermarket catalog — especially Eduard’s ZOOM series — is widest there. At 1/72, fine PE wiring is nearly invisible once the canopy is on and harder to handle; 1/32 maximizes visibility but raises kit cost, bench space, and complexity.
Before You Buy Anything: What to Assess First
The most expensive beginner mistake is buying a set before knowing whether it fits your kit. Ten minutes here saves money and frustration.
Step 1 — Know your kit’s scale and manufacturer. Sets are engineered to a specific manufacturer’s mold. An Eduard ZOOM set for the Tamiya 1/48 F6F-5 Hellcat will not fit the Hasegawa tooling of the same aircraft, because the cockpit tub, instrument panel, and internal fuselage geometry differ. Confirm three data points: the kit manufacturer, the exact scale (1/48), and the catalog number or year of tooling — some makers have multiple toolings of one aircraft, such as Tamiya’s older 1/48 Spitfire versus Eduard’s newer one. It is on the box and cross-referenced on Scalemates.com.
Step 2 — Evaluate what is already there. Many Tamiya and Hasegawa kits tooled after 2000 carry surprising cockpit detail. Run a quick in-the-box audit: Is the sidewall detail engraved or raised, with lever and switch positions? Are dial faces and the instrument shroud present? Does the kit include seatbelt detail or just a smooth seat pan? Are wheel-well ribs and hydraulic lines indicated, or is the bay empty? The Tamiya 1/48 Spitfire Mk.I, for example, is widely regarded among modelers on Britmodeller and the FineScale Modeler forum as exceptionally detailed for its scale and price — needing perhaps only a wash and dry-brush rather than a full PE set — while older Airfix toolings have shallower detail that benefits from a basic ZOOM set.
Step 3 — Decide on a single focal zone. Pick exactly one area for your first build. The cockpit interior is the universally recommended start: it is visible through the closed canopy, it is the first area judges and viewers inspect at IPMS club meetings and competitions, it returns the highest improvement per dollar and hour, and all work must finish before you close the fuselage — a natural discipline that forces planning.
Pro Tip: Research sets before buying. Check Scalemates.com and the Eduard website (www.eduard.com) for in-box previews and built-gallery images — Eduard’s pages show each ZOOM fret’s contents — while Hyperscale.com and Britmodeller.com publish built reviews with before-and-after photography.
The Beginner’s Superdetailing Toolkit: What You Actually Need
The “Dos and don’ts with photo-etched metal parts” tutorial from FineScale Modeler, cross-referenced by Scale Modelling Now, identifies the core minimum kit.
Cutting and handling:
- A sharp craft knife with a #11 blade (X-Acto #11) for cutting PE off the fret; its steep angle lets you roll-rock the cut across the tab without distorting neighbors. Some modelers prefer the rounded-tip #10.
- Smooth-jawed, flat-nose (needle-nose) pliers, jaws padded with masking tape to avoid marring the brass — the single most important bending tool for beginners.
- A single-edge razor blade with a metal ruler for long, precise bends: align the ruler on the fold line, slide the blade beneath the part, pivot up for a clean right angle.
- A dedicated PE bending tool (optional) from RP TOOLZ, The Small Shop, DSPIAE, or AK Interactive — worth it only for regular PE use, not a single set.
- Two pairs of fine-tipped tweezers for placing and holding parts.
- A Post-It note (sticky side up) or a Ziploc bag to beat the “carpet monster” — press the fret onto the sticky note before cutting so the freed part adheres for retrieval.
- A Blue Tack pickup stick (optional) — a toothpick tipped with Blue Tack for placing tiny parts without drop risk.
Adhesives:
- Cyanoacrylate (CA / super glue) is standard for brass-to-plastic, but never apply it from the bottle to small parts. Deposit a micro-drop on aluminum foil or a palette, transfer it to the bonding surface with a pin, toothpick, or copper-wire hook, hold the part 30 to 60 seconds, then reinforce with a second micro-drop. Medium-viscosity CA suits most bonds; thin CA wicks into a joint by capillary action when you touch the brush tip to a positioned part’s edge.
- White PVA (craft) glue gives a brief repositioning window for a small painted PE part before final CA bonding — useful for pre-painted ZOOM parts, where CA residue would show.
- CA fumes irritate the mucous membranes: work ventilated or use a small fan. Accelerator (CA kicker) speeds the cure, but excess can leave white frosting on some painted surfaces.
Painting essentials:
- A fine detail brush, size 10/0 (000) or finer, for picking out PE and resin details; synthetic kolinsky sable brushes (Vallejo, Artis Opus) hold a fine point.
- The right interior colors. The primary reference for USAAF and USN WWII aircraft is Interior Green, matched to FS 34151 (ANA 611 in wartime spec) — the semi-matte medium green dominant in USAAF cockpits from roughly 1943 onward, including the P-51D, B-17G, B-26F, and P-38. Bronze Green (broadly matched to ANA 623) preceded Interior Green in USN cockpit use, appearing in pre-war and early-war naval aircraft interiors including the F4F Wildcat. Modern USAF jets use Cockpit Black, a flat to semi-gloss near-black. Tamiya, Mr. Hobby (Gunze), Vallejo, and AMMO by Mig Jimenez all offer FS 34151 matches.
- A graphite pencil (2B or 6B), optional. Rubbing the tip on frame edges and panel bezels after painting yields a subtle metallic sheen at zero cost — a technique documented in FineScale Modeler tutorials.
Safety first: Resin safety is non-negotiable. Polyurethane resin dust is a confirmed respiratory hazard. Always wet-sand resin (the wet paper traps dust), wear a NIOSH N95 or better dust mask even when wet-sanding, work outdoors or well-ventilated, and never use sprue cutters on a resin casting block — use a fine-toothed razor saw.
Step-by-Step: Your First Superdetailed Cockpit
This is the heart of it — a repeatable sequence for a first cockpit interior. The order itself prevents most disasters.
Step 1 — Choose the right starter set. Eduard’s ZOOM series (catalog prefix FE for 1/48 color photoetch) is the universally recommended first set across FineScale Modeler, Scale Modelling Now, and Britmodeller. A ZOOM set is a single compact fret of only the most visible details — instrument panels, seat harnesses, sidewall levers — in pre-painted, multi-color factory finish, so you do not paint the PE before installing it. As of mid-2026, Eduard offers ZOOM sets for many popular 1/48 beginner kits, including ZOOM sets for the Spitfire Mk.I (Tamiya 1/48) and the A-4C Skyhawk (Hasegawa 1/48), plus sets for Tamiya’s F6F-5 Hellcat, F4U Corsair, and P-47 Thunderbolt in multiple sub-variants. If you prefer resin, a single Aires resin cockpit tub (for example, for the 1/48 Spitfire Mk.V) swaps the kit’s shallow tub for a fully dimensional casting — the most dramatic single-step gain, but with more skill (fit-testing, trimming, wet-sanding, resin primer) and greater cost. Start with either PE or resin, not both. One more low-risk upgrade: Master Model (Poland) makes turned-brass pitot tubes and angle-of-attack probes in 1/72, 1/48, and 1/32 — drop-in parts requiring only that you cut off the plastic original and CA-bond the brass.
Step 2 — Prep the cockpit opening. Dry-fit before painting. Remove the stock cockpit parts and test-fit the new set against the internal fuselage walls while the halves are still open, noting trim areas. Most Eduard ZOOM PE sets fit without modification; some resin sets need minor trimming of the tub’s side walls to clear internal detail. Sand any raised molding around the aperture that stops the tub or PE from seating flush — 400-grit wet-and-dry to remove material, then 600-grit to smooth. The non-negotiable rule: finish all fit-checking before closing the fuselage. Once it is cemented, your only access is the cockpit opening, far too small to install most sets.
Step 3 — Paint the base color first. Before attaching anything, airbrush or brush-paint the base interior color onto every cockpit surface — walls, floor, and the resin set itself. For a resin tub, a thin, well-thinned airbrushed coat beats a spray can, where heavy pressure pools paint and fills detail. Then apply color modulation: mix the base color with 10 to 15 percent white and brush it onto raised surfaces, center panels, and the upper faces of horizontal details. This optical trick makes the cockpit read three-dimensional under display light and costs nothing but a little white. Seal with a matte varnish before the wash, to protect the modulation and give the wash a consistent surface.
Step 4 — Apply a panel-line wash. This is among the three most impactful, beginner-accessible techniques there are. Dilute dark brown or flat black to roughly 90 percent thinner, 10 percent paint — a barely tinted liquid (pre-formulated washes from Tamiya Panel Line Accent Color, the AMMO by Mig PLW range, or AK Interactive remove the guesswork). Touch a fine brush tip to a panel-line corner or recess; capillary action pulls the wash in without strokes across the surface. After it sets — 10 to 20 minutes, or overnight for a full cure — dampen a cotton swab with enamel thinner (enamel washes) or water (water-based washes like Flory Models) and wipe clean with single strokes front to back, the direction grime would accumulate on the real aircraft. Done right, this one step turns a uniform gray cavity into a shadow-filled space — the most perceptible improvement for the least cost.
Step 5 — Install the detail set. Cut PE from the fret only as needed, one part at a time — parts on the fret cannot be lost; freed parts vanish to the carpet monster. For pre-painted Eduard ZOOM parts with self-adhesive backing, peel each using the edge tab and position it precisely with tweezers before it touches the plastic; once the adhesive contacts the surface, repositioning is difficult and can damage the factory paint, so work slowly. For non-adhesive PE, transfer a micro-drop of CA from a foil palette to the bonding surface — never to the part — set the part with tweezers or a Blue Tack stick, hold 30 to 60 seconds, then reinforce with a second micro-drop at the edge joint.
Step 6 — Final detail touches. With everything cured, pick out raised details — throttle quadrant handles, gunsight heads, oxygen-hose coupling blocks, trim-wheel details — using a 10/0 brush and appropriate colors (red and yellow warning markings, aluminum metalwork, rubber-black hose fittings). Then dry-brush the frame edges: load a stiff flat brush with a slightly lighter mix of the base color, wipe off nearly all the paint on a paper towel until the brush barely marks it, and feather the bristles across raised frame edges, seat members, and detail rims to highlight structure and simulate wear. Install the canopy last, after all interior work is sealed and any handling damage is fixed, to protect the detail from adhesive, fingerprints, and tape damage during later assembly.
Beyond the Cockpit: Other High-Impact Superdetailing Zones
Once the cockpit clicks, here is where to go next.
Wheel wells and landing gear bays. The wheel bay is the second most-inspected area of any displayed model, especially among IPMS judges, yet most older toolings leave it a shallow recess in one flat color. For near-zero cost: add stretched-sprue hydraulic lines, CA-bonded at each end; add short lengths of fine copper or lead wire as wiring and actuator fittings; then lay a two-tone job — a base color (Interior Green FS 34151 for USAAF WWII aircraft, or flat white for USN and post-war jets) plus a dark gray shadow wash in corners and recesses. The FineScale Modeler YouTube channel documents these techniques, including silver for gear legs, rubber black for tires, and diluted buff and dust tones for post-operational weathering.
Engine faces and cowl interiors. On open-nose radial-engine aircraft — the P-47 Thunderbolt, F4U Corsair, and B-17 Flying Fortress nacelles — the engine face is partly visible through the cowling opening. A resin engine face, or a kit engine dressed with dry-brushed metallic highlights and hand-laid ignition wire (fine copper wire threaded between distributor points), makes a compelling focal point at moderate cost.
Seat belts. Eduard’s pre-painted seatbelt PE sets for 1/48 and 1/72 are consistently cited by modelers on Britmodeller and FineScale Modeler as the single highest-impact, most accessible cockpit upgrade. Eduard makes generic WWII USAAF, USN, RAF, and Luftwaffe sets that fit most applicable aircraft, plus aircraft-specific sets. The Eduard STEEL series uses thin, flexible steel for more fabric-like behavior when bent; these are peel-position-glue assemblies, fitted belt and buckle in sequence before pressing into the seat pan.
Antennas and pitot tubes. Replacing oversized kit-molded antenna posts and pitot tubes is one of the most visually corrective fixes available — at 1/48, the plastic versions are invariably too thick and blunt, scaling out at many times the real diameter. Options: stretched sprue (free, for antenna rigging and simple mast rods); thin 0.1 to 0.3 mm brass or copper wire (CA-bonded, for antenna wires and fine cables); or Master Model turned-brass pitot sets, the highest-accuracy choice, dropped in by cutting the plastic original at its base and CA-bonding the replacement.
Common Mistakes and How to Avoid Them
These are the errors most commonly reported on the FineScale Modeler forum, Britmodeller, and Scale Modelling Now.
- Buying detail sets before checking compatibility. Confirm the set is designed for your specific kit manufacturer, scale, and tooling. An Eduard set for Tamiya will not fit Hasegawa, and vice versa.
- Gluing PE out of sequence. Install all interior photoetch before closing the fuselage. Reaching through a finished cockpit opening with tweezers is extremely difficult and risks damaging painted surfaces and installed parts.
- Over-detailing for the scale. At 1/72, fine wiring and tiny PE are nearly invisible once the canopy is on. The rule: if you cannot see it from 12 inches away in normal light, it has no impact.
- Skipping dry-fitting. Always dry-fit resin before painting. Resin shrinkage varies by manufacturer and batch, so minor trimming is common; finding a fit problem after painting wastes time and risks the finish.
- Breathing resin dust. Never sand or cut resin without wet-sanding and a dust mask. Polyurethane particulate is a confirmed respiratory hazard.
- Misaligning self-adhesive PE. Position Eduard ZOOM self-adhesive parts precisely with tweezers before the adhesive touches the surface; once it contacts the plastic, repositioning is extremely difficult without damaging the paint.
- Applying CA straight from the bottle. The nozzle deposits too much glue, creating unwanted fillets and fume frosting. Always transfer CA via pin, toothpick, or wire hook from a palette drop.
- Bending PE after painting (non-pre-painted sets). Finish all bending first — bending after painting cracks and flakes the paint at the fold.
Budget Guide: How Much Does Superdetailing Actually Cost?
Superdetailing costs sit on a clear spectrum — from genuinely free to a moderate single purchase — and you can produce professional-looking results at every tier.
- Tier 1 — Nearly Free (scratch-built). Materials you already have or scavenge: stretched sprue from kit-gate waste, fine wire from scrap bins or stripped electrical wire, diluted existing paint for washes, your existing brushes for dry-brushing, masking tape for seatbelts in a pinch. Time: 30 to 60 extra minutes per session. Impact: high — a correct wash and dry-brush transforms a flat cockpit’s perceived depth.
- Tier 2 — Entry-Level (a single Eduard ZOOM or seatbelt set). The most affordable category of commercial aftermarket product in the hobby — single-fret items in small cardboard envelopes, available from major US retailers such as Squadron.com, Sprue Brothers, and HobbyLink Japan US, and direct from Eduard’s US-facing store. Prices vary by retailer and exchange rate, but as of mid-2026 Eduard ZOOM sets for 1/48 are among the least expensive made. Impact: very high — pre-painted ZOOM sets skip the painting step, so the install-to-display cycle is short.
- Tier 3 — Moderate (a full resin cockpit tub). An Aires 1/48 cockpit tub is a larger purchase than a ZOOM set and asks more technique — resin priming, careful wet-sanding, test-fitting — but delivers the most dramatic step change, with deeply undercut recesses, dimensional wiring, and equipment detail no painting can coax from the kit’s shallow plastic.
The bottom line: superdetailing does not require a large upfront investment. Start with Tier 1 free techniques on one build, add a single Tier 2 Eduard ZOOM set on the next, and evaluate before deciding whether Tier 3 resin is justified.
Frequently Asked Questions
How do I start superdetailing a scale model airplane cockpit for the first time, step by step?
Superdetailing a model airplane cockpit for the first time starts with a single pre-painted Eduard ZOOM photoetch set matched to your specific kit, then follows a fixed six-step sequence.
- Choose a compatible Eduard ZOOM set for your exact kit and scale.
- Dry-fit before painting — check the fit before cementing the fuselage.
- Paint the base color with light modulation (10 to 15 percent white on raised surfaces).
- Seal with matte varnish, then apply a panel-line wash.
- Install PE parts one at a time, using CA applied via a pin.
- Dry-brush the frame edges, pick out raised details, and install the canopy last.
What is the cheapest way to start superdetailing a scale model airplane without buying expensive resin sets?
The cheapest superdetailing techniques for scale model airplanes cost nothing beyond materials you already own, and the results are far more visible than most beginners expect.
- Panel-line washes mixed from diluted existing paint.
- Dry-brushing raised cockpit details with a lightened base color.
- Stretched-sprue antenna and rigging replacements from kit-gate waste.
- Pencil graphite (2B or 6B) rubbed on cockpit frame edges for a subtle metallic sheen.
What are the best aftermarket superdetailing brands for beginner scale modelers working in 1/48 scale?
For beginners working at 1/48 scale, Eduard is the best superdetailing brand to start with, because its pre-painted ZOOM sets require no painting and fit precisely to named kits.
- Eduard — photoetch, pre-painted ZOOM sets, STEEL seatbelts; highest accessibility, broad kit compatibility.
- Aires — resin cockpit tubs, seats, wheels; moderate accessibility, highest realism gain, resin-specific technique required.
- Master Model — turned-brass pitot tubes and probes; very high accessibility as drop-in single-part replacements.
- Verlinden — resin detail sets, now legacy and discontinued; secondary market only.
How do I glue photoetch brass parts to a plastic model without them falling off or getting damaged?
Cyanoacrylate (super glue) is the correct adhesive for bonding photoetch brass to a plastic scale model airplane, applied in micro-drops via a pin, toothpick, or copper-wire hook from a foil palette — never from the bottle nozzle.
- Transfer a micro-drop of CA from a foil palette to the bonding surface, not to the part.
- Set the part with tweezers, then hold 30 to 60 seconds for the initial cure.
- Reinforce with a second micro-drop at the edge joint once positioned.
- For large, flat, non-load-bearing parts, brushed-on clear varnish gives an adequate bond with no fume hazard; for maximum-strength joints, use thin CA by capillary action after positioning.
Is 1/48 scale or 1/72 scale better for beginner superdetailing on a scale model airplane?
1/48 scale is the better choice for beginner superdetailing, because the larger cockpit opening makes interior detail visible and the wider range of PE and resin sets gives beginners more compatible options.
- The 1/48 cockpit is clearly visible through the closed canopy.
- PE parts are larger and easier to handle without advanced magnification.
- The Eduard ZOOM catalog is widest in 1/48.
- At 1/72, fine PE is often invisible behind the canopy and harder to handle, suiting advanced modelers.

Key Takeaways
- Start with a single Eduard ZOOM pre-painted PE set matched to your kit and scale — the most accessible, lowest-risk entry point.
- Superdetail the cockpit first: it is the area judges, viewers, and you see most clearly, and all work must finish before the fuselage closes.
- Paint, wash, and dry-brush before attaching any set — these free techniques deliver the largest realism gain per hour.
- Dry-fit all resin and photoetch parts before painting and before closing the fuselage; there are no second chances.
- Budget superdetailing is real: Tier 1 techniques cost nothing, and a single Tier 2 Eduard set costs less than most new kits.