Skip one step in the paint–decal–seal chain and your markings will silver, your washes will bleed, and weeks of work will look amateur. Here’s the exact sequence experienced modelers never break.
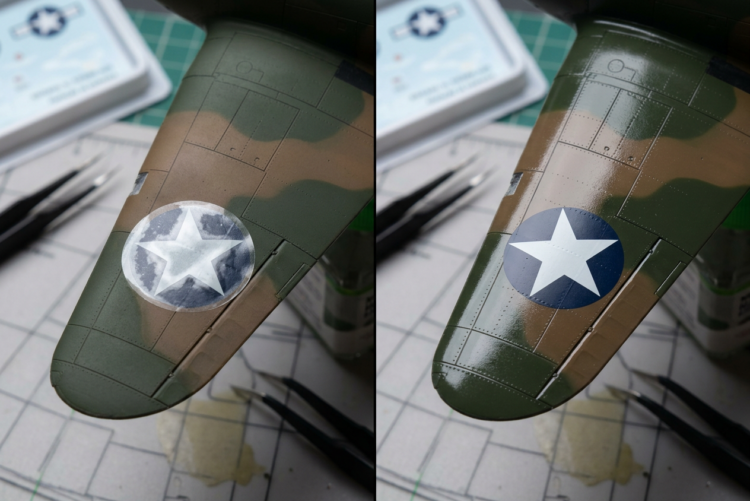
You scrape every seam clean, airbrush the camouflage in thin even coats, then slide the national insignia onto that beautiful flat paint — and within an hour a milky halo blooms around every marking. That’s silvering, the most common heartbreak in the hobby, caused not by a bad decal but by the wrong order of operations.
This guide walks through the correct model airplane kits finishing order of operations — primer, base color coat, pre-decal gloss coat, decals, post-decal sealing coat, weathering, final topcoat — and why each step must happen in that exact sequence. Each layer is chemically and physically interdependent: skip or reorder one and you trigger a specific failure; get it right and your decals disappear into the paint, your washes flow cleanly, and the finished model looks like the real thing.
Why Sequence Matters: The Science Behind the Finishing Order of Operations
The finishing sequence is dictated by paint chemistry and surface physics, not preference. Each layer must be chemically compatible with, and physically supported by, the layer beneath it — introduce one out of order and it can dissolve, lift, or react with what’s underneath. Three reasons make the order non-negotiable. First, decals require a gloss surface. Decals are printed onto a clear carrier film that must bond flush to the paint, and only a gloss coat provides that flush, air-free bond; applied to a flat surface, the film silvers — basic surface physics, not a product defect. Second, weathering agents must be applied in the correct window. Enamel and oil washes are thinned with mineral spirits or odorless thinner, and those solvents attack and lift some paint systems applied directly, so a gloss clear coat acts as a chemical barrier. Third, the final topcoat locks everything in permanently, sealing all weathering, decals, and base color while setting the model’s definitive sheen.
So what is silvering? It’s the visible result of air trapped beneath a decal’s carrier film. Flat paint has a microscopically rough surface — thousands of tiny pockets that stop the film lying flat — and as those gaps dry they scatter light, giving the film a silvery, cloudy look instead of the invisible, paint-blended finish of a correct decal. The cure is prevention at the correct step: a gloss coat before any decals.
Step 1 — Apply the Base Coat (and Why This Comes Before Everything Else)
The sequence begins before any paint goes down, because surface prep determines whether every later layer adheres. Remove the mold seam — the ridge where the mold halves separated — by scraping with a No. 11 X-Acto blade held perpendicular, then sand 400 grit followed by 600 grit wet-or-dry used wet, checking under raking light. Wash away mold-release residue, which blocks paint adhesion, in lukewarm water with a few drops of mild dish soap and an old soft toothbrush; rinse, then air dry or blow recesses clear with low-pressure air — never a cloth, which sheds lint. From here, handle the model only at the edges or with cotton gloves.
Primer is essential because it does three things bare plastic cannot: provides an adhesion foundation that resists chipping and peeling, reveals flaws like scratches and sink marks while they’re easy to fix, and gives a neutral color base so finish colors behave predictably. Widely used U.S. primers: Tamiya Liquid Surface Primer (lacquer, thinned about 1 part primer to 2 parts Tamiya Lacquer Thinner), Mr. Surfacer 1000/1200/1500 from Mr. Hobby/Gunze (the finer 1200 and 1500 airbrush smoother), and Testors gray spray-can primer for those without an airbrush. After full cure — 30 minutes minimum, preferably overnight for lacquers — lightly polish with 0000 steel wool for a micro-smooth base. The same light 0000 steel wool polish between successive color coats removes dust nibs and maintains a smooth, detail-preserving surface throughout the build-up process; blow or vacuum away all debris before the next coat.
Apply color in thin, multiple passes, never one heavy coat that obscures rivets and panel lines. Tamiya acrylics (X and XF series) thin with X-20A at roughly 1 part paint to 1–1.5 parts thinner, sprayed at 12–15 PSI from about 2 inches; allow 24 hours before masking. Mr. Color lacquers thin about 1:1 with Mr. Color Leveling Thinner. Testors enamels need 24 hours between coats and 72 hours before masking. The general airbrush working ratio is 25–33% thinner by volume (approximately 2–3 parts paint to 1 part thinner). Remember: “dry to the touch” is not cured — if the paint still smells of solvent it is still wet, and overcoating it risks crinkle, crazing, and lifting.
Step 2 — Apply the Pre-Decal Gloss Coat (The Step Most Beginners Skip)
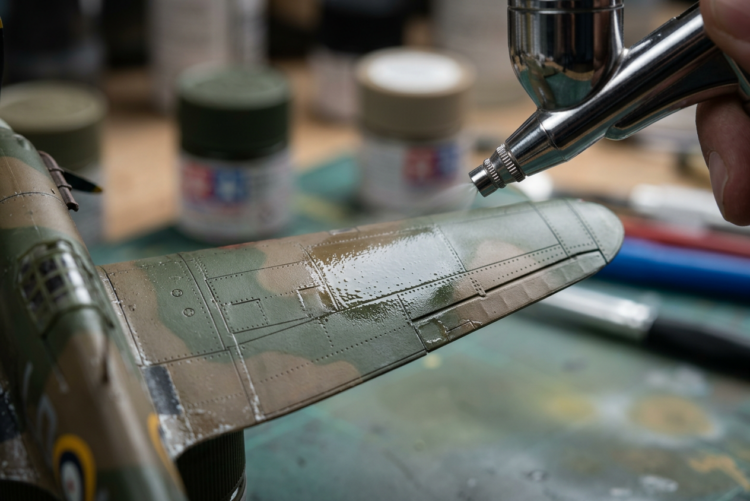
Once the base color is fully cured, you reach the most important — and most skipped — step in the entire model airplane kits finishing order of operations: a clear gloss topcoat over the whole model before any decals. The gloss coat fills in the microscopic texture of flat aircraft colors, creating a smooth surface onto which the carrier film bonds without trapping air. Decals then slide into position, film edges become nearly invisible, and silvering is eliminated — or reduced to a level you can address with setting solution. The gloss layer also seals and protects the paint, since Micro Sol is slightly acidic and can lift or stain unprotected paint.
Proven products include Alclad II Aqua Gloss (ALC-600), a water-based acrylic gloss that sprays straight from the bottle at 20–25 PSI, dries fast, levels smooth, and resists all setting solutions (allow 24 hours before decaling; never let it freeze); and Future/Pledge floor polish (sold under the Pledge brand in the U.S. — verify the current product name with your local hobby or hardware retailer, as SC Johnson periodically updates its floor care line), a decades-old modeler’s trick that dries to a hard, crystal-clear gloss and can be airbrushed at 12–15 PSI, brushed, or dip-applied. General gloss lacquer clears from Tamiya and Mr. Hobby also work and must be fully cured before decaling.
Apply in thin, even passes over the entire model — not just decal zones, or you’ll create visible sheen differences. Airbrush at 12–20 PSI, keep moving 3–4 inches from the surface, and build light passes rather than one flood coat (Aqua Gloss tolerates a “just before it runs” wet coat because it self-levels). Allow 24 hours minimum to cure. For natural metal finish aircraft, some jet-age airframes, and certain naval subjects that were inherently semi-gloss in service, a semi-gloss pre-decal coat is historically accurate — still smooth enough for the film to bond without trapping air.
Pro Tip — Test on Sprue First: Test the gloss coat on a piece of cut sprue before committing to the model, checking for fisheye (craters from contamination) or crazing (crinkles from solvent incompatibility); if either shows, fix the cause first. This gloss layer also creates the “neutral platform” your oil and enamel washes need in Step 5.
Step 3 — Apply Decals (Now That the Surface Is Ready)
With the gloss coat fully cured, the model is ready for markings — the most patience-demanding stage. Work in order:
- Cut each decal with minimal carrier film. Use a sharp No. 11 blade on glass or Plexiglas, cutting decals individually as needed (not all at once), as close to the print as practical — less clear film means less air-trapping area. Trim interior film from open letters and numbers, and use a Waldron-style or generic round punch tool for circular markings like fuel caps.
- Apply Micro Set (blue bottle) to the receiving surface with a clean cotton swab, not a brush — the swab absorbs just enough without over-wetting. It softens the adhesive and acts as a cushion that lets the decal slide for precise positioning.
- Soak the decal in lukewarm water about 10 seconds (modern decals need 10–30; older ones longer). Avoid hot water, which dissolves adhesive too fast. It’s ready when it slides freely; blot the backing on a tissue.
- Slide the decal off its backing onto the model, holding the backing with tweezers and sliding it out using a damp Q-Tip to hold the decal in place. Keep it wet — a dry decal tears.
- Position with a damp brush or Q-Tip, working center-outward with the lightest touch.
- Blot — never rub — with a clean tissue to remove excess water; rubbing distorts or tears a wet decal.
- Apply Micro Sol (red bottle) over the settled decal once it has stopped moving (typically 10–15 minutes after Micro Set). It softens the film to conform to panel lines, rivets, and compound curves; the decal may wrinkle alarmingly at this stage — leave it undisturbed; it will pull flat as it dries. Apply 3–4 more coats, letting each dry, until it lies absolutely flat.
- Wait 12–24 hours minimum before touching the decaled areas. Handling while the adhesive is soft will lift, wrinkle, or distort markings.
Avoid the mistakes specific to this step: cutting too close to small lettering (a small border actually aids placement on tiny stencils), pressing too hard on a wet decal, applying Micro Sol before the decal stops moving (it locks it in the wrong spot), and bending the sheet during cutting (it cracks the inks). Never apply decals to a flat surface — no setting solution fully compensates.
On sourcing: aftermarket makers including Cartograf (Italy), Microscale (U.S.), and AIMS Decals generally print to a higher standard than kit decals. Cartograf is known for sharp printing and thin, conforming film; Microscale responds well to the Micro Set/Micro Sol system. Aftermarket decals conform better to detail and compound curves than thick kit decals, which may need extra gloss coats afterward to bury raised edges. Store sheets in sealed airtight containers away from light and moisture, since aged decals grow brittle. For out-of-production or irreplaceable sheets, consider scanning them at 1,000 DPI before use — a digital archive gives you a reproduction option if the originals are damaged or exhausted.
Step 4 — Apply the Post-Decal Sealing Coat (Locking Everything In)
Once all decals are fully dry and cured — and not before — a second clear coat goes over the entire model. Beginners often assume the pre-decal gloss was the only clear coat needed; it is not. This coat does two non-substitutable jobs: it seals and protects the decals from the enamel washes and oil thinners coming in Step 5, whose solvents attack carrier film and lift edges; and it creates a unified surface sheen, since decaled areas have a subtly different gloss level than surrounding paint, which the sealing coat equalizes for predictable wash flow and clean-up.
At this stage the clear coat is typically gloss or semi-gloss — not the final flat/matte topcoat — because washes work most controllably on a slick surface; applying flat now would make wash application unpredictable and removal messy. The same products as the pre-decal coat (Aqua Gloss, Future/Pledge, Tamiya gloss clear) apply here.
Before spraying, run a quality check: hold the model at a low angle under a bright, raking light. Any raised decal edges show as faint halos. Fix them with another coat of Micro Sol, or — for stubborn edges — gently burnish with a toothpick side or soft fingertip plus more Micro Sol. Understand the distinction: the sealing coat (gloss/semi-gloss, after decals) and the final topcoat (the definitive flat/satin/gloss finish, after weathering) are two separate applications that cannot be collapsed into one without compromising the weathering or the finish.
Step 5 — Add Weathering Effects (In the Right Window)
With the model in its sealed gloss state, weathering can be applied safely. Work the techniques in order. Panel line washes come first: diluted enamel or oil paint — typically burnt umber, dark brown, or near-black dark gray, never pure black, which looks harsh — thinned to roughly 80–90% thinner to 10–20% paint. Touch a fine brush (size 0 or 00) to the lines and let capillary action draw the wash along automatically. Let it partially dry (10–30 minutes, until the sheen dulls), then wipe back excess with a cotton swab or tissue dampened in clean mineral spirits, wiping nose to tail so streaks suggest the physics of flight. The gloss surface makes this clean and forgiving — the solvent has nothing to grip, lifting wash from the surface while leaving paint in the recesses. The rule: washes go on only after the post-decal sealing coat is fully cured, or the solvent will undercut and lift decal edges.
Exhaust and gun stains follow, airbrushed with heavily thinned paint (roughly 75% thinner to 25% paint). Streak exhaust stains (metallic exhaust paint or dark brownish-gray) along the airflow from the exhaust ports, heavier at the source and fading rearward. For gun stains (flat black with a few drops of flat white), streak from the gun ports — wing-mounted stains extend across upper and lower wing surfaces, nose-mounted stains broader and less distinct due to the rounded fuselage. These demand reference photography, since direction and intensity are type-specific.
Chipping and paint wear is optional and subject-dependent — right for heavily used fighters or rough-strip operators, wrong for factory-fresh, well-maintained carrier, or some jet-age subjects, and reference photographs are mandatory. To dry-brush, load a flat brush with a little silver, brush almost all of it off onto paper, then apply the trace to leading edges, tail surfaces, and the nose, following the direction of airflow.
Above all, exercise restraint. Real operational aircraft are maintained by ground crews who take pride in their appearance; build effects gradually in thin layers and stop before the effect looks like what you aimed for. Museum aircraft and period photographs show subtle fading, modest panel-line definition, and discrete staining — err toward “slightly used, well-maintained” rather than “heavily weathered.”
Step 6 — Apply the Final Protective Topcoat (The Finish Line)
The final topcoat is the last layer, serving two purposes at once: it permanently locks in every element — base color, decals, washes, stains, chipping — protecting them from handling and dust; and it sets the definitive sheen, which must match the subject: flat/matte for most WWII military aircraft, modern camouflaged subjects, and service-color aircraft (flat also unifies slight color variations and visually eliminates raised decal edges); satin for some jet-age airframes and certain British and Commonwealth subjects; gloss for air racers, pre-war civilian aircraft, some naval schemes, and natural metal finishes.
Three flat products are standards. Testors Dullcoat / Clear Flat Lacquer is a decades-old staple — airbrushable straight from the bottle or thinned about 1:1 with lacquer thinner, dead-flat, widely available (Testors relabeled it “Clear Flat Lacquer Finish,” same formula). Alclad II Clear Flat is an acrylic flat compatible with the Aqua Gloss used earlier; apply thin even coats, since heavy application on curves can leave dusty residue. Mr. Super Clear Flat from Mr. Hobby/Gunze is a reliable lacquer-based flat in spray-can and airbrush form — use it well-ventilated.
Apply in thin, even passes; multiple light coats beat one heavy coat, which produces a chalky, frosted look. The most common failure is frosting (“blushing”) — a milky haze from water condensing in the wet coating under high humidity, with temperatures below 13°C (55°F) and humidity above 65–70% the prime culprits. Avoid flat-coating on rainy days, in unheated winter garages, or right after rain; work in a dry, climate-controlled space, ideally 65–75°F (18–24°C) and below 50–60% humidity. If frosting occurs, a thin semi-gloss or gloss coat can dissolve and re-level the frost, or add Mr. Retarder Mild to slow drying. Don’t handle the model for at least 24 hours after the final topcoat — even light handling can leave marks in the soft film.
Quick-Reference Checklist — The Complete Finishing Order at a Glance
- Surface prep — Remove seams and wash with dish soap to strip mold release and ensure adhesion.
- Primer coat — Gray or white; adhesion foundation and flaw detection.
- Base color coat(s) — Thin, multiple passes to establish the color scheme.
- Pre-decal gloss coat — Entire model; creates the smooth surface that prevents silvering.
- Decals — Apply with Micro Set / Micro Sol onto the cured gloss surface.
- Post-decal sealing coat — Gloss or semi-gloss; protects decals and unifies sheen for washing.
- Weathering — Panel line washes, then exhaust/gun stains, then optional chipping.
- Final flat/satin/gloss topcoat — Locks everything in and sets the definitive sheen.
Common Mistakes to Avoid
- Decaling over a flat or matte surface. The carrier film traps air in the rough paint, producing silvering. Prevention: always apply a pre-decal gloss coat over the entire model first — not optional. If silvering already occurred, gloss varnish over the decal followed by Micro Sol can displace trapped air in mild cases, but it’s a partial, inconsistent fix.
- Applying weathering washes before sealing decals. Mineral spirits used to wipe back washes attack unprotected paint and decal adhesive alike, pulling color, lifting carrier film edges, and creating irreversible staining. Prevention: apply the post-decal sealing coat and let it fully cure before any weathering.
- Rushing curing time between coats. Coats over uncured layers interact chemically, causing crazing, lifting, and color shift. Prevention: err longer — lacquers 30–60 minutes between light coats and overnight before masking; enamels 24 hours between coats and 72 hours before masking. If it smells of solvent, it’s still wet.
- Applying flat topcoat in high humidity. Moisture condenses in the coating, producing frosting that ruins the finish. Prevention: flat-coat only in a dry, climate-controlled space — humidity below 60%, temperature above 55°F (13°C) — and test on painted sprue if conditions are uncertain.
Frequently Asked Questions
How do I step-by-step apply decals to a model airplane kit so they don’t silver?
Preventing silvering requires applying decals over a gloss-coated surface — this is the single most important factor.
- Sand and wash the model to remove mold-release residue.
- Apply primer, then base color coats, and allow full cure.
- Apply a clear gloss coat (Alclad II Aqua Gloss, Future/Pledge, or Tamiya gloss clear) over the entire model and let it cure 24 hours.
- Cut decals with a minimal carrier-film border using a sharp No. 11 blade.
- Brush Micro Set (blue bottle) on the target surface.
- Soak the decal in lukewarm water 10–30 seconds until it slides freely.
- Slide it onto the Micro Set-prepared surface and position with a damp Q-Tip.
- Blot — don’t rub — excess water with a tissue.
- Once settled, apply Micro Sol (red bottle), let it dry, and repeat 3–4 times.
- Wait 12–24 hours minimum before handling.
What is the exact process for applying a gloss coat before decaling a model airplane kit?
Applying a pre-decal gloss coat requires coating the entire model — not just the decal areas — in a clear gloss varnish, then allowing it to fully cure before placing any decals.
- Ensure the base color coat is fully cured (24 hours minimum for lacquers, longer for enamels).
- Select your gloss: Alclad II Aqua Gloss (straight from the bottle), Future/Pledge floor polish, or Tamiya clear gloss.
- Test the gloss on a piece of sprue first to check for fisheye or crazing.
- Apply in thin, even passes at 12–20 PSI (airbrush), covering the entire model.
- Use multiple thin coats rather than one heavy coat.
- Allow a minimum of 24 hours to cure before applying any decals.
- The surface should appear consistently glossy under all lighting angles.
What order do I paint, decal, and seal a model airplane kit for the best results?
The correct model airplane kits finishing order of operations is: primer → base color coat(s) → pre-decal gloss coat → decals → post-decal sealing coat → weathering washes → final flat/satin/gloss topcoat.
- Primer and base color coat: establish the scheme on a properly prepared surface.
- Pre-decal gloss coat: create a smooth, silver-free surface for decals (the most-skipped step).
- Decals with Micro Set and Micro Sol: apply markings to the gloss surface.
- Post-decal sealing coat (gloss or semi-gloss): protect decals before weathering.
- Weathering washes and effects: panel lines, stains, and wear — on the sealed gloss surface only.
- Final topcoat (flat, satin, or gloss per subject): lock everything in permanently.
How do I fix silvered decals on a scale model aircraft after they’ve already dried?
Fixing silvered decals after drying is difficult and inconsistent — the best approach depends on severity, but no fix is as reliable as prevention.
- Mild silvering: apply a clear gloss coat directly over the affected decal to penetrate the film edges and displace trapped air, then follow with Micro Sol to soften the film flat.
- Moderate silvering: pierce the silvered film with a fine pin at several points, then apply Micro Sol and let it dry so the solution reaches the trapped air beneath.
- Severe silvering: the only reliable fix is removing the decal entirely (soften with Micro Sol, lift with a wet soft brush), re-glossing, and applying a new decal.
- Prevention for next time: always gloss-coat the entire model before placing decals, and trim carrier film to a minimum.
What type of clear coat should I use over decals on a model airplane kit before weathering?
After decals are fully cured, apply a clear gloss or semi-gloss coat over the entire model before any weathering — this seals and protects decals from weathering solvents.
- The post-decal coat must be gloss or semi-gloss, not flat/matte, because washes need a smooth surface to flow and clean up.
- Recommended products: Alclad II Aqua Gloss, Future/Pledge floor polish, or Tamiya clear gloss.
- Apply over the entire model in thin, even passes.
- Allow full cure (24 hours minimum) before any enamel or oil washes.
- The final flat/matte coat comes after all weathering — not before.
- This is separate from the final flat topcoat: two clear-coat applications are standard professional practice.

Key Takeaways
- Sequence is chemistry. The finishing order — primer, color coat, pre-decal gloss, decals, sealing coat, weathering, final topcoat — is dictated by paint chemistry and surface physics, not preference; each step creates the conditions the next one needs.
- The pre-decal gloss coat is the most critical step beginners skip. It eliminates silvering, protects paint from setting solutions, and creates the smooth surface decals and panel-line washes both require.
- Two clear coats are standard practice. A gloss or semi-gloss sealing coat goes on after decals and before weathering; the final flat/satin/gloss topcoat goes on after weathering — not the same step.
- Curing time matters as much as technique. Rushing between coats causes crazing and lifting. If it smells like paint, it’s still wet.
- Weathering restraint reflects reality. Subtle panel-line definition, modest leading-edge wear, and delicate exhaust staining read as more credible than heavy weathering.