Turn a toy-store-shiny model into a battle-worn veteran — with a paintbrush, a few household tricks, and the confidence to know when to stop.
A crisp, freshly painted kit looks clean — and, frankly, a little like a toy. Weathering model airplanes is what closes the gap between something that looks assembled and something that looks flown. As Robin Carpenter writes in Airbrushing Scale Model Aircraft, a freshly painted model “can look nice and crisp, but does lack that realistic look, and has a more toy-like appearance. By just adding a few minor touches, you can make the model look far more realistic.”
The thing that stops most beginners isn’t the technique. It’s the fear of going too far and wrecking hours of work. Here’s the reassuring part: every experienced modeler has over-weathered a build at least once before learning restraint — and done in the right order, weathering a model airplane is controlled and, at nearly every stage, reversible.
This guide walks you through a six-step, no-airbrush-required sequence — gloss coat, panel-line wash, dry-brushing, chipping, pastel stains, and a final flat coat — with a built-in safety net at each step so a slip in one stage never traps or ruins the work underneath.
What You’ll Need
Get everything on the bench before you start, so nothing stops you mid-task.
Skill level and time: Beginner-friendly. No airbrush is needed for any of the six techniques. This isn’t a single-sitting job — the wet stages need drying time (the gloss coat cures overnight, and an oil wash wants a full day to dry), so plan on a couple of short sessions rather than one marathon.
Starting point: Begin only after the model is fully assembled, base-coated, and decaled. All seams must be eliminated before painting, and the panel lines need to be recessed so a wash can flow into them. Weathering is a finishing stage, not a repair stage.
Clear coats: A clear gloss — Tamiya TS-13 Clear (rattle can), Alclad II ALC-600 Aqua Gloss, or Pledge/Future floor gloss — and a clear flat, such as Testors Dullcote, Tamiya Flat Base mixed with clear, or any matte acrylic varnish.
Weathering media: Artist’s oil paints (Burnt Umber, Raw Umber, Lamp Black, Raw Sienna) for panel-line washes and streaks. As Carpenter notes, “Oil paints can be purchased in small sets at a reasonable cost. A set like this will last for years.” Prefer something ready-made? Pre-mixed enamel or acrylic washes from AK Interactive, Vallejo, or Ammo of Mig work well, and the water-based Flory Models clay wash is especially beginner-friendly — brush it on, let it dry, then wipe the excess back with a damp cloth. You’ll also want a set of artist’s soft pastels in black, dark brown, raw umber, medium gray, and light tan or buff.
Solvent: Odorless mineral spirits, sold as Turpenoid Odorless or Mona Lisa Odorless Thinner — both safer for indoor use than regular mineral spirits.
Brushes and tools: A size 0 or 00 fine-pointed brush for flowing wash into panel lines; a flat, wide, slightly stiff brush (an old, worn-out one is ideal) for dry-brushing; cotton swabs; soft rags or paper towels; and a silver pencil (Berol Verithin or equivalent) or a graphite pencil for chipping. Keep your weathering brushes separate from your clean painting brushes.
Optional but useful: A cheap “test mule” model or spare parts to practice on before you touch the finished build.
Reference photos: One or two real photos of the exact aircraft type and unit you’re modeling. The Smithsonian National Air and Space Museum and the Imperial War Museum photo archive are good places to look.
Step-by-Step: How to Weather Your Model Airplane
Follow the order every time: gloss coat, then wash, dry-brush, chip, pastel/stain, and finally the flat coat. Each stage sets up the next, and a thin barrier coat between stages means a mistake can usually be wiped back without disturbing the work below it.
Step 1: Seal the Finish with a Gloss Coat
Weathering always starts on a gloss surface. A wash flows freely across gloss by capillary action; on a matte surface it soaks in everywhere and can’t be wiped cleanly. The gloss layer also protects your decals from silvering and shields the base paint from the solvents you’ll use later. Confirm the decals are already applied and fully cured before you begin.
Apply thin, even coats — 12 to 15 PSI if you’re airbrushing (figures per Carpenter, Airbrushing Scale Model Aircraft; adjust for your specific airbrush and clear coat). If your base paint is enamel, lay down an acrylic gloss first to create a chemistry barrier between the enamel and the coats to come. Then let it cure overnight before you touch it with a wash.
Expected result: A uniformly shiny, smooth surface across the entire model, decals included, with no silvering anywhere.
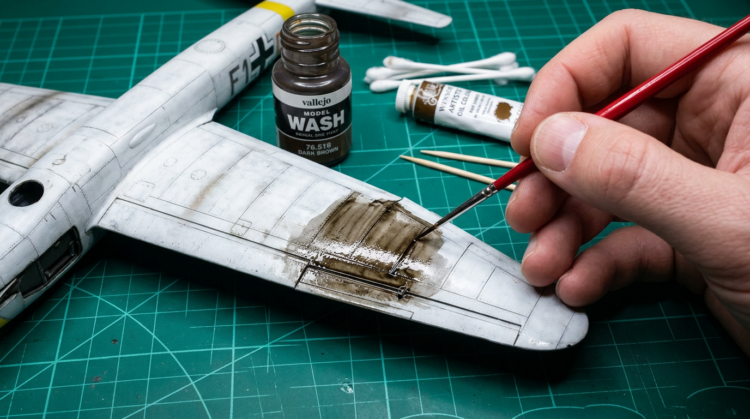
Step 2: Apply a Panel-Line Wash for Depth and Grime
A panel-line wash is a pin wash — roughly 85 to 95 percent thinner to 5 to 15 percent paint — flowed into the recessed panel lines. It simulates accumulated grime and darkens the recesses to give the model visual depth.
For the oil-paint method, squeeze a pea-sized blob of Burnt Umber onto a piece of cardboard and let the oil bleed out of it for 15 to 20 minutes; this “lean” mix flows better. Thin it to a watery consistency with odorless mineral spirits, touch the tip of your fine brush to a panel line, and let capillary action carry it along.
Reach for dark brown or raw umber for most aircraft, and skip pure black — it’s too harsh at scale. As one weathering guide puts it: “I recommend using a quality artist oil paint to accent panel lines and recesses. I use dark browns, greens or grays, never black.”
Wipe the excess with a cotton swab dampened in mineral spirits, always working nose to tail on the fuselage and leading edge to trailing edge on the wings — never across the airflow. And don’t outline every seam. Carpenter’s warning is worth taping to the bench: “If every seam appears in a constant colour, the weathering will stand out like a sore thumb and look very unnatural.”
Expected result: Fine dark lines sit in the recesses, the flat panels look clean, and the whole model reads as visibly deeper than before.
Step 3: Dry-Brush to Highlight Raised Detail
Dry-brushing needs a flat surface — on gloss, the bristles just slide off the detail. Lay down a thin flat or seal coat between the wash and this step.
Load a flat, stiff brush with a lightened shade of your base color, mixing in buff or cream rather than white. Drag the brush across a paper towel until almost no paint transfers; it should feel and look dry. Then lightly drag it across raised panel edges, rivets, and leading edges so pigment catches only on the high points. Build the effect up over several passes, working from darker to progressively lighter shades, and test on a scrap part first.
Keep scale in mind: a 1/72 model needs markedly lighter dry-brushing than a 1/32, because the same mark represents far more damage at the smaller scale.
Expected result: Raised edges look lighter and more three-dimensional, and the surface reads as varied instead of flat and monotone.
Step 4: Add Paint Chipping for Worn Metal Edges
Chips don’t happen at random. On a real aircraft they cluster on the leading edges of the wings and tail, along walkways and cockpit entry sills, on engine access panels, in the prop arc, and around wheel-well edges. Check your reference photos before you touch the model.
Method A — the silver pencil (safest for beginners): Sharpen a Berol Verithin silver pencil or a 2B graphite pencil and touch it along those edges in short, irregular strokes. The big advantage, as Scale Model Aircraft points out, is forgiveness — “if you don’t like what you’ve done, erase it and start over.” Seal it with a flat coat afterward.
Method B — sponge chipping: Tear an irregular piece of blister-pack foam, pick up a little silver or Vallejo Aluminum, and dab most of it off on a paper towel. Stipple it onto the wear areas with a light tapping motion. Test on your fingernail first, and step back frequently to check placement and scale.
Expected result: Irregular metallic dots and strokes on logically worn areas only — the effect should read as paint wear, not random battle damage.
Step 5: Build Up Dust, Exhaust Stains, and Fluid Streaks with Pastels
Scrape a soft pastel stick against 120-grit sandpaper to make a fine powder, pick up a small amount on a wide soft brush, and apply it dry in logical zones — behind and below the exhaust stacks, around gun ports and wheel wells, and along walkway areas. Blend it with a dry cotton swab in the direction of airflow, and build the colors up on top of one another as needed.
Match the exhaust stain to the engine type:
- Rolls-Royce V-12s (Spitfire, P-51 Mustang): light gray stains on dark surfaces and darker gray on light surfaces — relatively subtle overall.
- Inverted V-12s (Messerschmitt and Junkers types): oily black exhaust, the result of oil draining down into the combustion chambers.
- Radial engines: dark, oily start-up stains combined with lighter gray clean-running stains on top.
For oil and fluid streaks, thin Raw Umber or Burnt Sienna oil paint to a very watery consistency, touch it in at the top of the streak source — a panel gap or the edge of the engine cowling — and draw the brush straight down in a single stroke. Feather the lower end with a clean, barely damp brush. Apply streaks on a flat surface, where oil paints blend better than they do on gloss.
Throughout, remember that less is more: build up gradually and check as you go.
Step 6: Seal the Weathering with a Final Flat Coat
The final flat coat locks in every layer — wash, dry-brushing, chips, and pastel powder — and unifies the sheen across all of those different media. A matte finish is also historically correct for most World War II and Cold War military aircraft, while a satin finish suits some jet subjects. Carpenter’s reminder: “Make sure you apply a matt clear coat afterwards to avoid disturbing the dust while handling the model.”
Mist it on in light passes from at least 10 to 12 inches away — several thin coats are far safer than one heavy one. Pastels and clear coats don’t always mix well — some modelers report that any varnish dulls or erases pastel work entirely, while others get away with a very light mist from a distance. If you want insurance rather than risk, skip the flat coat over pastel areas and use a pigment fixative instead, then re-apply pastel powder afterward if any effect is lost.
Expected result: A uniform flat sheen across the whole model, with every weathering effect locked down and protected.
Tips and Expert Shortcuts
- Practice first. “If you are new to these techniques, the best advice with weathering is to practise on something else first until you are confident of the effect, leaving your newly completed masterpiece intact,” writes Carpenter.
- Build in thin layers. Adding more is always possible; removing too much is far harder.
- Keep it proportional to scale. A chip that reads fine at 1/32 stands for basketball-sized damage at 1/72, so 1/72 and 1/48 models want a much lighter hand than 1/32 or 1/24.
- Seal between stages. A thin barrier coat means any mistake in the next stage can be wiped back without disturbing the finished work beneath it.
- Try the lean-oil trick. Let the linseed oil bleed out of your oil paint onto cardboard for 15 to 20 minutes before thinning. The leaner mix flows better, dries faster, and is less likely to leave a shiny patch when you wipe it back.
- Keep the reference photo in front of you. As one modeling resource puts it, “it’s easy to get carried away and add streaks and weathering to specific areas of your model that just aren’t there on the real thing.”
Common Mistakes and Troubleshooting
Overdoing it. Chips covering more than 10 to 15 percent of a panel, a wash that turns every seam into a uniform dark grid, a model that looks like wreckage. Scale Model Aircraft names the failure plainly: beginners end up with “an aircraft so battered and worn that no self-respecting pilot would climb into it except under penalty of death!” Fix (while workable): re-dissolve and wipe back with more odorless mineral spirits. Fix (already sealed): a new flat coat, then a thin gloss coat, then a very diluted filter of the base color (about 90 percent thinner), then re-seal.
Wash bleeding under decal edges. Prevent it by sealing your decals well before washing — Carpenter’s advice is that “if the decals have been applied to the gloss surface of the model before the oil paint is run into the panel lines, make sure that they have been well sealed in.” Fix: let it dry completely, apply a fresh gloss coat, and if a stain persists, lay a fresh decal over it.
Dry-brushing turns muddy. Color smears across the flat panels instead of catching only the raised edges — usually because there’s too much paint on the brush or you’re working on gloss. Fix: the brush must feel and look completely dry before it touches the model. If the smear is already there, seal it with a flat coat (which blends it slightly) and retry with a drier brush.
Chipping in the wrong places. Chips landing on flat fuselage panels or wing centers — areas that never chip on a real aircraft. Prevent: reference photos identify the logical wear areas before you start. Fix: pencil chips erase, and sponge chips applied over a barrier coat dissolve with the appropriate solvent.
Pastel dust disappears under the flat coat. Subtle exhaust and dust effects vanish after sealing, usually because the coat went on too wet or too close. Prevent and fix: mist from 12 to 15 inches in several thin passes, or use a pigment fixative instead of a flat coat over pastel areas; if effects still disappear, simply re-apply pastel powder afterward.
Gloss coat crazing or milky haze. Fine crazing or a milky bloom, particularly on metallic finishes, caused by incompatible paint chemistry, base paint that hasn’t fully cured, or humidity. Carpenter cautions against putting washes “directly on to paintwork that has no clear coat applied, as it can stain it by leaving a tide mark.” Prevent: allow 24 hours or more of curing before any clear coat, and always test a new clear coat on scrap first.
How to Verify Your Results
Start with the arm’s-length test. Step back to arm’s length, then a few feet farther. The weathering should read as use and age — not dominate the model. If it’s the first thing your eye lands on, it’s too heavy. The guiding principle from Scale Model Aircraft holds: weather with a light touch.
Next, compare against your reference photo. Hold the photo beside the model and check the tone, pattern, and intensity of the weathering. If the model looks noticeably more worn than the real aircraft, blend or remove effects before the final sealing coat.
Finally, run a few technical checks before that last coat: no loose pastel powder remaining, the oil wash fully dried (24 hours or more from application), no solvent haze (it usually clears as the solvent evaporates), and a consistent sheen across every surface and material.
Once these brush-and-pastel methods feel comfortable, you’ve got a solid foundation to build on. The next rung up is airbrush-based work — dot filtering with heavily thinned oil paints, pre-shading along the panel lines before the base color, and hairspray chipping. But there’s no rush: master the light touch first, and every model after this one will look better than the last.
FAQ
How do I know if I’ve weathered my model too much?
You’ve gone too far when the weathering — not the airplane — is the first thing anyone notices. Watch for these signs:
- Chips cover more than 10 to 15 percent of any panel surface.
- The wash has turned every panel into a uniform dark grid.
- The model looks like wreckage rather than a used aircraft.
- At arm’s length, the wear dominates the overall impression.
- The model looks significantly more battered than your reference photo.
What household items can I use to weather a model airplane if I don’t own hobby-specific products?
You can weather a model airplane convincingly with art-store and hardware-store staples — in fact, these are exactly what many experienced modelers already use.
- Panel lines: artist’s oil paints thinned with odorless mineral spirits.
- Chipping: a #2 graphite pencil, or an old makeup sponge for stippled chips.
- Exhaust stains: artist’s soft pastel chalk sticks scraped on sandpaper and applied with a makeup brush.
- Gloss coat: Pledge FloorCare Multi-Surface Finish (the product sold as “Future” in hobby circles).
- Flat coat: Testors Dullcote, or any craft-store matte acrylic varnish.
Do I need an airbrush to weather a model airplane?
No — every step in this guide works without an airbrush.
- All six stages (gloss coat, wash, dry-brush, chip, pastel, flat coat) can be done with rattle-can clear coats, brushes, cotton swabs, pencils, and soft pastels.
- As Carpenter notes, the pastel method “is useful for exhaust stains, if you are not comfortable with using your airbrush.”
- An airbrush makes application faster and more uniform, but it’s entirely optional at the beginner stage.
What’s the difference between a wash and dry-brushing?
A wash darkens the low points while dry-brushing lightens the high points — they’re opposite techniques that work best as a pair.
- Wash: paint thinned 85 to 95 percent, flowed into the recesses, done on a gloss surface.
- Dry-brushing: a nearly dry brush dragged across raised edges, done on a flat surface.
- Used together: the wash deepens the panel lines, the dry-brush pops the raised detail, and the two combine into a convincing three-dimensional illusion.
How do I fix a weathering mistake without ruining the paint underneath?
Most weathering mistakes are recoverable, because the gloss barrier coat keeps the weathering layer separate from your base paint.
- Wet wash: wipe it away immediately with a cotton swab dampened in mineral spirits.
- Dried wash: re-dissolve it with solvent, wait 30 to 60 seconds, then wipe.
- Pencil chips: erase them before sealing — “if you don’t like what you’ve done, erase it and start over.”
- Over-weathered finish: seal with a flat coat, apply a thin diluted filter of the base color, then re-seal.
- Dry-brush smear: lay a new flat coat (it blends the smear) and retry with a drier brush.

Key Takeaways
- Always seal the base coat and decals with a gloss coat before any wet weathering — it’s the safety net for the entire job.
- Follow the sequence every time: gloss coat → wash → dry-brush → chip → pastel/stain → flat coat.
- Less is more — build effects up in thin layers, because subtle weathering convinces at every scale.
- Use reference photos of your specific aircraft, before and during, to place effects where they realistically belong.
- The gloss barrier is your safety net: every layer over it can be wiped back cleanly before sealing, as long as you act in time.