



Stop ruining your builds. The one unbreakable weathering rule every beginner ignores—and the step-by-step system that keeps your model looking sharp, not trashed.
You Built a Clean Mustang. Then You Reached for the Black Wash.
You spent two weeks on a Tamiya 1:48 P-51D Mustang—item 61040, with its detailed cockpit, separate main-wheel hubs, two styles of exhaust stubs, optional-position flaps, drop tanks, and weapons all painted (Hobbylinc Tamiya P-51D listing). The decals sat down clean and the natural-metal finish looked sharp. Then you flowed a black wash into every panel line to “make it pop,” and your sleek escort fighter suddenly looked like it had been dragged behind the airfield. That moment—when a clean airframe turns cartoonish under a flood of dark wash—is the single most common heartbreak in beginner weathering.
It does not have to happen. Model airplane weathering for beginners starts with one idea that runs against instinct: restraint. Real aircraft are maintained systems, not abandoned wrecks, and scale magnifies every stain you add. Weathering is not a single dirty wash; it is a controlled finishing system you apply in gates, checking your work at each stage. This guide gives you that system—the products, the sequence, the stop points, and the four mistakes that ruin more beginner builds than anything else.
Why Restraint Is the Master Rule
“Less Is Usually More”—And Why That’s True
The governing principle of all weathering is restraint, and the evidence comes from two directions: the experts and the real aircraft you are trying to copy.
On the technique side, the warnings are consistent. ScaleSpot notes that subtle panel-line shading gives a model’s surface visual depth, but adds that “Like most modelling techniques, it is easy to overdo, which then becomes distracting” (ScaleSpot panel-line guide). David W. Aungst, writing for HyperScale, frames weathering as an art form rather than a routine task: “The biggest artistic point in weathering is knowing when to stop – how much is too much?” His warning is blunt: “Suddenly, a magic line is crossed and the weathering is too much, ruining the whole effect” (HyperScale weathering article by David W. Aungst).
On the real-aircraft side, the picture corrects a beginner’s instinct toward grime. U.S. Air Force Technical Order 1-1-691 is titled “Cleaning and Corrosion Prevention and Control, Aerospace and Non-Aerospace Equipment,” with contents that include “Aircraft Wash Intervals,” “Aircraft Clear Water Rinse Requirements,” “Immediate Cleaning,” and “Deployed Aircraft Wash Requirements” (Air Force TO 1-1-691). The Navy’s NAVAIR 01-1A-509-2, “Cleaning and Corrosion Control Volume II Aircraft,” covers aircraft cleaning, fresh water rinsing, post-cleaning procedures, and special cleaning after desert or sand exposure (NAVAIR 01-1A-509-2). Appearance is a managed maintenance topic, not a cosmetic afterthought.
That is the reframe: weathering simulates operational wear, not neglect. Look at the clean end of the spectrum for proof. The T-38 Talon is a twin-engine, high-altitude, supersonic jet trainer used by Air Education and Training Command for joint specialized undergraduate pilot training, and the T-38C trainers at Vance AFB represent the maintained, well-kept end of the spectrum—the opposite of the over-weathered beginner finish (Vance AFB T-38C Talon fact sheet; U.S. Air Force T-38 Talon fact sheet). The early Lockheed F-104 Starfighter sits at the same end—the National Air and Space Museum calls it “the missile with a man in it” and the first U.S. jet fighter in service to fly Mach 2, a sleek, low-streaking subject worth studying as a contrast to an over-weathered finish (Smithsonian National Air and Space Museum F-104A collection page).
“Less is usually more” is the beginner’s master rule—but it is not an absolute law, and reference photos decide the exception. Tom Cleaver’s account of Solomon Islands F4U Corsairs describes one of the few situations where weathering “too much is not enough” is the rule, “rather than the more usual ‘less is more,’” because contemporary photos show heavy operational deterioration: exhaust and gunfire stains left unwashed after missions, fuel-tank leakage, high-octane fuel effects, and abrasion from coral or dirt runways (Tom Cleaver F4U-1A Corsair review). Scale Modelling Now’s tutorial featuring Geoff Coughlin ties it together: “Keep checking your reference photos,” because “it’s easy to get carried away and add streaks and weathering to specific areas of your model that just aren’t there on the real thing” (Scale Modelling Now pastel weathering article).
The “Stop Test”: Use the 3-Foot Rule
The most powerful error-preemption tool a beginner has costs nothing: step back from the model. After each weathering step, set the model on the bench, move back about three feet, and ask whether the effect still reads as aircraft structure or as a cartoon outline drawn on the surface.
The arithmetic explains why this works. At 1:48 scale, one foot of viewing distance equals 48 real feet, so a model viewed from three feet away looks as it would if you were standing roughly 144 feet from the real aircraft—because 3 multiplied by 48 equals 144. Full-size stains that look modest from 10 feet away can read like heavy black bands when reproduced at full intensity on a model effectively viewed from much farther off. The sources back the takeaway: ScaleSpot says panel-line shading should be subtle and appropriate to the scale of the model, and Large Scale Planes argues that panel-line highlighting should be integrated into the overall effect and not stand out by itself (Large Scale Planes AK Paneliner review).
Tip Box — The 3-Foot Rule: Put the model on the bench, step back three feet, and ask whether the panel lines still read as aircraft structure or as a cartoon outline. At 1:48, that three-foot look equals about 144 feet in real life, so anything that screams from that distance is probably too strong.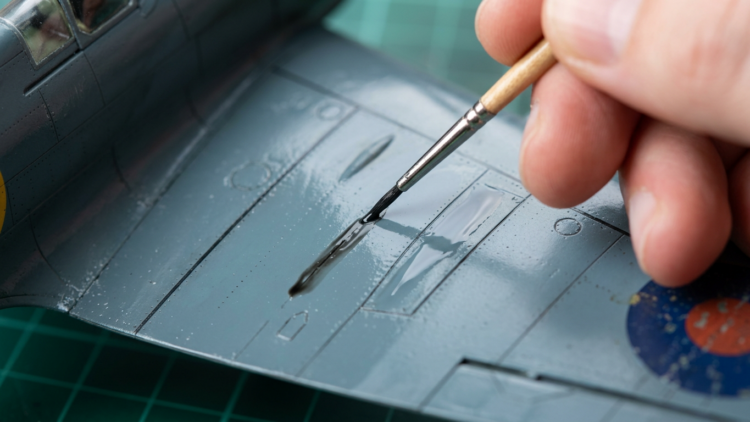
Before You Begin: What You Need
You do not need a weathering rack with forty bottles. A beginner needs one reliable product in each category plus a few cleanup tools.
Essential Supplies List
- Gloss clear coat. This is the mandatory prep coat before any wash. ScaleSpot recommends sealing the painted model with an acrylic gloss clear before panel washing, because it protects the paint and helps the wash flow into recessed lines (ScaleSpot panel-line guide). Tamiya X-22 Clear is a solid choice—Tamiya describes it as “a clear coat to give a lustrous glossy finish” (Tamiya X-22 Clear product page).
- Panel line wash. AK Interactive describes its paneliners as high-quality enamel products developed for scale aircraft models, with improved flow to highlight panels and create depth and contrast in surface details (AK Interactive Paneliner for Brown and Green Camouflage). The AK aircraft Paneliner range is organized by camouflage family: AK2071 Brown and Green Camouflage, AK2072 Grey and Blue Camouflage, AK2073 Sand and Desert Camouflage, AK2074 White and Winter Camouflage, and AK2075 Black Camouflage (Large Scale Planes AK Paneliner review).
- Odorless mineral spirits or white spirit. Used to thin oil and enamel washes and clean up excess. Scale-model oil-paint guidance recommends low-odor or odorless mineral spirits and stresses ventilation when working with solvent vapors (Tangible Day oil paint guide).
- Artist oils in earth tones. FineScale Modeler’s dot-filter process uses artist’s oils, and common weathering choices include raw umber, burnt sienna, Payne’s gray, and black-type colors (FineScale Modeler dot-filter article; FineScale Modeler forum panel-line wash discussion). Start with raw umber and burnt sienna.
- Cotton swabs and flat cotton pads. For removing excess wash from the gloss-protected surface. AK’s procedure removes excess wash with a brush or cotton bud moistened with white spirit (Large Scale Planes AK Paneliner review).
- Fine pointed brushes. A pointed brush places liner precisely into recesses and lets capillary action do the work, which AK emphasizes on its Precision Panel Liner page (AK Interactive Black Precision Panel Liner). Keep a flat brush for blending.
- Matte varnish. Vallejo Matt Varnish 70.520 is a water-based acrylic matt varnish with a quick-drying formula that protects painted models from dust, scratches, dirt, and humidity (Vallejo Matt Varnish 70.520 product page). Tamiya XF-86 Flat Clear is another option in the same family, since Tamiya USA identifies XF-designated colors as flat finish (Tamiya USA Acrylic Mini XF-86 Flat Clear page).
A note on a famous old standby: if you have read older guides, you have seen Pledge Future—also sold as Klear—recommended as a cheap, accessible gloss coat. Treat it as legacy advice. Older hobby pages identify it under names like Pledge Multi-Surface Floor Finish, but newer hobby reporting says SC Johnson discontinued the product in January 2022 (Jon Bius Pledge replacement article). If you already own a bottle of the old Future, Pledge, or Klear, it can still work—just don’t build your supply plan around it as the easiest current option.
The Golden Rule of Weathering Chemistry
Here is where beginners destroy paintwork: they apply the wrong solvent over an incompatible base. The safe approach is to separate your layers by chemistry and seal between them. Use a fully cured acrylic or lacquer gloss clear coat under an enamel or oil wash, because ScaleSpot’s method relies on an acrylic gloss clear sitting under a thinned enamel wash, and FineScale Modeler warns modelers to be cautious using oil and Turpenoid techniques over enamels unless the clear coat is completely dry (ScaleSpot panel-line guide; FineScale Modeler dot-filter article).
Do not assume “acrylic” means immune to solvents. Tamiya USA says its acrylic paint can be thinned for airbrushing with Tamiya X-20A Acrylic Thinner and also with Tamiya Lacquer Thinner, with lacquer thinner yielding faster drying and a harder finish (Tamiya USA Acrylic Mini X-22 Clear page). Lacquer thinner is hotter than water or acrylic thinner, and it is not your beginner cleanup fluid for a panel wash—it can soften the paint underneath. For enamel and oil wash work, white spirit or odorless mineral spirits is the standard cleanup medium. The shorthand to memorize: acrylic paint, then an acrylic gloss barrier, then an enamel or oil wash, then an acrylic matte coat after the wash is fully dry.
The Beginner’s Step-by-Step Restraint System
This is the core process. Five steps, applied in order, each with a built-in stop point. Two of the five are optional. Run the 3-Foot Rule after every stage before you decide to add anything more.
Step 1 — Seal With a Gloss Coat First
A high-gloss clear coat is the first weathering step, not an optional polish. ScaleSpot explains that a clear gloss coat over the entire model provides a protective layer for the paint, helps the thinned wash flow into recessed lines, and allows excess to be removed cleanly (ScaleSpot panel-line guide). In short, the gloss coat is what makes the next step both effective and reversible.
Tamiya X-22 Clear is an evidence-supported choice: Tamiya describes it as a clear coat that gives a lustrous glossy finish, and Tamiya USA says its acrylic bottle paints are suitable for brush painting or airbrushing common model plastics, including styrene resin, Styrofoam, and wood (Tamiya X-22 Clear product page; Tamiya USA Acrylic Mini X-22 Clear page). Apply the gloss in light, controlled coats and let it cure fully before any solvent comes near it, because the next step’s cleanup depends on that clear barrier staying intact under white spirit or mineral spirits.
The procedure: spray or brush a smooth gloss coat over the painted and decaled model, let it cure fully, and do not begin the wash until the surface is slick enough that a dry cotton swab glides rather than drags. If the gloss dries rough, the wash will cling to the surface instead of flowing only into the recessed lines—fix the surface before you weather rather than scrubbing stains away later.
Step 2 — Apply Your First Panel Line Wash
This is the gateway technique and the most immediately gratifying. A panel line wash works by placing highly thinned paint into recessed lines and letting capillary action carry it along the structure. AK specifically says its precision panel liners are formulated to flow by capillary action into details and recesses without spreading or staining large areas (AK Interactive Black Precision Panel Liner).
Pick the right color. For most beginners, raw umber, dark brown, or dark gray is safer than pure black. AK’s aircraft Paneliner range is built around scheme-specific browns, grays, sand tones, and winter tones precisely because matching the wash to the camouflage avoids a harsh effect, and Large Scale Planes credits those sympathetic colors with keeping the result from looking severe (Large Scale Planes AK Paneliner review). As a starting map: dark gray on light gray or light blue aircraft; brown or raw umber on olive drab and green camouflage; sand-brown on desert schemes; and black only for very dark finishes, deep mechanical recesses, or subjects where references clearly show strong dark lines.
Mix it thin. If you are mixing a homemade oil wash, start around 1 part artist’s oil paint to about 10 parts odorless mineral spirits or white spirit—a ratio supported by multiple hobby technique sources, including Dave’s Model Workshop (Dave’s Model Workshop washes/pin washes/filters guide). A 1:10 to 1:15 range is a reasonable beginner zone—add thinner until the wash behaves like ink and flows freely without leaving opaque brush marks.
Apply, wait, then remove. Touch the loaded brush to the panel line and let the wash run; do not paint the whole panel black. Then wait before cleanup—start testing after about 10 to 20 minutes. AK’s own review procedure removes excess after roughly a 5-to-10-minute wait, while slower oil mixes may want a bit longer, so test, don’t guess. Remove the excess with a cotton swab, flat cotton pad, or flat brush dampened—not soaked—with white spirit or odorless mineral spirits, wiping in the direction of airflow (Large Scale Planes AK Paneliner review).
The number-one mistake here is scrubbing. The gloss coat makes controlled removal possible, but aggressive rubbing pulls the wash out of the recesses, stains the surface, or damages the clear barrier. Use one clean directional wipe per panel, then inspect. A before-and-after photo of a single panel—wash applied, then cleaned—is the most instructive thing you can study for this step, because it shows how much pigment should stay in the line versus on the surface.
Step 3 — Add a Subtle Filter (Optional)
A filter is not a wash, and confusing the two is a common beginner error. FineScale Modeler explains that a filter is applied in a controlled way so it does not accumulate along edges or in panel lines; its purpose is to alter the overall color, often to mimic fading and discoloration (FineScale Modeler top weathering techniques). FineScale Modeler’s dedicated dot-filter article describes the technique as leaving “only a fraction of a color,” and describes using Turpenoid to thin the colors down and remove excess, leaving only a trace of pigment on the surface (FineScale Modeler dot-filter article).
Keep it extraordinarily thin. Dave’s Model Workshop gives a filter ratio of roughly 1 part paint to 20 parts thinner—about a 5% paint mixture—and you can go even thinner as a beginner-safe variation (Dave’s Model Workshop washes/pin washes/filters guide). The dot-filter method uses artist oils and a thinner such as mineral spirits or Turpenoid, blended with a broad flat brush in the natural direction of airflow or gravity. Conservative starting pairings are a thin raw umber filter over a natural-metal finish, a thin yellow-green over olive drab, and a thin blue-gray over natural aluminum—but test on a spare wing or a plastic spoon first, because a filter shifts the base tone rather than merely adding dirt. FineScale Modeler describes the target as subtle light and dark shades that vary a monochromatic scheme and lend depth; the effect should be nearly invisible once dry.
Mix a filter so thin that it looks like tinted thinner, brush or airbrush it as a transparent layer, and stop if the color shift is obvious from three feet away. If you can stand back and say “I filtered this,” the filter is too heavy. This step is optional—you do not need to push every build through every effect.
Step 4 — Simulate Exhaust and Gun Stains (Optional)
Exhaust staining is optional because not every aircraft, service period, or maintenance state shows dramatic stains, and Geoff Coughlin’s reference-photo warning applies directly to where you put a streak (Scale Modelling Now pastel weathering article). Skip it on a first build without penalty.
If you do attempt it on a WWII piston fighter, start the stain at the exhaust stacks and move aft with the airflow. FineScale Modeler forum advice describes spraying a very dilute buff or reddish brown from the exhaust stack rearward, then adding a very dilute black inside that first layer for some finishes (FineScale Modeler exhaust-stain discussion). A simple beginner approach is to start quite thin—as Lincoln Wright of Paint on Plastic puts it, ‘maybe 3 times thinner than for a normal base coat’—and to keep pressure low, under 10 psi, for fine lines (Paint on Plastic exhaust-stain tutorial).
Work slow and steady. Wright warns that recovering from too much paint or a missed shot “would not be fun” and recommends going slow when dropping fine lines. For your Tamiya P-51D specifically, treat exhaust staining as narrow, aft-flowing discoloration from the side exhaust stacks—not random black clouds—because the National Museum of the U.S. Air Force identifies the P-51D’s WWII escort and fighter-bomber roles, while weathering practice insists every streak follow an origin point and the direction of airflow (National Museum of the U.S. Air Force P-51D fact sheet). The procedure: start the stain at the exhaust port, spray aft in the airflow direction, fade the mark as it extends rearward, and stop before it becomes the first thing the eye sees.
Step 5 — Seal Everything With a Matte Coat
A final matte or flat coat unifies the finish and protects the completed weathering—but it can also ruin the model if it goes on too heavy or under poor conditions, so it gets its own restraint rule. Vallejo says to apply Matt Varnish 70.520 in several thin layers at a distance of 15 to 20 cm, and specifically warns that several thin coats are better than one thick layer because a thick layer can produce unwanted accumulations and unpredictable drying (Vallejo varnish guide). For an airbrush, Vallejo’s official guide gives a defensible baseline of a 0.2 mm needle at 12 to 15 psi.
Conditions matter as much as technique. Golden Artist Colors’ varnish guidance says ideal varnish temperature is above 65°F and below 75°F, with relative humidity between 50% and 75%, and warns that excessive humidity or cool temperature may cause bloom—a whiteness or opacity caused by moisture trapped between varnish and paint layers (Golden varnish application guidelines). Aim for roughly 65 to 75°F and moderate humidity; if your room is damp or cold, wait. Golden also notes a second cause of a frosted result—on an absorbent surface, the varnish and solvent can soak in while the matting agent stays exposed as a white solid.
Mist on the first matte coat, let it flash off, then add a slightly wetter second coat only if the sheen still looks uneven. If the coat begins to frost, stop spraying immediately and let the model dry before any rescue, because adding more wet varnish in the same conditions can worsen the problem.
The 4 Most Common Beginner Weathering Mistakes (And How to Fix Them)
- Going straight to the wash without a gloss coat. Without the sealed, slick surface, the wash stains flat paint, collects in surface texture, and leaves a dirty patina that is hard to remove without damaging the paint below (ScaleSpot panel-line guide). Fix: Never skip the gloss coat. If staining has already happened and the paint is intact, let it dry, apply or reapply a compatible gloss clear, and use a gentler, more targeted wash after the barrier cures. If the wash has already etched or softened the paint, the safer correction is localized repainting and resealing—not more thinner, because solvent compatibility is the underlying problem.
- Using straight black wash on a WWII olive drab aircraft. Pure black panel lines on olive drab or green camouflage look artificial; AK makes a Brown and Green Camouflage paneliner precisely for these schemes, and Large Scale Planes says those sympathetic colors help avoid a harsh effect (AK Interactive Paneliner for Brown and Green Camouflage). Fix: Use raw umber, dark brown, or brown-gray to simulate dirt and shadow without drawing black outlines around every panel. If lines already read too starkly, dampen a swab with the correct thinner, wipe once in the airflow direction, and then tone the finish with a very thin brown-gray filter.
- Scrubbing the wash instead of wiping it. Wash cleanup is supposed to remove excess from the surface while leaving pigment in recessed detail; repeated rubbing pulls wash out of the lines or damages the clear coat (Large Scale Planes AK Paneliner review). Fix: Use a single clean directional wipe per panel or surface zone, then inspect—do not go back over an area with circular scrubbing. If a panel line ends up too clean, reapply a tiny amount of wash into that one line rather than smearing more wash across the surrounding panel.
- Applying a heavy matte coat in poor conditions. A thick coat can produce unwanted accumulations and unpredictable drying, and a damp or cool room can cause bloom—a whiteness or opacity from moisture trapped between varnish and paint layers (Vallejo varnish guide; Golden varnish application guidelines). Fix: Apply matte varnish in several thin layers in a room that is warm and not damp—aim for roughly 65 to 75°F and moderate humidity. A cautious rescue is sometimes possible by restoring an even clear layer and re-matting under better conditions, but test that repair first, because varnish chemistry differs by brand and by the layers beneath.
FAQ: 5 Common Beginner Weathering Questions
How do I step-by-step apply a panel line wash to my first scale model airplane kit without ruining the paint?
Applying a panel line wash to a scale model airplane requires sealing the base coat first, flowing a diluted wash into the recesses, and removing the excess with a mineral-spirits-dampened swab. Work in this order:
- Paint and decal the model, then seal everything under a gloss clear coat and let it cure fully (ScaleSpot panel-line guide).
- Touch a fine pointed brush to the panel lines so the wash flows in by capillary action—do not brush whole panels (AK Interactive Black Precision Panel Liner).
- If mixing a homemade oil wash, start around 1 part oil paint to 10 parts odorless mineral spirits and adjust until it behaves like ink (Dave’s Model Workshop washes/pin washes/filters guide).
- After a short wait, remove excess from the gloss surface with a barely damp swab or flat brush, leaving pigment only in the recesses.
What is the exact process for weathering a model airplane that keeps it looking realistic without going overboard?
Realistic model airplane weathering relies on a five-step restraint ladder—gloss coat, panel line wash, optional filter, optional exhaust stain, and a final matte seal—with a stop point after each stage. Run it like this:
- Gloss coat, then a 3-foot inspection.
- Panel-line wash, then a 3-foot inspection.
- Optional filter, then a 3-foot inspection.
- Optional exhaust stain, then a 3-foot inspection.
- Final matte coat (ScaleSpot panel-line guide; FineScale Modeler top weathering techniques; Vallejo varnish guide). It works because each stage has a stop point—and David W. Aungst identifies knowing when to stop as the central artistic challenge.
Why does my panel line wash look too dark and messy on my model airplane, and how do I fix it?
A too-dark or messy panel line wash is almost always caused by a color that is too stark, a mix that is too pigment-heavy, a surface that is too flat, or cleanup that moved wash across the surface instead of leaving it in the recesses. Correct it in three moves:
- Remove the excess with a thinner-dampened swab or brush in controlled, directional strokes (Large Scale Planes AK Paneliner review).
- Switch from black to a scheme-specific wash such as brown-and-green, gray-and-blue, or sand-and-desert (AK Interactive Paneliner for Brown and Green Camouflage).
- Once the wash is dry, add a very subtle filter to unify the color—never as a heavy second wash (FineScale Modeler dot-filter article).
What weathering products should a beginner use on their first model airplane kit to get the best results?
The best starter kit for a beginner is one reliable gloss clear, one scheme-appropriate panel line wash, one mild thinner, a few artist-oil earth colors, cotton swabs, fine brushes, and one reliable matte varnish—not an entire weathering rack. Good examples:
- Gloss: Tamiya X-22 Clear (Tamiya X-22 Clear product page).
- Wash: AK Interactive Paneliner in Brown and Green or Grey and Blue Camouflage (Large Scale Planes AK Paneliner review).
- Oils and thinner: Raw umber and burnt sienna with odorless mineral spirits (Tangible Day oil paint guide).
- Matte: Vallejo Matt Varnish 70.520 or Tamiya XF-86 Flat Clear (Vallejo Matt Varnish 70.520 product page).
How do I step-by-step weather just the exhaust stains on my WWII fighter model without over-doing the whole airframe?
Weathering only the exhaust stains on a WWII fighter model requires a highly diluted dark mix applied in thin passes that originate at the exhaust stacks and fade aft toward the tail. Follow these steps:
- Find the exhaust outlet, then use reference photos to decide whether stains are present and whether they read gray, brown, tan, or black (FineScale Modeler exhaust-stain discussion).
- Make the first airbrush pass very thin and light, moving aft from the stack in the airflow direction.
- If a second darker pass is needed, keep it inside the first stain rather than expanding it outward.
- Stop after the first visible hint—Lincoln Wright stresses thin paint, low pressure, and slow application to avoid hard-to-recover mistakes (Paint on Plastic exhaust-stain tutorial).

Key Takeaways
- Restraint is the master rule. Expert sources warn that weathering is easy to overdo, and real aircraft are maintained under formal cleaning and corrosion-control systems—so model documented service wear, not default neglect.
- Always seal with a gloss coat first. It protects the paint and helps the wash flow into recessed detail; skip it and stains become permanent.
- Apply washes by capillary action, then wipe—never scrub. Touch the wash into the line, wait briefly, and remove excess with a single directional stroke.
- Build effects in multiple ultra-thin layers. Filters, exhaust stains, and matte coats all look more realistic when they stay subtle, transparent, and checked against references.
- Seal with a matte coat only when the weathering is dry, applied in several thin layers under reasonable temperature and humidity.