One forgotten step between paint and decals wrecks hours of work. Here’s exactly why a gloss coat is essential — and how to apply it correctly every single time.
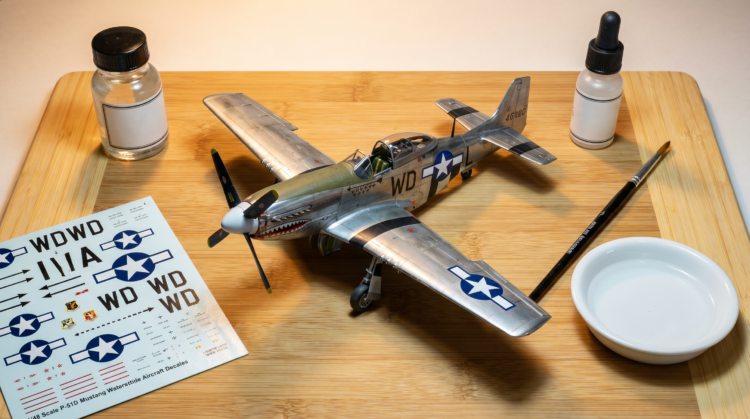 You did everything right until the decal dried.
The camouflage on your P-51D Mustang wing went down clean. You float the national star-and-bars into place, slide it off the backing paper, blot the water away — and then the surface dries. A pale, cloudy halo creeps in around the edge of the marking, and the crisp insignia suddenly looks like a sticker pressed onto plastic. The same thing happens on a gray F-4 Phantom fuselage: a decal that looked perfect while wet turns milky once the water evaporates.
That defect has a name. Modelers call it silvering, and it shows up when air gets trapped under a decal’s clear carrier film because the marking never made complete contact with a smooth enough surface. The cure is the step this guide is built around: applying a gloss coat before decals on model airplane kits is the single most impactful finishing technique a beginner can learn. Flat and matte paints are the usual culprits behind silvering — under magnification, a matte finish is microscopically uneven, resembling a pebbled beach, and scatters light in every direction. When a decal’s transparent film bridges across that rough texture, tiny pockets of air stay trapped underneath and catch the light, giving the clear carrier a silvery, milky look instead of disappearing.
A gloss coat is not a luxury upgrade — it is a bridge layer. It does not change your camouflage color; it temporarily changes the surface texture from decal-hostile to decal-friendly, and a final matte or satin topcoat restores the scale finish afterward. Professional modelers and competition builders routinely gloss before decaling — established workshop practice, not a guarantee, since decal thickness, carrier film, old adhesive, and technique all matter too. A fair way to put it: the gloss coat creates the smooth surface, and Micro Set, Micro Sol, careful trimming, and patient drying finish the job. What follows is the full sequence, with no guesswork.
Why Your Flat Paint and Decals Don’t Mix
Gloss and matte surfaces reflect light very differently at the microscopic level, and that difference is the whole reason silvering happens. Gloss paint can dry into what is effectively a very flat plane — a surface so even it reflects light regularly and can behave almost like a mirror. Matte paint does the opposite: when it dries it is microscopically uneven, and that rough, pebbled texture scatters light in all directions, giving a flat finish its dead, non-reflective look.
A waterslide decal needs close, continuous contact with the surface underneath. On a rough matte finish, the clear film cannot settle into every dip and ridge, so air stays trapped beneath it. Arma Hobby identifies that incomplete adhesive contact as the real cause of silvering, and waterslide guides used by modeling clubs say the same in plainer terms: apply a decal to a matte finish and the carrier can show up as silver because air is trapped underneath. So the optical chain is simple — rough paint creates air pockets, air pockets interrupt the film’s contact, and that interrupted contact reflects light in a way that makes the clear carrier visible. Gloss breaks the chain by smoothing the surface so the film sits flat.
Be honest about what gloss does, though. It is not a chemical cure for silvering and it does not make decals “stick by magic.” It is a surface-texture fix that improves physical contact and gives your decal adhesive and setting solutions a better surface to work on. Microscale reinforces this from the chemical side — Micro Set improves adhesive action and slightly softens the film, but works best on a smooth surface to begin with. And the gloss stage is temporary: the surface your decals touch should be gloss or very smooth, but once they are sealed you choose a flatter topcoat to bring back scale realism.
Quick Fact: What Is Silvering?
Silvering is the visible silvery, cloudy, or pale halo that appears when air remains trapped under a decal’s clear carrier film instead of letting the film and adhesive make full contact with the model surface. It shows up most often over a matte or insufficiently smooth surface — and it is far easier to prevent with a smooth gloss layer than to repair after the carrier film dries.
Your Gloss-Coat Toolkit: What to Buy Before You Begin
Treat this less as a brand list and more as a decision tree. The safest buying advice is not “buy the hottest clear” — it is “choose one compatible system, test it on painted scrap, and learn how it behaves before coating a finished airplane.”
- Lacquer clears (rattle can):Tamiya describes TS-13 Gloss Clear as a synthetic lacquer spray useful for large model surfaces, in a 100 ml can. Testors Glosscote is another traditional lacquer clear, listed in the Testors catalog under Top Coats — Lacquer. Use both with ventilation and thin coats.
- Acrylic / water-based clears:Tamiya USA places Acrylic X-22 Clear in its acrylic line — water-soluble acrylic resins, suitable for brush or airbrush — so X-22 is acrylic, not lacquer, despite how it is sometimes grouped. Vallejo Gloss Varnish 70.510 is a quick-drying water-based acrylic gloss varnish that protects models from dust, scratches, dirt, and humidity. Both are forgiving for airbrush beginners.
- Specialist airbrush gloss:Alclad II Aqua Gloss (ALC600) is a water-based, airbrush-only clear recommended at 15–20 psi.
- Advanced solvent-based clear: Color GX (GSI Creos) includes GX112, listed as Super Clear III UV Cut Gloss — pair it with ventilation and a test spray, and don’t rely on unsupported thinning ratios.
- General-purpose clear:Krylon Crystal Clear Acrylic Coating is a non-yellowing, moisture-resistant gloss that dries in minutes, but it is not marketed for model decals, so test it on scrap first.
- Legacy floor-finish option:Pledge FloorCare / Future was a long-time modeler’s gloss, but FineScale Modeler notes the U.S. products are discontinued. Treat it as legacy, not a guaranteed current buy.
Tools and safety: an airbrush, a wide soft brush, or a rattle can; plus a well-ventilated workspace, nitrile gloves, and lint-free cloths. Mind solvent strength — lacquer sprays can attack fragile paint if applied too wet, while water-based clears are more forgiving but still need drying and testing.
Decal setting solutions (companions, not gloss products): Microscale describes Micro Set as the first solution — for wetting, adhesion, and slight softening — and Micro Sol as the stronger solution that completely softens the decal for difficult surfaces. They come after the gloss coat, never instead of it.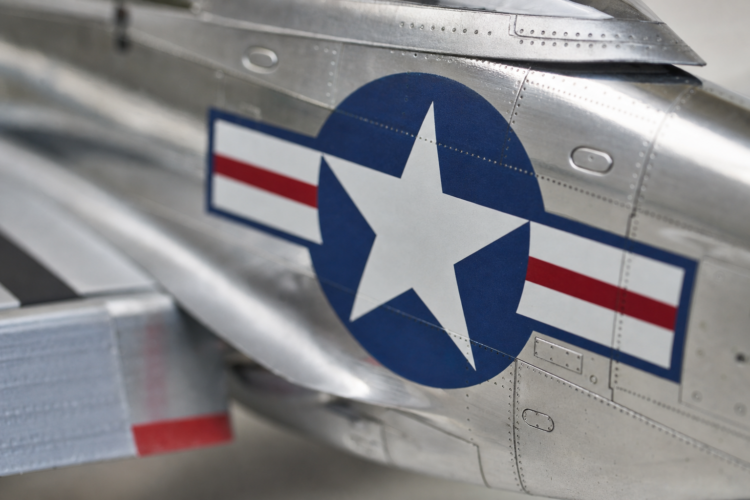
Step-by-Step: How to Apply a Gloss Coat for Decals on Model Airplane Kits
Work through these six steps in order. The whole routine is a rhythm: inspect, clean, test, mist, build, cure — then decal, soften, dry, and seal.
Step 1 — Cure and inspect your base paint. Let the base coat fully cure, not just touch-dry: a conservative beginner window is at least 24 hours for lacquer base coats and 48 hours for acrylic. Treat those as bench practice, since many product pages say “quick drying” without a decal-specific overcoat window, and PPG lists insufficient drying between coats as a cause of finish defects. Then inspect under a raking light, and level only a dust nib or ridge with 2000-grit — sand the defect, not the camouflage.
Step 2 — Clean the surface. Alclad’s directions require surfaces free of dust, grease, oil, and finger marks, and the Farnham guide says to remove dirt and grease before decaling. For a cured model, a barely damp lint-free cloth is enough; don’t scrub fresh acrylic with aggressive alcohol. Let it dry fully. Watch for fingerprints near panel lines and wing roots — the gloss coat will magnify them.
Step 3 — Prepare the product. Stir bottle products rather than shaking, so you don’t whip in bubbles. Thin as appropriate: Tamiya notes its acrylics can be thinned with X-20A Acrylic Thinner or with Tamiya Lacquer Thinner for faster drying and a harder finish — but tolerating lacquer thinner doesn’t make X-22 a lacquer. Then test. Alclad advises testing on scrap plastic; better still, use a paint mule carrying the same primer, paint, and gloss as your model, since compatibility problems come from the whole stack.
Step 4 — Apply in thin, overlapping passes. Build two to three thin coats rather than one heavy wet coat, which risks runs, pooling in detail, and long dry times. PPG ties orange peel to poor technique, incorrect pressure, and film thickness, and recommends thin, even coats.
- Airbrushing:15–20 psi is a reasonable beginner starting range for many water-based gloss coats, though pressure and distance vary by product. For reference, Alclad calls for 12–15 psi at close range per the manufacturer’s current product directions for its finishes, while Aqua Gloss is airbrush-only at 15–20 psi. Make the first coat a light tack coat and later coats slightly wetter.
- Rattle can:hold roughly 10–12 inches away with consistent passes, and test the spray pattern on cardboard or a spoon first.
- Brush-on (Pledge-style gloss):Cybermodeler documents brushing or airbrushing Pledge FloorCare as a gloss layer. Use a wide soft brush and don’t over-brush self-leveling products.
Pro Tip: If you can read newsprint reflected in your model’s surface, your gloss coat is visually ready for decals. Just confirm the surface is also dry, tack-free, and not cool or rubbery — shine alone doesn’t prove a full cure.
Step 5 — Allow a full cure. As conservative minimums, allow roughly 2–4 hours for lacquers, 4–6 hours for acrylic and water-based gloss, and overnight for rattle-can coats before decaling. Write those in pencil: humidity, film thickness, and temperature all extend drying. PPG ties humid or cold conditions to blushing and improper drying to orange peel, so give the coat extra time in a damp or cool shop. A cured gloss coat looks glass-smooth and feels tack-free — though “glass smooth” means continuous contact under decals, not a show-car mirror.
Step 6 — Apply the decals. Trim excess carrier film as close to the marking as practical first — Arma Hobby notes less film means less chance of silvering. Soak each decal about 30–45 seconds, let the adhesive activate, and slide it off only once it moves freely; waterslide decals are paper, water-soluble glue, and a printed layer, and dampening dissolves the glue. Microscale is explicit on order: Micro Set first to improve adhesion, Micro Sol later, once the decal won’t move easily. Micro Sol completely softens the decal, so use as few strokes as possible and leave it alone — a decal wrinkling under it is part of softening, and touching it then is more dangerous than waiting. On aircraft, the highest-risk decals are large national insignia, walkway stripes, intake warnings, and dense stencil data, which combine broad carrier film with panel lines and curves. Cut along panel lines only after the decal resists movement.
Five Gloss-Coat Mistakes Beginners Make — and How to Fix Them
Most gloss-coat disasters are a chain of preventable surface-prep errors, not mysterious product failures.
- Glossing over uncured paint.Clear over soft paint can craze or wrinkle the base coat. Wait for a full cure. If wrinkling appears, stop, let it harden, level only after it is stable, and repaint — don’t bury soft paint under more clear.
- Using a mismatched solvent base.Chemistry differs: Tamiya TS-13 is a synthetic lacquer, while Tamiya X-22 and Vallejo Gloss Varnish are acrylics. Hot lacquer flooded over un-hardened water-based acrylic can lift the base coat. The rule is “test the exact stack,” since some products layer safely after a full cure and light misting. Alclad’s advice to test on scrap settles the doubt.
- Applying too thick in one pass.A heavy coat pools in panel lines, runs on vertical surfaces, and collects along flap hinges, canopy rails, and the wing-root fairing. Thin coats always win. If a run appears, let it harden and level it later rather than brushing wet clear around.
- Rushing the cure before decaling.A coat dry on top but soft underneath is a trap — water, setting solution, and swab pressure can imprint the clear and lock marks under the topcoat. Microscale’s guidance to leave decals alone during softening reflects how much decal work rewards patience.
- Skipping gloss on “already glossy” kits.Many surfaces look semi-gloss but aren’t smooth enough to accept decals. The IPMS McKinstry guide notes one coat of Future doesn’t always make a surface smooth enough, and grays and greens may need sanding and another coat. Judge the decal area under raking light — the dull islands around panel lines are where silvering starts. Since a decal must bond across its full area, partial gloss isn’t enough for a large marking.
What If It’s Already Silvered? Let the decal dry fully, prick only the silvered area with a fresh needle or new blade tip, apply a controlled dot of Micro Sol, and leave it untouched until dry; the IPMS guide describes a fresh-blade-plus-Sol approach for bubbles, wrinkles, and panel-line settling. Be realistic, though — some silvering under large carrier areas can’t be made fully invisible without repainting, replacing the decal, or disguising it with restrained weathering.
Rescue Operations: Fixing Gloss-Coat and Decal Problems
Knowing the Plan B in advance is what lets you attempt the technique without fear.
- Cloudy or milky gloss (blushing):PPG defines blushing as a milky haze from moisture trapped in the wet film, caused by cold, wet, or humid weather or forced drying. Pause, improve the room, let the coat harden, and test a recovery coat on scrap; a second thin coat in better conditions often clears a light blush.
- Orange-peel texture:PPG describes a pebbled surface from droplets failing to coalesce, tied to poor technique, excessive distance, incorrect pressure, or insufficient drying. Level gently after the clear hardens, then re-apply a better-leveled coat.
- Silvering despite a gloss coat:usually a patchy or insufficient coat. Inspect every decal zone before wetting the first decal, add another coat where needed, let it cure, and apply Micro Sol to re-seal edges.
- Decal lift or edge peeling:reserve Micro Sol for setting and use Micro Set or clean water for positioning. If an edge lifts, wick a tiny amount of setting solution under it — but don’t flood and stain the surrounding finish.
- Final topcoat lifting decals:a heavy wet matte coat can re-soften recent decals. Apply the flat in two or three light dusting passes before any wetter coat; Microscale’s advice to let decals dry first supports the wait.
Frequently Asked Questions About Gloss Coat for Decals on Model Airplane Kits
How do I step-by-step apply a gloss coat before putting decals on my model airplane kit?
Applying a gloss coat before decals on a model airplane kit means cleaning and curing your base paint, building two to three thin coats of clear gloss, letting it fully cure, and only then decaling with Micro Set and Micro Sol.
- Cure the base paint, then inspect under raking light and level any dust or rough spots.
- Clean the surface free of dust, grease, oil, and finger marks, then let it dry.
- Choose a gloss clear matching your tools — Tamiya TS-13 (lacquer spray), Tamiya X-22 (acrylic bottle), Vallejo Gloss Varnish (water-based acrylic), or Testors Glosscote (lacquer top coat).
- Apply two or three thin, overlapping coats, watching for pooling around panel lines.
- Let the gloss become smooth and tack-free, then apply Micro Set first and Micro Sol only after the decal is positioned.
What is the best gloss coat product to use for decals on model airplane kits as a beginner?
The best beginner gloss coat is the one that matches your tool setup, ventilation, paint system, and comfort level — not a single universal brand.
- No airbrush:a hobby rattle can such as Tamiya TS-13, a synthetic lacquer spray useful for large surfaces.
- With an airbrush:Tamiya X-22 (acrylic) or Vallejo Gloss Varnish (water-based acrylic), both forgiving bottle clears; Alclad Aqua Gloss is airbrush-only at 15–20 psi.
- Legacy option:Pledge FloorCare / Future products are reportedly discontinued in the U.S., so look for replacements.
- Every option:test it on painted scrap first.
Why do my model airplane decals look silvery and how do I fix it?
Decal silvering on model airplane kits happens when the clear carrier film doesn’t make complete contact with the surface and air stays trapped under the film — and the fix is always a gloss coat applied before decaling.
- Matte paint is microscopically uneven and scatters light, while gloss reflects more regularly, so a matte finish traps air that makes the carrier look silver.
- Prevent it by glossing before decals and using Micro Set (improves adhesion, slightly softens the film) and Micro Sol (completely softens the decal to conform to difficult surfaces).
- To repair, let the decal dry, prick only the silvered area with a fresh blade or needle, apply a dot of Micro Sol, and leave it alone until dry.
Can I apply a gloss coat with a regular brush instead of an airbrush on my model airplane kit?
Yes, you can brush a gloss coat onto a model airplane kit using a water-based acrylic gloss such as Tamiya X-22 or Vallejo Gloss Varnish and a wide, soft brush — no airbrush is required.
- Tamiya states its acrylics are excellent for brush painting or airbrushing, which supports brushing X-22 when handled correctly.
- Use a wide, soft brush, work quickly, and avoid overworking so you don’t leave ridges.
- Brushing suits small 1/72 aircraft, localized panels, or touch-ups; an airbrush or rattle can gives more even coverage on large 1/48 or 1/32 wings.
- Dry under a dust-free cover to avoid trapped lint.
What exactly is the process for sealing decals with a flat coat after applying them to my model airplane?
Sealing decals means letting them dry fully — Microscale recommends overnight — and then applying thin mist coats of a protective flat, satin, or gloss varnish to lock in the markings and restore the scale finish.
- Let decals and setting solutions dry overnight before any protective coat.
- Apply the final flat or satin in light mist passes; avoid a heavy wet matte coat, which can lift decals.
- Use compatible products, and if weathering will follow, consider a light clear sealing coat first.
- Don’t use a flat coat to hide preventable silvering — a matte coat over trapped air usually makes the defect permanent.

Key Takeaways
- A gloss coat before decaling is the single most effective step against silvering, because it smooths the surface so trapped air can’t make the carrier film visible.
- Apply two to three thin coats over fully cured base paint, then let the gloss cure fully before any decals.
- Lacquer, acrylic, and water-based clears all work, and no airbrush is required — but test the full paint-clear-decal stack on scrap first.
- Use Micro Set before Micro Sol, trim carrier film, and never rush the cure.
- Seal finished decals with a thin-misted flat or satin topcoat.