That ghostly silver halo around your decals isn’t bad luck — it’s bad prep. One gloss coat and the right technique stop it cold, and a silvered decal you’ve already applied can usually be rescued.
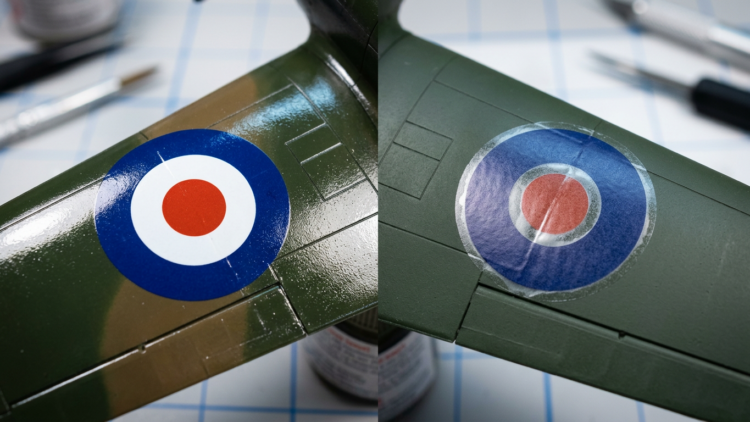
You finish the paint job of your life, slide the first roundel into place, let it dry overnight — and the next morning a dull, milky, silvery halo is glowing around every marking. If that sounds familiar, you’re in good company: decal silvering is one of the most common and visually destructive problems a beginner scale modeler runs into.
Here’s the good news. This is not your fault, and it is not a defect in the decals. A reliable model airplane decal silvering fix comes down to one simple piece of physics, then a repeatable process. Silvering is caused by air trapped between the decal’s clear carrier film and the microscopic texture of flat paint — and it is 100 percent preventable with a high-gloss clear coat applied before decaling, and largely recoverable on decals that have already silvered using Micro Sol setting solution and the pin-prick method. This guide walks both tracks: prevention for decals you haven’t applied yet, and rescue for the ones already glowing silver on your bench.
What’s Actually Happening Under That Carrier Film
To fix silvering for good, you first need to know what you’re looking at. A waterslide decal is a multi-layer sandwich: printed ink designs sit on top of a clear carrier film — also called the decal film or carrier — which is bonded to a paper backing sheet by a thin, water-soluble adhesive layer, with a protective top coating sealing the inks. The critical part is that clear carrier film. It extends beyond the printed ink image and forms an invisible border around every marking, and it is this transparent border that produces silvering.
Now factor in your paint. Most scale aircraft colors are flat, or matte, paints. Their surface looks smooth to the eye but is actually microscopically rough — thousands of tiny peaks and valleys that scatter incoming light in every direction, which is why flat paint looks non-reflective. Gloss paint, by contrast, has a very smooth, uniform surface that reflects light in a single direction, giving it that shiny appearance.
When you lay a decal over flat paint, the clear carrier film bridges across the microscopic peaks instead of conforming down into them. That traps countless tiny air pockets in the valleys beneath the film. As the decal dries, those air pockets stay put, and light entering the film refracts off all those minute air-to-film interfaces — producing the silver or milky halo you see around, and sometimes through, the decal.
The part worth tattooing on your workbench: silvering is not a product defect, and it is not caused by the quality of the decal. Even premium aftermarket decals from world-class printers such as Cartograf — widely regarded in the scale modeling community as producing the best, most consistently thin carrier film available — can silver when applied to a flat surface.
Even the best aftermarket decals from Cartograf or Microscale can silver on a flat surface — it’s physics, not a product defect.
So what’s the fix? A high-gloss clear coat applied over the paint before decaling fills those microscopic peaks and valleys, creating a smooth, continuous surface. With no surface texture left to bridge, the carrier film bonds directly to what’s underneath: no valleys, no trapped air, no silvering.
Your Decaling Toolkit: What to Gather Before You Touch the Decal Sheet
Before you start either the prevention workflow or a rescue job, pull together everything you’ll need so you’re not hunting for a cotton swab mid-application. Here’s the full kit, grouped into surface prep materials and application tools.
Surface prep materials
- Tamiya TS-13 Clear Gloss (spray can) — your pre-decal gloss coat. It’s a synthetic lacquer that produces a very high gloss; apply it in thin mist coats only, because it’s potent enough to lift or wrinkle decals if it goes on too heavy.
- Pledge Multi-Surface FloorCare Finish (formerly Future) — an alternative gloss coat; this acrylic floor polish brushes or pours on and self-levels to a perfect gloss, no airbrush required. Note: SC Johnson discontinued it in January 2022. Modelers with remaining stock still use it; those without should reach for a purpose-made hobby gloss coat. Holloway House Quick Shine Floor Finish is a widely discussed community substitute, though it has drawn mixed reviews versus the original, particularly for canopy masking.
- AK Interactive Glass Coat or Vallejo Gloss Varnish — purpose-made hobby acrylic clear gloss coats and reliable substitutes for Pledge, compatible with acrylic and enamel paint systems.
- Minwax Fast-Drying Polyurethane Gloss — an enamel-based gloss that can be airbrushed without thinning. It’s used and recommended by scale model author Mike Ashey.
- Micro Set (Microscale Industries, blue label) — the decal application fluid; a wetting agent brushed onto the surface before sliding the decal on. It slightly softens the film, improves adhesion, and lubricates positioning.
- Micro Sol (Microscale Industries, red label) — the setting and conforming solution; a stronger chemical softener applied over the decal after positioning, temporarily softening the carrier film so it conforms to surface detail. Also your primary tool for rescue operations.
- Tamiya TS-80 Flat Clear (spray can) — a synthetic lacquer flat for the final seal coat, widely respected for its excellent nozzle quality and available at most hobby retailers.
- Super Clear Flat (Mr. Hobby/Gunze, B-514) — a lacquer-based seal coat alternative considered one of the best flat clear coats available, sold at most hobby retailers and online.
Application tools
- X-Acto No. 11 blade (with handle) — for trimming carrier film and cutting decals from the sheet. A new, sharp blade is mandatory.
- Single-edge razor blade — for tangential cuts around curved decal edges.
- Soft-bristled paintbrush — for applying Micro Set and Micro Sol and for sliding and positioning decals.
- Cotton swabs (Q-Tips) — for blotting (never wiping) water and setting solution from under the decal, cleaning up glue residue, and pressing decals down.
- Flat-bladed toothpick or decal-setting paddle — for positioning and nudging decals.
- Small glass or Plexiglas cutting surface — for cutting decals without marring your work surface.
- Steel ruler or straight edge — for guiding the blade on straight-line cuts.
- Sharp pin or No. 11 blade tip — for making micro-punctures in silvered decal film during repairs.
- Small bowl of distilled or room-temperature water — for activating decals; distilled water is preferred for consistent results.
- Sharp scissors — for rough-cutting decal sections from the sheet (never bend the sheet).
- Waldron-type punch set — for removing the center carrier film from small round decals such as fuel cap indicators.
Pro tip: “Avoid using hot water to soak decals — it activates the adhesive too fast, dramatically shortens your repositioning window, and can cause the decal to release from the backing before you are ready.”
The One Step Most Beginners Skip — and Why It Changes Everything
If you take one thing from this guide, make it this: applying a gloss coat before decaling is, without question, the single most impactful step a beginner can take to prevent silvering. It is standard practice at every level of competition modeling — from local IPMS club meets to national-level contests — and universally endorsed in authoritative modeling references. Here’s the workflow, step by step.
- Complete all painting and let the paint cure fully. Enamels need a minimum of 24 hours; lacquers typically 1–2 hours per the manufacturer’s instructions. Flat paints dry faster than gloss, but every bit of paint must be fully cured before any clear coat goes on.
- Select your gloss coat medium. Options with verified community use: Tamiya TS-13 Clear Gloss spray (a synthetic lacquer producing a very high-gloss finish — apply in thin mist coats, since it’s potent enough to lift or wrinkle decals if laid on too heavy); Pledge Multi-Surface FloorCare Finish or a Quick Shine substitute (brush or airbrush it on and it self-levels to a glass-like finish without airbrush equipment — allow at least 24 hours before decaling); Minwax Gloss Polyurethane (enamel-based, recommended by scale author Mike Ashey, airbrushes without thinning); or Vallejo and AK Interactive Gloss Varnish (purpose-made hobby options compatible with acrylic and enamel paint systems).
- Apply the gloss coat in thin, even passes. Lay down two thin coats of clear gloss, allowing full drying between coats, until the surface reaches a uniform polished-glass appearance. Never try to achieve full coverage in one heavy coat.
- Inspect under raking light. Hold the model under a single angled (raking) light source and slowly rotate it. Any area that appears dull, satin, or semi-gloss is a potential silvering zone and must be recoated before you proceed.
- Allow full cure before decaling. Give it a minimum of 24 hours of full cure before applying any decals. Laying decals over a coat that has dried on the surface but hasn’t fully cured beneath can still produce partial silvering.
Common mistake: Do not apply decals over a semi-gloss or satin finish. Only a true high-gloss surface — one that looks like polished glass — adequately fills the microscopic surface texture that traps air under the carrier film.
How to Apply Model Airplane Decals Without Trapping a Single Air Bubble
With a true gloss surface under you, technique seals the deal. Decaling can feel nerve-wracking the first few times, so work through it in clear checkpoints and don’t rush.
Preparation: trimming the carrier film. Before soaking any decal, trim the carrier film as close to the printed ink edge as possible. Rough-cut the decal from the sheet first (leaving a small border), then make a final precision cut with a sharp No. 11 blade, using a steel ruler for straight edges and tangential cuts with a single-edge razor blade for curved contours. For large national insignia and fuselage art, remove as much carrier film as possible from all edges and internal clear areas such as the inside of letters like “A” or “9.” For tiny instructional stencil decals, a small border of film helps with handling, so leave it on. For small round decals like fuel cap indicators, use a Waldron-type punch set to punch out the center carrier film — these resist setting solutions and are prone to silvering even over a gloss surface. The logic is simple: less carrier film means less surface area to bridge over air pockets, and therefore reduced silvering risk even in imperfect conditions.
Now the application process:
- Soak in room-temperature (lukewarm) water. Place the trimmed decal in room-temperature or slightly lukewarm water. Most modern decals need only about 10–15 seconds of submersion; older decals may take longer. The decal is ready when it slides freely across its backing paper. Don’t leave it floating for an extended period — the water-soluble adhesive can leach off into the water, reducing the decal’s ability to bond to the model.
- Apply Micro Set to the model surface. While the decal soaks, brush a thin, even coat of Micro Set (blue label) directly onto the gloss-coated surface where the decal will sit. Micro Set is a wetting agent that slightly softens the decal film and dramatically improves adhesion.
- Slide the decal off its backing onto the model. Once it slides freely, position the backing paper over the target area and slide the decal off onto the Micro Set-wetted surface. Alternatively, use a soft brush or the tip of a toothpick to ease the decal off the backing.
- Position carefully using a soft brush and distilled water. Use a soft brush dampened with distilled water to nudge the decal into its final position. Work quickly but gently — Micro Set gives you a brief working window before adhesion begins. For large decals like numerals and letters, position from the most stable end and work toward the opposite edge to avoid folding.
- Blot (do not wipe) from the center outward. Using a dry or lightly dampened cotton swab, blot the decal gently from the center outward to draw excess water and Micro Set from under the film. Never wipe — lateral pressure can tear the carrier film or shift the decal, and wiping drags solution toward the edges instead of removing it.
- Apply Micro Sol over the positioned decal. Once positioned and blotted, brush a generous coat of Micro Sol (red label) over the entire top surface of the decal. Micro Sol is a chemical softener that temporarily softens the carrier film so it conforms to surface texture including panel lines and rivet detail. The decal will likely wrinkle as the Micro Sol activates — this is normal and expected. Do not touch, move, or press the decal while Micro Sol is active and wet. The wrinkles will flatten as the solution evaporates and the film settles into the surface.
- Allow 12–24 hours of undisturbed drying. Let the decal dry completely and undisturbed, ideally overnight. Decals placed over heavily detailed surfaces may need multiple Micro Sol applications — apply each successive coat only after the previous one has fully dried.
- Clean up residue. Once fully dry, gently clean any remaining water stains or adhesive residue around the decal’s perimeter with a clean Q-Tip dampened with water. Let it dry before the final seal coat.
Timing guidance: Modern kit decals from Tamiya and recent Eduard and Airfix releases using Cartograf-printed sheets typically need 10–15 seconds of soaking and respond well to Micro Sol after a single application. Older or third-party decals with thicker carrier film may need up to 4–6 applications of Micro Sol and longer drying periods between coats.
When It’s Already Too Late — How to Rescue a Silvered Decal
If you found this article because a decal has already silvered, don’t strip it off yet. In most cases, a silvered decal hasn’t fully bonded to the paint — the carrier film is still bridging those air pockets rather than conforming to them, which means the situation is recoverable. Rehydrating and chemically softening the film gives it a second chance to collapse into the surface micro-texture and bond properly. Two rescue methods, graduated from least invasive to most:
Repair Method 1 — The Micro Sol Rehydration Method (mild to moderate silvering). This is the first approach to try, and it works for most cases of fresh-to-moderate silvering, especially when the decal is still relatively pliable and hasn’t fully cured to the surface.
- Brush a generous coat of Micro Sol (red label) directly over the silvered area.
- Let it soak undisturbed for 5–10 minutes. Do not touch the decal.
- Blot — do not rub — very gently with a dry cotton swab to absorb excess solution.
- Allow 12–24 hours of complete drying, then inspect the result.
- If silvering persists, repeat. Up to 3–5 applications are common before achieving a satisfactory result.
Repair Method 2 — The Pin-Prick Method (stubborn or fully dried silvering). When Micro Sol alone isn’t enough — typically when the silvering has fully dried and the carrier film has partially bonded in a raised position — the pin-prick method gives the softener access points to work from below the film.
- Use a very sharp pin or the very tip of a new No. 11 blade to make a series of tiny punctures in the silvered area of the carrier film. Be precise — puncture the clear film only, never the printed image.
- Brush Micro Sol into and around the punctured area.
- Press gently and vertically (never laterally) with a dry cotton swab directly over each puncture to help the softener penetrate and collapse the air pocket.
- Allow 12–24 hours to dry. Repeat if necessary.
For very stubborn, fully cured silvering — particularly with older decals or thick commercial kit decals — some experienced modelers escalate to Walthers Solvaset, a stronger chemical decal softener than Micro Sol. Use it with caution: it’s more aggressive and carries a higher risk of wrinkling or damaging the ink layer if over-applied. One community source suggests Mr. Color Leveling Thinner or even Tamiya Extra-Thin Cement as “nuclear option” last-resort treatments for completely failed silvering, but these are genuinely last-resort options, not standard practice — both can damage paint and carrier film if misapplied. The consensus in primary and tier-1 sources is to exhaust multiple Micro Sol applications and the pin-prick method before escalating.
When to give up on a silvered decal. If the carrier film has cracked, the printed image has been distorted, or multiple rescue cycles have failed to improve things, the right move is to remove the decal entirely — rehydrate with water and scrape it off carefully, or carefully sand it away once the surface is prepared — and replace it with a spare from the kit sheet, a third-party aftermarket sheet, or a custom-printed replacement.
Warning: Never apply excessive force to a wet decal — carrier films, particularly on older kit sheets or vintage aftermarket decals, tear under lateral pressure. Press only vertically, never drag or rub.
Locking Your Decals In: The Final Matte or Satin Seal Coat
Once every decal is applied, set, and cleaned, the model needs a final clear coat — typically a flat or matte finish for operational military aircraft, or a satin for late-war or lightly worn subjects. This step does three jobs: it locks the decals permanently in place, protecting them from handling, weathering washes, and later painting; it unifies the finish, since without a clear coat over the entire model the decal zones look shinier than the surrounding paint and create an obvious “patch” effect; and it eliminates residual micro-silvering risk by capturing any marginal areas where the carrier film was close to, but not completely, silvered.
Apply a thin coat of clear flat — Tamiya TS-80 or Mr. Super Clear Flat, for example — over the entire model surface, not just the decal areas, and allow 24 hours of full cure before any subsequent weathering such as oil washes, dry-brushing, or pastel dusts. Both Tamiya TS-80 and Mr. Super Clear Flat (Mr. Hobby B-514) are lacquer-based sprays that deliver a consistent, dead-flat finish; TS-80 is available at most hobby retailers and online, and Mr. Super Clear Flat is widely available online.
Pro tip: “Applying clear flat only over the decal zones creates a visible difference in sheen between the decal area and the rest of the painted surface — visible in any directional light. Always coat the entire model.”
Common mistake: “Apply the flat clear coat in multiple thin coats rather than one heavy pass. A single heavy application can cause the flat coat to ‘blush’ milky white — a phenomenon caused by moisture being trapped in the coating — and can lift or crinkle decal edges.”
The 7 Mistakes That Cause Silvering — and How to Avoid Every One
These are the seven errors most frequently cited as causes of decal silvering in authoritative scale modeling references and experienced community documentation. Each one pairs the mistake with its consequence and the correction.
- Skipping the gloss coat. Applying decals directly to flat paint is the single most common cause of silvering. The correction is always to apply at minimum one full, cured coat of clear gloss before any decal work begins, regardless of how “good” the paint surface looks.
- Leaving too much carrier film on the decal. Every unnecessary millimeter of carrier film is extra surface area that can trap air. Trim as close to the printed image edge as blade control allows, and use a punch tool or careful freehand cuts for internal clear areas inside letters and numbers.
- Using hot water to soak decals. Hot water activates the water-soluble adhesive too rapidly, sharply reducing your repositioning window, and in extreme cases can release the decal from the backing before it reaches the model. Always use room-temperature or slightly lukewarm water.
- Rubbing instead of blotting. A lateral wiping motion creates friction that can tear the carrier film or ink layer and damages fine surface detail. Always blot vertically, pressing straight down with a cotton swab from the center of the decal outward.
- Moving the decal after applying Micro Sol. Micro Sol softens the carrier film enough to make it extremely fragile, so moving or sliding the decal afterward will wrinkle, stretch, or tear it. Always achieve final positioning before applying Micro Sol.
- Applying flat clear coat in a single heavy pass. A thick single application of flat or matte clear can “blush” milky — particularly in humid conditions — and can lift decal edges. Always apply flat clear in multiple thin coats, letting each flash before the next.
- Masking over flat clear coat before it has fully cured. Masking tape applied over a flat clear coat that has surface-dried but not fully cured will pull up both the flat coat and the decals beneath when removed. Complete all masking operations that require tape contact before applying any flat clear coat.
Frequently Asked Questions About Decal Silvering
How do I step-by-step fix silvering on a model airplane decal that I’ve already applied?
Fixing decal silvering that has already occurred requires softening the carrier film to collapse the trapped air pockets, and there are two methods based on severity.
Micro Sol Rehydration Method (mild to moderate silvering):
- Brush a generous coat of Micro Sol (Microscale Industries, red label) over the silvered area.
- Let it work undisturbed for 5–10 minutes.
- Blot — do not rub — gently with a dry cotton swab.
- Allow 12–24 hours of full drying, then inspect.
- Repeat up to 3–5 times if silvering persists.
Pin-Prick Method (stubborn, fully dried silvering):
- Use a sharp pin or No. 11 blade tip to make tiny punctures in the silvered section of the clear carrier film — not in the printed image.
- Brush Micro Sol into the punctured areas.
- Press gently and vertically with a dry cotton swab to collapse the air pocket.
- Allow 12–24 hours to dry. Repeat if necessary.
What is the exact process for applying a gloss coat before decals to prevent silvering on a scale model?
Applying a gloss coat before decals is the single most reliable prevention method for decal silvering, and the process takes four steps.
- Allow all paint to fully cure (minimum 24 hours for enamels; 1–2 hours for lacquers).
- Apply a purpose-made clear gloss — Tamiya TS-13 Clear Gloss lacquer spray, AK Interactive Glass Coat, or Vallejo Gloss Varnish — in two thin coats, allowing full drying between coats.
- Inspect the surface under a raking light source. Every area of the model must appear mirror-smooth; any dull or satin patches need an additional coat.
- Allow the gloss coat to cure for 24 hours before applying any decals.
Why do my model kit decals always look silver or milky even when I apply them carefully?
Model airplane decals look silver or milky because tiny air pockets are trapped under the clear carrier film — and this almost always comes down to the paint surface, not the decal or the application technique.
- No gloss coat under the decals. Flat paint has a microscopically rough surface; the carrier film bridges the peaks and traps air in the valleys. A high-gloss surface fills those valleys, eliminating the air trap.
- Too much carrier film remaining. The wider the clear border around the printed image, the more film is available to bridge air pockets. Trim the film as close to the ink edge as possible.
- Semi-gloss or satin finish used instead of full gloss. A surface must be a true high gloss — mirror-smooth — before decals go on. Satin and semi-gloss still have enough microscopic texture to cause silvering.
What is the best decal setting solution to use to prevent silvering on a model aircraft — Micro Sol or Micro Set?
Micro Set and Micro Sol are not interchangeable — they perform different jobs in a two-step system, and using both is the correct approach.
- Micro Set (blue label) — Applied to the model surface before the decal is placed. It is a wetting agent and mild softener that improves adhesion and helps the decal slide into position, beginning the process of bonding the carrier film to the gloss surface.
- Micro Sol (red label) — Applied over the placed decal after positioning is finalized. It is a chemical softener that temporarily makes the carrier film pliable so it conforms to surface textures, panel lines, and rivet detail. It is also the primary tool for both preventing and rescuing silvering.
For preventing silvering, use Micro Set under the decal and Micro Sol over the decal. For rescuing already-silvered decals, use Micro Sol repeatedly, with the pin-prick method for stubborn cases.
How do I know if my gloss coat is smooth enough to apply decals without them silvering?
A gloss coat is ready for decals when it passes the raking-light inspection test: the entire surface reflects light in a single, uniform direction like a mirror.
- Hold the model under a single angled (raking) light and slowly rotate it through 360 degrees. Any area that appears dull, matte, or satin scatters light non-uniformly — it is not ready and needs another coat.
- The surface should look wet — as if it has just been brushed with fresh varnish — even when fully dry.
- Run a fingertip very lightly over the surface (avoid touching decal areas after application). A properly gloss-coated surface feels glassy smooth with no perceptible texture.
If any area fails these checks, apply another thin coat of clear gloss to that area, allow full cure, and re-inspect.

Key Takeaways
- Silvering is caused by air trapped under the clear carrier film on a flat paint surface — not by faulty decals.
- A high-gloss clear coat applied before decaling is the single most effective prevention method.
- Trim the carrier film as close to the printed image edge as possible — less film means less silvering risk.
- Micro Sol can rescue already-silvered decals by softening the carrier film so it conforms to the surface.
- Always seal decals with a clear flat coat over the entire model, not just the decal zones, for a unified finish.