


Everything you need to add real cockpit, wheel-well, and antenna detail to a plastic model — starting with the scrap in your toolbox, long before you ever open your wallet for resin or photo-etch.
Superdetailing model airplanes has a reputation as an expensive rabbit hole — the kind of hobby where a full resin cockpit costs more than the kit it’s going into, and the aftermarket bill quietly climbs past the price of the model itself. It doesn’t have to start that way. Most of the details that separate a standout build from a straight out-of-the-box one never came in the box to begin with: radio antenna wires; cockpits with seat belts, switches, and detailed instrument panels; hydraulic lines in the wheel wells; and brake lines on the landing gear. Nearly all of them can start with materials already sitting in your toolbox or spares box.
This guide is written for the builder who has finished a kit or two straight from the box and wants to push past that level without overspending. By the end, you’ll know exactly which high-impact details you can add for free with scrap materials — and, when it’s finally time to spend, how to pick the one or two aftermarket sets that deliver the most visible payoff per dollar. We’ll also name the trap that catches more detailers than any budget ever will: Advanced Modeler Syndrome, the reason so many ambitious projects never make it to the finish line.
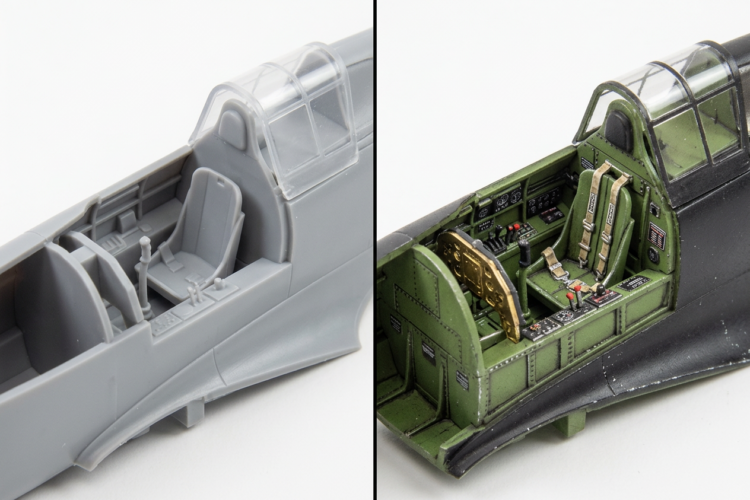
What You’ll Need Before You Begin
You don’t need a specialized kit of tools to start superdetailing. If you’ve already finished one or two out-of-the-box builds, most of what follows is likely on your bench right now.
Skill level and time: One or two completed out-of-the-box kits is enough experience to begin. Superdetailing is a session you add onto a normal build, so there’s no fixed time — the work scales with your ambition.
Tools you probably already own:
- A hobby knife with fresh No. 11 blades
- Sprue cutters
- Tweezers
- Wet-or-dry sandpaper in 400 and 600 grit
- Masking tape
- White glue
- Super glue (cyanoacrylate, or CA) with accelerator, and putty
- A pin vise fitted with small drill bits — the No. 50 to No. 80 range covers antenna mounts, brake lines, and switch holes
Low-cost scratch-building materials:
- Scrap sprue saved from finished kits — the raw material for stretched-sprue antennas, stringers, and gun barrels
- Sheet styrene, such as Evergreen Scale Models; the 0.010- to 0.025-inch range is the useful window for interior parts
- Fine wire, thread, and even old guitar strings for wiring and hoses
- 3M masking tape for seat belts
Optional, only if the budget allows, is one small, focused photo-etch set or a single resin cockpit — but hold off until Step 4, where we show you how to decide whether to buy one at all. The most important “tool” on this list costs nothing: reference material. Close-up photographs and cutaway drawings of the real aircraft are what tell you which details are worth adding in the first place.
The Step-by-Step Process
Step 1: Research Before You Buy Anything
The single highest-value superdetailing step is also the cheapest: research. Talk to the builders behind the models you admire and you’ll find a common thread — before they ever cut one part from a sprue tree, they researched the aircraft. They tracked down books and magazines with close-up photos and cutaway drawings, then studied them looking for answers to specific questions: Were the control surfaces left unlocked when the plane was parked? Were the wheel-well doors open or closed? Were the brake lines on the front or the back of the landing gear strut? What did the cockpit really look like?
That research does more than guide your hands — it sets your budget. How much detailing you can do depends partly on the scale in which you build. A 1/72 scale Corsair will not allow the amount of detailing that can be done on a 1/48 or 1/32 scale version of the same aircraft. In 1/72, the size of the parts limits how far you can go; 1/48 makes full cockpit and wheel-well work practical; 1/32 gives you the most room of all.
Decide your detail ceiling before you spend a dollar. Once you know how far your chosen scale and your own ambition will let you go, you won’t waste money on parts that overshoot either one.
Step 2: Master the Free Techniques First
This is where the “without going broke” promise gets real. The techniques below are the backbone of no-budget superdetailing, and several of them produce the highest-visibility results in the whole hobby.
Seat belts and harnesses. The most common form of cockpit detailing is adding seat belts and shoulder harnesses, and you don’t need to buy a thing to do it. They are easily cut from masking tape, and the metal parts are either painted on with silver paint or added using miniature fittings you can buy later. For the belts, reach for 3M masking tape — it does not rip easily, takes paint well, and looks realistic. Match the layers to your scale: for 1/48 and 1/32 scale kits use two layers of tape back to back; on 1/24 scale kits use three layers; and on 1/72 scale kits use a single strip. For good-looking leather belts, paint the tape with a base color of Polly-S earth brown and highlight it by drybrushing with Testors wood color. To add the buckle hardware at the belt tips, place four drops of silver paint in a box pattern on the top of each belt that needs it, applying the paint with a sharp-tipped round toothpick.
Stretched sprue — a technique, not a purchase. Stretched sprue is the workhorse of free detailing, and the raw material is the plastic tree your kit came on. To stretch sprue, heat a six-inch section over a candle flame, holding it by the ends and slowly turning it to heat it through until it begins to sag. Remove the sprue from the flame, wait a second or two, then pull gently. The sooner you pull, the thinner the filament. Pull immediately after taking it off the heat and you get spider-web-thin strands that are great for antenna wires. Wait a little longer before pulling to produce fuselage stringers and longerons that simulate welded tube-steel frames. Wait longer still, and you can draw out gun barrels and landing gear struts.
Wiring, hoses, and fuel lines. A cockpit or wheel well full of plumbing reads as “busy” from across the room. Make oxygen hoses from short pieces of wrapped guitar string, and fuel lines from strands of castoff electrical cord or other soft wire, fastening the ends with super glue. Wherever possible, make the stringers long enough that you can glue their ends out of sight where you view them through the cockpit opening — that helps you avoid glue buildup, puddling, and etching where it shows.
Instrument panels. If the kit instrument panel is entirely lacking in character, you may elect to build your own. Your options include commercially available miniature instrument faces, faces cut from scrap decal sheets, or dials engraved on a black-painted white plastic sheet with a circle guide and a scribing tool.
Opening hatches and panels. To open doors and hatches you will need either a jeweler’s saw to cut around the opening, or a hot knife — a soldering gun with a hobby knife blade mounted in it — to melt and cut its way around. Practice on scrap before you try either tool on your model, or you may find yourself going back to the dealer for a second kit. If the door or cover is relatively flat, you can often save that expense by making the part from sheet styrene instead.
One habit pays off across all of these: for most cockpit detail parts, white glue is the better choice. It does not remove paint, it does not run, it dries clear, and any excess can be washed off. Save the super glue for bonding wire to plastic. And if you have to choose where to invest your time, cockpit sidewall detail and antenna wire give you the most visible payoff for the least money.
| TIP — Save Your Sprue: Keep the scrap sprue from every finished kit. It is the free raw material for stretched-sprue antennas, stringers, and gun barrels, so the Step 2 techniques never cost you anything. Sprue molded in black or dark gray is best, because it does not need painting. |
Step 3: Know Your Kit’s Weak Points Before You Spend
Once you have squeezed everything you can out of the free techniques, you’re ready for the question that decides whether you ever open your wallet: does this kit actually need aftermarket parts?
The answer starts with the kit’s weakest area, because that is where a purchase earns its keep. A good resin ejection seat, for instance, may be worth more to a build than a full fret of photo-etch, and thin, to-scale landing gear details are another high-value target. Scale matters here too — the bigger the model, the more an upgrade tends to pay off. In 1/32 scale, aftermarket almost always earns its place; in 1/48, it depends on the kit.
There is a budget logic worth internalizing: many aftermarket sets are made for modern kits whose molded detail is already very good, which means you often get more benefit by pairing a detail set with an older kit that genuinely needs the help. Put simply, don’t buy detail for a kit that already has it.
Before you spend anything, run a quick evaluation on the kit in front of you:
- Is the cockpit a bare tub with no detail?
- Are the wheel wells open holes or solid blobs of plastic?
- Is the instrument panel a featureless slab, or is it already finely molded?
- Is this a modern tooling (say, a current Tamiya or Eduard ProfiPACK kit) or an older one? Old toolings benefit most.
- Will the area even be visible on the finished model? If not, save your money entirely.
Step 4: Choose One Small Purchase, Not a Full Set
When a kit does have a gap worth filling, the “without going broke” rule is simple: buy one small, targeted set — not a full package.
First, understand what you’re choosing between. Photo-etched sets are thin metal pieces, all flat, that can achieve incredibly small and detailed parts. Resin sets look and feel like the plastic bits we are used to, but instead of injection molding, they are cast. Because there is less automation in casting, the maker of the resin can really go to town on the detail. The downside is that resin parts are usually attached to a casting block along one side or edge, which you will have to remove.
That difference points each material at a different job. Photo-etch is best for flat details: seat belts, instrument panels, placards, mesh, and landing gear oleo details. Resin is best for three-dimensional detail: cockpit tubs, ejection seats, engine faces, and wheel wells. Resin costs more per set because of the hand-casting involved.
For a beginner, the entry point is the small, single-purpose photo-etch set. Eduard’s Zoom line (the FE series in 1/48 scale) and similar targeted frets are built exactly for this — they cover a single cockpit element such as an instrument panel, seat belts, or landing gear details, and they are smaller and less expensive than full BigEd or ProfiPACK sets. A typical Zoom-style set might include a replacement instrument panel along with harness straps, rudder pedals, trim chains, and more. A dedicated seat belt and harness fret can supply several pre-painted parts per seat — as a discrete, low-cost upgrade rather than a full conversion.
Here is the payoff rule: a small photo-etch instrument panel and seat-belt set delivers more visible improvement per dollar on a beginner build than a full resin cockpit conversion. Save the resin cockpit for a kit whose interior is genuinely bare — and even then, buy detail sets one at a time, as a specific kit calls for them, instead of stockpiling frets for models you have not built yet.
| TIP — Buy One Set at a Time: Purchase detail sets one at a time, as a specific kit calls for them, rather than stockpiling. Owning resin and photo-etch frets for kits you have not built yet is the classic overspending trap. |
Step 5: Work Resin, Photo-Etch, and White Metal Efficiently
Once you have bought a set, the goal is not to waste it. Aftermarket parts are less forgiving than plastic, so a few rules protect your investment.
Use the right adhesive. This is the rule that trips up beginners most: resin will not react to the same adhesives as plastic, so cyanoacrylate (CA) adhesives must be used instead. Etched metal is the same story — it will not adhere with normal plastic cement and also requires cyanoacrylate. Be aware that some CA glues take longer to cure on resin than others, so you may need an accelerator to speed things along.
Clean up resin parts safely. A resin part is typically attached to the mold by a casting plug that must be carefully cut away with a razor saw, after which the remaining scar is cleaned up with fine wet-and-dry sandpaper. Use a serrated blade with teeth for the cut; do not try to use sprue cutters on a resin block, or you will ruin the part.
Then a hard safety rule, not a suggestion: resin dust is a serious respiratory hazard. All cutting and sanding of resin must be done wet to keep particles out of the air, and you should wear a dust mask or respirator while you work. Never dry-sand resin. Wet sanding — dip the sandpaper in water and sand as normal — keeps the dust down and is the single most important habit when working the material.
Dry-fit before you commit. Aftermarket parts are not always drawn to match every kit precisely, so test first. Before you paint, dry-fit a resin cockpit tub or photo-etch panel against the kit’s fuselage halves to confirm it sits where it should. It also helps to make a practice piece from spare material before attempting a tricky photo-etch installation on the model itself, and to use a bending machine when folding larger photo-etch parts so they do not distort.
| WARNING — Resin Dust Is Toxic: Resin dust is a health hazard to breathe. Always wet-sand resin parts and wear a dust mask or respirator when cutting or sanding. Never dry-sand resin. |
Step 6: Sequence the Build So Nothing Gets Wasted
The order you work in can save you from expensive do-overs — because undoing a bad joint on a resin or photo-etch part usually means buying a replacement, unlike cheap plastic.
The cockpit is the usual place to start. Interior detailing has to happen before the fuselage halves close, and some of the work — such as opening cabin doors, hatches, and gun bays — must be done while the kit parts are still in halves. Wheel-well detail follows the same logic: add it before the wing assembly is buttoned up and while the bay is still easy to reach.
A reliable sequence looks like this:
- Research the aircraft and decide your detail ceiling; gather your reference photos.
- Open any hatches and cut control surfaces while the parts are still in halves.
- Build and paint the cockpit interior — instrument panel, seat, seat belts, and sidewall wiring.
- Dry-fit any resin or photo-etch parts against the fuselage halves before cementing anything.
- Close the fuselage halves, then handle external paint and markings.
- Add wheel-well detail before the wing assembly is finished.
- Save antenna wires, brake lines, and other external details for last, during final assembly.
Test-fit scratch-built and aftermarket parts before you commit glue to them. On plastic, a mistake is cheap; on resin or photo-etch, it can cost you the part.
Tips and Warnings
Keep these quick-reference notes at your bench. The tips save money and effort; the warnings protect both your parts and your lungs.
| TIP — Match the Glue to the Job: Use white glue for most cockpit plastic-to-plastic detail — it dries clear, does not etch plastic, and any excess washes off. Switch to super glue (CA) for wire-to-plastic joints and for anything resin or photo-etch. |
| TIP — Check Your Cockpit Colors: Paint the gunsight a lighter shade than the console behind it so it stands out. If you paint it the same color as the console, the detail will not be visible. |
| TIP — Dry-Fit Everything: Aftermarket parts are not always drawn to match every kit precisely. Always dry-fit a resin cockpit tub or photo-etch panel against the fuselage halves before painting. |
| WARNING — Protect the Canopy: Tube plastic cement fumes can frost the inside of a canopy. Use white glue or a dedicated canopy cement such as Kristal Klear on clear parts, and keep tube cement away from them. |
| WARNING — Super Glue Sets Fast: Super glue can set before you have positioned a part, especially if you reach for the accelerator too soon. Work in small sections and apply accelerator only after the part is exactly where you want it. |
| COMMON MISTAKE — Buying Before Evaluating: Don’t buy a full detail set on enthusiasm before checking whether the kit’s factory parts actually need replacing. Run the Step 3 checklist on every kit first. |
Troubleshooting: When Things Go Wrong
Even careful builders hit snags. Here are the ones that come up most, and how to recover.
“I bought a resin part that doesn’t fit the kit.” Light wet-sanding of the casting edge usually brings it into line; if there is a gap, scratch-build a shim from sheet styrene rather than buying a second set. Dry-fitting before you paint catches most fit problems while they are still easy to fix.
“My super glue set before I positioned the part.” Work in small sections, and apply accelerator only after the part is in its final position. If you catch it immediately, a sharp No. 11 blade can sometimes separate the joint cleanly.
“My stretched sprue keeps breaking.” Reheat and re-pull — it costs nothing to try again. The usual cause is pulling too fast, so wait a beat longer after taking the sprue off the heat before you draw it out.
“My photo-etch seat belt buckles are bending and distorting.” Handle them with precision tweezers, and use a bending machine for larger parts. Pre-paint before installation, and accept that a little irregularity actually adds realism to worn harnesses.
“Glue bled onto my clear canopy and fogged it.” If it is white glue, dampen it with water and gently lift it away. If it is liquid cement, the fog may be permanent — so prevent it by masking canopies before doing any cement work nearby.
“I keep buying more detail sets and never finishing a model.” This one has a name: Advanced Modeler Syndrome (AMS), the well-documented habit of becoming so absorbed in superdetailing and accurizing that builds never reach the finish line. The fix is the Step 1 rule — decide the exact scope of your superdetailing before you open the box, and focus on finishing rather than perfecting.
How to Know You’ve Succeeded
When the build is done, a few quick checks tell you whether the effort paid off:
- Does the cockpit read as “busy” at arm’s length — can you pick out color variation, small switches, or seat belt straps without magnification?
- Do the wheel wells show visible lines — brake lines and hydraulic tubing — instead of bare plastic?
- Does at least one added detail, whether an antenna wire, a belt buckle, or an instrument panel, hold up under close inspection within 12 inches?
- Are all your resin, photo-etch, and white metal parts secured with CA glue rather than plastic cement?
- Is the antenna wire taut and straight, not sagging?
The larger point is the one the headline promised: real superdetailing progress is possible before you spend a single aftermarket dollar, and every dollar you do spend afterward should go toward the kit’s weakest, most visible area. There is wisdom in easing in, too. As the corpus advises, “Pick two or three of the techniques that intrigue you most, then continually add to your list of accomplishments as you build more models.” Once you have run a full build with these methods, a second kit is the natural place to try a complete resin-and-photo-etch set.
Frequently Asked Questions
How do I start superdetailing a model airplane kit without buying any aftermarket parts?
Start with the free techniques that use scrap and the basic tools you already own.
- Cut seat belts and harnesses from masking tape — two layers for 1/48, a single layer for 1/72 — and paint the buckle hardware silver.
- Stretch scrap sprue over a candle flame to make antenna wires.
- Add cockpit sidewall wiring from castoff electrical wire or guitar string, glued with CA.
- Drill out the brake-line holes on the landing gear and run fine wire for the lines.
- Scribe or engrave instrument-panel detail on painted plastic with a scribing tool.
What is the cheapest way to add cockpit detail to a plastic model kit?
The cheapest cockpit detail comes from masking tape, scrap sprue, and a toothpick — often at no cost at all.
- Masking-tape seat belts and harnesses cost nothing if the tape is already on hand.
- Stretched sprue supplies switches, stringers, and antenna wires straight from kit scrap.
- Instrument dials can be cut from scrap decal sheet and set on a painted plastic console.
- Silver paint dots applied with a toothpick make convincing belt grommets and switch tips.
How do I know if a resin or photo-etch detail set is actually worth buying for my kit?
A detail set is worth buying only when the kit has a genuine, visible gap that its factory parts do not fill.
- Run the Step 3 checklist: is the area truly bare or poor on the molded parts?
- Will the area even be visible on the finished model? A closed cockpit or solid wheel well is not worth the spend.
- Is this a modern kit with high molded detail or an older tooling? Old toolings benefit most.
- Start with a single targeted set rather than a full conversion.
What’s the difference between resin, photo-etch, and white metal aftermarket parts?
Resin, photo-etch, and white metal each suit a different kind of detail, and all three bond with CA glue rather than plastic cement.
- Photo-etch: thin brass or steel sheets, flat, ideal for seat belts, instrument panels, mesh, and placards.
- Resin: cast three-dimensional parts for cockpit tubs, ejection seats, engine faces, and wheel wells — but it generates toxic dust, so always wet-sand.
- White metal: cast metal for landing gear, exhaust stacks, and small fittings; it is heavier than plastic or resin and takes CA or epoxy.
- Cost runs lowest for photo-etch, mid-range for a resin cockpit, and highest for full conversion sets.
Why do I keep buying model detail sets but never finishing my builds?
You are describing Advanced Modeler Syndrome (AMS), a documented pattern in the hobby where the pursuit of more detail keeps builds from ever getting finished.
- Apply the Step 1 ceiling rule: decide the exact scope of your superdetailing before you open the box.
- Focus on one build at a time, and set a no-buy rule until the current model reaches the paint stage.
- Reframe the reward as finishing, not accumulating rather than collecting unopened detail sets.

Key Takeaways
- Free techniques — stretched sprue, masking-tape seat belts, and scratch-built wiring — deliver most of superdetailing’s visible impact before you spend anything.
- Research the real aircraft first; it is the cheapest detailing tool there is, and it sets your detail ceiling before a dollar leaves your pocket.
- Buy small, targeted aftermarket sets rather than full conversions, and only for kits with genuine gaps in their molded detail.
- Resin and photo-etch both need cyanoacrylate glue, not plastic cement — and resin dust demands wet-sanding and a mask.
- Set your detail ceiling before you start to avoid Advanced Modeler Syndrome, the endless-upgrade trap that leaves kits unfinished.