Orange peel paint is the #1 finish killer for scale model airplane builders — and it’s 100% preventable. Here’s exactly why it happens and how to fix it, step by step.
Why Your Model Looks Worse After Painting
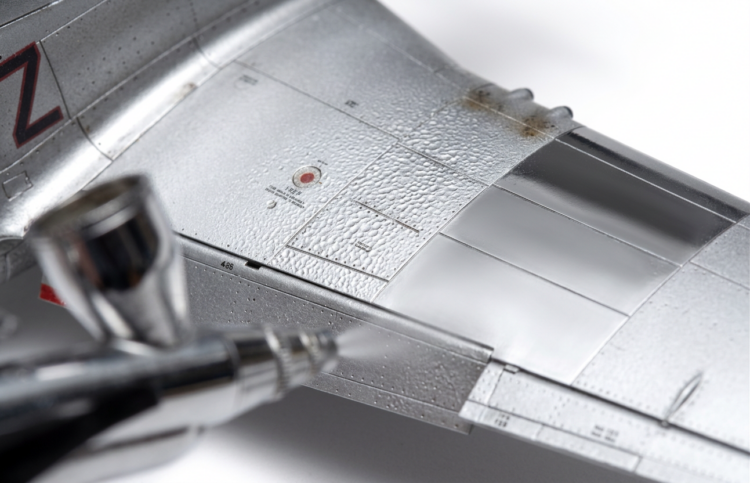
You spent two evenings sanding seams, filling panel lines, and dry-fitting every part of a 1:48 kit until the surface under primer looked immaculate. You pick up the airbrush, dial in what feels like a reasonable pressure, and lay down your first color coat. What comes back at you is not the smooth, glass-like finish you worked for. Instead, the fuselage is covered in a texture that looks uncomfortably like the dimpled skin of a Florida orange — rough to the fingertip, dull under raking light, and genuinely demoralizing.
This is orange peel paint, and it is the single most common finishing complaint among beginner scale model aircraft enthusiasts. The good news: it is entirely predictable and entirely preventable. Every case of orange peel on a scale model airplane traces back to one or more of three specific, fixable variables. This guide walks you through exactly why it happens and precisely how to fix it — or prevent it entirely next time.
 What Orange Peel Actually Is (And Why Scale Modelers Should Care)
Per The Definitive Guide to U.S. Scale Model Aircraft Terminology, orange peel is defined as: “Paint defect creating a bumpy texture resembling orange skin, typically caused by improper thinning, excessive air pressure, or spraying from too great a distance when airbrushing.”
The physics are straightforward. When paint is atomized through an airbrush tip and propelled toward the model, the droplets are suspended in air for a brief transit. During that transit, the solvent carrier — water for Vallejo acrylics, alcohol for Tamiya acrylics, or lacquer thinner for Mr. Color — begins to evaporate. If enough solvent evaporates before the droplets land, they arrive with a partially-solidified outer shell and cannot flow out to merge with adjacent droplets into a flat film. They freeze in place as textured globules. That is orange peel.
The defect matters more on a scale model airplane than in automotive painting for a precise geometric reason. At 1:48 scale, a surface irregularity of just 0.1 mm represents the equivalent of 4.8 mm on the real aircraft. At 1:72 scale, the magnification is even more severe. Orange peel also sabotages decal work: waterslide decals require a smooth, ideally gloss-coated surface to bond without silvering. A bumpy surface traps air between the decal film and the plastic, turning the clear carrier film into a visible, whitish haze.
A practical diagnostic: run a clean fingertip lightly across the painted surface. The target for a properly applied color coat on a scale model aircraft is a surface that feels smooth as glass — no detectable roughness whatsoever. Any roughness confirms orange peel is present, even if it is not yet visible under normal overhead lighting. Under raking (low-angle) light, even mild orange peel becomes obvious.
The Three Real Culprits Behind Orange Peel
Every case of orange peel on a scale model airplane reduces to one or more of these three root causes.
Culprit 1 — Paint That’s Too Thick
Paint that is too viscous does not atomize properly. Instead of breaking into a fine mist, thick paint exits the airbrush as larger, heavier globules that cannot merge into a flat film once they land. The consistency benchmark used consistently across the reference modeling community is clear: “A general rule is that the paint should resemble milk in its consistency, and when a regular paint brush is dipped in the mix it should drop from the bristles in a couple of seconds — not run off like water, nor stick to the brush for long before dripping off.”
The traditional starting ratio for most acrylic paints is 25–33% thinner by volume of paint. For Tamiya acrylics specifically, the FineScale Modeler forum confirms: “Rough guidelines of thinning ratio is 2:1–3:1 (Tamiya acrylic paint : thinner),” which corresponds to 25–33% thinner. A conservative starting point of 20–30% thinner is a safe baseline; always test and adjust before touching the model. Old or congealed paint presents a separate problem: “The orange peel effect can also be caused by bad thinner, or the wrong thinner, old paint…” Lumpy or crumbly pigment cannot be restored by adding more thinner — discard it.
Culprit 2 — Air Pressure Set Too Low (or Too High)
Low pressure prevents proper atomization. The paint exits the tip in larger droplets, either landing as orange peel or splattering unevenly. At the other extreme, excessively high pressure — above 25–30 PSI for standard acrylics — creates its own form of orange peel. The aggressive airflow strips solvent from droplets during transit, and they arrive too dry to level out. As one widely-cited hobby resource confirms: “Keep in mind that too much pressure (>20 psi) will cause it to come out grainy and have a sand-like texture, similar to orange peel and equally undesirable!” The standard working range for most plastic modeling is 15–20 PSI for general work, with 10–15 PSI for corners and fine detail.
Note that pre-thinned metallic paints — Alclad II and AK Interactive among them — require significantly lower pressures of approximately 8–12 PSI because they are already highly diluted. Using standard acrylic pressures on Alclad II causes immediate orange peel or uneven metallic particle distribution.
Tip dry is a related pressure-side contributor. High pressure combined with fast-drying acrylics accelerates paint drying on the needle tip, causing spitting and localized texture defects. Per the Definitive Guide, tip dry is a “Common airbrushing problem where paint dries on the needle tip, causing spitting and uneven spray patterns. More frequent with fast-drying acrylics and can be minimized with proper thinning and air pressure adjustment.”
Culprit 3 — Holding the Airbrush Too Far from the Surface
“If the tip is too far away, the paint will dry as it hits the surface of the model resulting in what is commonly called the orange peel effect.” The practical working distance for color coats on most hobby airbrush setups is 3–4 inches (75–100 mm). Every extra inch of distance gives solvent more time to flash off before the droplet lands.
Environment compounds the problem. Working above 75–80°F (24–27°C) dramatically accelerates solvent evaporation, effectively shortening the safe working distance. Humidity also matters: “Airbrush in a temperature of less than 75 degrees” and “Airbrush in humidity of no more than 60 percent (50 percent is better).”
How to Stop Orange Peel Before It Starts: A Step-by-Step Setup Checklist
Work through these five steps at the start of every paint session. Each one directly addresses one of the root causes above.
Step 1 — Thin Your Paint Correctly
The rule is absolute: “ALWAYS USE THE PAINT MANUFACTURER’S RECOMMENDED THINNER.” Use brand-specific thinners. Generic substitutes produce unpredictable results.
- Tamiya X/XF acrylics → Tamiya X-20A Acrylic Thinner. Many experienced modelers also use Mr. Color Leveling Thinner with Tamiya acrylics for its self-leveling properties.
- Color lacquers → Gunze Sangyo Mr. Color Leveling Thinner. The FineScale Modeler forum explains: “The only real difference is that Mr Levelling Thinner has more retarder in it, extending the drying time and giving the paint more time to self-level, hence the name.” This is the single most effective product-level intervention for orange peel prevention with lacquer-based paints.
- Vallejo acrylics → Vallejo Airbrush Thinner combined with Vallejo Flow Enhancer.
Always pour paint into a clean, separate mixing cup first — never thin directly in the bottle. Add thinner starting at 20–25% of the paint volume. Stir thoroughly for 30–60 seconds, then perform the drip test: dip a clean stirrer into the mix and watch the flow. Paint should stream off the stirrer steadily — not hang in heavy globs, and not run off instantly like water. Adjust in single-drop increments until the skim-milk consistency is right.
Step 2 — Set Your Compressor Pressure
Always dial in pressure on scrap card before touching the model. Use these ranges as your starting points:
| Task / Paint Type | PSI Range |
| Acrylic base coats & color coats | 15–20 PSI |
| Detail work, panel lines, fine edges | 10–15 PSI |
| Lacquers and enamels | 18–25 PSI |
| Pre-thinned metallics (Alclad II, AK) | 8–12 PSI |
| Corners and raised detail | 10 PSI |
Step 3 — Calibrate Your Spraying Distance
For color coats, maintain approximately 3–4 inches (75–100 mm) between the airbrush tip and the model surface. Perform the “just wet” test on a piece of white card: spray a short pass and assess. The pattern should land visibly damp — not pooling or running, but wet enough to show a sheen. If the pattern lands dry and flat with no wet sheen, solvent is evaporating too fast. Move closer, reduce pressure, or add a retarder. Keep the airbrush moving parallel to the surface throughout each pass, not in an arc — an arcing wrist motion unconsciously increases distance at the ends of each stroke.
Step 4 — Apply in Thin, Overlapping Passes
“Do not try to achieve complete coverage in one airbrushing session. Usually two or three light, thin coats are better than one thick coat.” Each coat should appear nearly transparent on the first pass. Allow each coat to fully flash off before the next application: approximately 2–5 minutes for acrylics, longer for enamels and lacquers. Push the air button before the paint reaches the surface and release it after the airbrush tip leaves the surface — this prevents splattering at the start and end of each pass.
Step 5 — Control Your Environment
Avoid painting above 75°F (24°C) or in humidity above 60%. In warm conditions, add 1–2 drops of Vallejo Retarder Medium per paint cup — but not more than 10% of the total mix, or the paint may fail to cure. If you are airbrushing in a garage or basement, wet-mop the floor before your session to suppress airborne dust particles. Compressor users should fit an inline moisture trap to prevent water-droplet contamination from spitting onto the wet model surface.
How to Fix Orange Peel After It’s Already Happened
If orange peel is already on the model, your first step is a severity assessment. Use this quick diagnostic chart:
| Severity | How to Identify | Fix |
| Light | Visible only under raking light; smooth to fingertip | Level 2 Micromesh polishing only; or gloss clear coat + Level 2 |
| Medium | Visible under normal lighting; slightly rough to fingertip | Level 1 wet sanding (1,200→2,000) + Level 2 polishing |
| Severe | Clearly visible bumps; catches a dragged fingernail | Level 3 full strip-back and repaint |
Level 1 — Wet Sanding (Light to Moderate Orange Peel)
Before picking up sandpaper, cure time is mandatory. For acrylics, wait a minimum of 24 hours. For enamels and lacquers, allow 48–72 hours. Attempting to sand paint that has not fully cured tears the surface rather than abrading it.
- Add 1–2 drops of dish soap to a bowl of clean water — the surfactant reduces friction and prevents sandpaper clogging.
- Start at 1,200-grit automotive wet/dry sandpaper. Work in long, even strokes using only the weight of your fingers — do not press down.
- Rinse the paper and the surface frequently. “Wet sanding reduces surface abrasion and helps polish the plastic.”
- Progress through grits: 1,200 → 1,500 → 2,000. Check under raking light after each grit before moving on.
- Critical warning: wet sanding removes paint. Reduce pressure to almost zero near panel lines, raised rivets, trailing edges, and wing tips — these areas lose paint faster than flat surfaces.
A real-world example from the modeling reference library is instructive: “The right tail boom area had some orange peel on it due to the fact that the paint dried before hitting the surface… The orange peel was carefully removed using a 0000 steel wool pad. The steel wool residue was completely blown off using high pressure air from the airbrush.” For very mild surface texture, 0000 steel wool on a dry, fully cured surface is a viable alternative — but every trace of steel residue must be completely removed before any further paint application.
Level 2 — Micromesh Polishing (After Wet Sanding, or for Light Texture)
After completing the 2,000-grit stage, the surface will be uniformly matte. The Alclad II Micromesh Polishing Cloth Set (#301) brings it back to gloss. The set contains grades 3,600, 4,000, 6,000, 8,000, and 12,000 plus a foam rubber pad. Work through each grade in sequence using water as lubricant. Each step removes the scratches left by the previous grit. After the 12,000-grit stage, apply a small amount of Tamiya Polishing Compound Fine on a soft cotton cloth in gentle circular motions, then follow with Tamiya Polishing Compound Extra Fine. The surface is now ready for a new gloss clear coat and decals.
Level 3 — Re-prime and Repaint (Severe Orange Peel)
When the texture is visible under any lighting or clearly catches a fingernail, the only reliable path forward is removing the affected paint entirely.
- Flat-sand the surface back to smooth primer using 600-grit sponge sander. Work in a controlled pattern; the goal is to knock back the worst texture, not necessarily expose bare plastic.
- Re-prime with a self-leveling primer: Tamiya Fine Surface Primer, Alclad II Gray Primer & Microfiller, or Mr. Surfacer 1500 thinned with Mr. Color Leveling Thinner.
- The silver paint reveal test: apply a thin coat of Testors Silver over the re-primed area. Under raking light, any remaining scratches, grooves, or imperfections become immediately visible as shadows in the metallic surface. Sand and re-prime those spots before repainting.
- Repaint following the full prevention protocol in the section above.
What You’ll Need: The Orange Peel Prevention Kit
Paint Thinners
- Tamiya X-20A Acrylic Thinner— The standard thinner for Tamiya X/XF acrylics. Alcohol-based; designed for proper airbrush atomization. Available in 40 ml and 250 ml bottles.
- Gunze Sangyo Mr. Color Leveling Thinner— Lacquer thinner with a built-in retarder that extends drying time and actively promotes self-leveling. The most effective single product for fighting orange peel in lacquer-based paints. Compatible with Mr. Color, Mr. Hobby, and Tamiya lacquer-type paints. Available in 40 ml, 110 ml, and 400 ml bottles.
- Vallejo Airbrush Thinner + Vallejo Flow Enhancer— The recommended pairing for Vallejo acrylics. The Flow Enhancer reduces surface tension, improves atomization, and significantly reduces tip dry. Add 1–2 drops per 10 drops of paint.
- Distilled Water— A suitable supplementary thinner for true water-based acrylics. Preferred over tap water, which contains minerals that can affect paint chemistry.
Wet Sanding & Polishing
- 1,200–2,000 grit automotive wet/dry sandpaper— Available at auto parts stores. The standard orange peel rescue progression.
- Alclad II Micromesh Polishing Cloth Set (#301)— Contains 3,600, 4,000, 6,000, 8,000, and 12,000 grit cloths plus foam rubber pad. The definitive post-sanding polishing system for scale model surfaces.
- Tamiya Polishing Compound Fine / Extra Fine— Final gloss-restoration step after Micromesh. Apply on a soft cotton cloth before the final clear coat.
Airbrush Aids
- Vallejo Retarder Medium— Slows acrylic dry time in warm environments above 75°F / 24°C. Use at a maximum of 1 drop per 10 drops of paint.
- Inline moisture trap— Essential for compressor users. Prevents water droplets from contaminating the paint stream and causing secondary surface defects.
(Check current pricing at online hobby retailers such as Sprue Brothers, Squadron, or your local hobby shop.)
Frequently Asked Questions
How do I step-by-step fix orange peel texture on my scale model airplane after I’ve already painted it?
Orange peel texture on a scale model airplane can be fixed in three escalating levels depending on how severe the texture is.
- Light (visible only under raking light): Allow paint to cure fully (24 hours minimum for acrylics; 48–72 hours for enamels). Polish with Alclad II Micromesh (3,600 → 12,000 grit) using water as lubricant. Final polish with Tamiya Polishing Compound on a soft cotton cloth. Apply a fresh gloss clear coat before decaling. No wet sanding needed for light texture.
- Medium (visible under normal lighting):Allow paint to cure fully (24 hours minimum for acrylics; 48–72 hours for enamels). Wet sand starting at 1,200-grit with soapy water, progressing to 1,500-grit and 2,000-grit. Work extremely carefully near panel lines and raised detail — wet sanding removes paint. Then follow the Level 2 Micromesh polishing sequence (3,600 → 12,000 grit) and finish with Tamiya Polishing Compound. Apply a fresh gloss clear coat before decaling. For very heavy texture, start at 800–1,000-grit, but use extreme caution.
- Severe (bumps visible to naked eye; catches fingernail):Flat-sand back to primer with 600-grit. Re-prime with Tamiya Fine Surface Primer or Alclad II Gray Primer. Apply the silver paint reveal test. Sand revealed flaws, re-prime, then repaint using the full prevention protocol.
What is the exact process for thinning Tamiya acrylic paint to avoid orange peel on a scale model?
To avoid orange peel when airbrushing Tamiya acrylic paint, use Tamiya X-20A Thinner and thin to a skim-milk consistency, starting at approximately 70–80% paint to 20–30% thinner by volume.
- Pour the required amount of Tamiya paint into a clean mixing cup — never thin directly in the bottle.
- Add Tamiya X-20A Thinner starting at 20–25% of the paint volume (for 1 ml of paint, start with 0.20–0.25 ml thinner).
- Stir thoroughly for 30–60 seconds with a clean stirrer.
- Perform the drip test: dip the stirrer and observe the flow. Paint should stream steadily — not in heavy globs, and not running off instantly like water.
- If too thick, add thinner in single drops and retest.
- Spray a test pass on white card at your working pressure (15–20 PSI). The spray should land “just wet” — damp but not pooling. Adjust before touching the model.
Note: Tamiya acrylics also respond well to Mr. Color Leveling Thinner, which adds self-leveling properties and further reduces orange peel risk. Many experienced modelers prefer it with Tamiya paints for exactly this reason.
Why does my airbrush keep leaving a grainy, rough finish on my model airplane even when I follow the instructions?
A grainy or rough finish on a scale model airplane almost always results from one or more of four causes: paint too thick, air pressure too high, airbrush held too far from the surface, or tip dry on the needle.
- Paint too thick:Does your paint drip cleanly off a stirrer? If it hangs in heavy globs, it needs more thinner. Target: skim-milk consistency.
- Air pressure too high:For standard acrylics, pressure above 20–25 PSI causes solvent to evaporate from droplets before they land, producing a dry, grainy finish. Reduce to 15–20 PSI and retest on card.
- Airbrush too far from the surface:Maintain approximately 3–4 inches (75–100 mm) for color coats. Every extra inch increases the chance of premature solvent evaporation.
- Tip dry:Fast-drying acrylics — especially Tamiya and Vallejo — clog the needle tip during use, causing the airbrush to spit partially-dried particles. Inspect the tip every few minutes and wipe with a Q-tip soaked in thinner. Adding Vallejo Flow Enhancer (1–2 drops per paint cup) significantly reduces tip dry.
What airbrush pressure should I use to get a smooth, glass-like finish on a 1:48 scale aircraft model?
For a smooth, glass-like finish on a 1:48 scale aircraft model, start at 15–20 PSI for standard acrylics on base coats, reduce to 10–15 PSI for detail work, and use 8–12 PSI for pre-thinned metallics like Alclad II.
| Task / Paint Type | PSI |
| Acrylic base coats and color coats | 15–20 PSI |
| Detail work, panel lines, camouflage edges | 10–15 PSI |
| Lacquers and enamels | 18–25 PSI |
| Pre-thinned metallics (Alclad II, AK Interactive) | 8–12 PSI |
Always dial in pressure on scrap card first. Spray a test pass and assess: the pattern should land visibly wet — not dry and dusty, not pooling. Adjust in 1–2 PSI increments until the “just wet” result appears on the card before moving to the model.
How do I wet sand a scale model airplane without damaging the paint or surface detail?
Wet sanding a scale model airplane safely requires fully cured paint, proper grit progression, water as lubricant, and extreme care near panel lines, raised detail, and thin edges.
- Confirm cure time: minimum 24 hours for acrylics, 48–72 hours for enamels and lacquers. Under-cured paint tears instead of sanding smoothly.
- Add 1–2 drops of dish soap to a bowl of clean water.
- Start at 1,200-grit wet/dry sandpaper for moderate orange peel (1,500-grit for light texture).
- Work in long, even strokes using only the weight of your fingers — no pressing down. Rinse paper and surface frequently.
- Protect edges: reduce pressure to almost zero near panel lines, raised rivets, trailing edges, and wing tips.
- Progress through grits: 1,200 → 1,500 → 2,000. Check under raking light between each stage.
- Follow with Alclad II Micromesh (3,600 → 12,000 grit) using water, to remove fine sandpaper scratches and restore gloss.
- Final polish: Tamiya Polishing Compound Fine, then Extra Fine, on a soft cotton cloth with gentle circular motions.

Key Takeaways
- Three root causes, one fix: Orange peel on a scale model airplane always traces back to thick paint (poor atomization), wrong air pressure (too low spits; too high dries droplets before landing), or the airbrush held too far from the surface. Eliminate all three simultaneously.
- The skim-milk rule: Correctly thinned paint — flowing like skim milk off a stirrer at 20–33% thinner by volume — is the single most effective prevention measure. Always use brand-specific thinners.
- 15–20 PSI and 3–4 inches: These two numbers form the reliable baseline for most acrylic color coat work. Always test on scrap card before touching the model.
- The wet sanding rescue: Orange peel that has already dried can be fixed: cure fully (24+ hours), wet sand 1,200→2,000 grit with soapy water, polish with Alclad II Micromesh and Tamiya Polishing Compound, then apply a fresh gloss clear coat.
- Environment matters: Painting above 75°F (24°C) or in humidity above 60% dramatically raises orange peel risk. Use Vallejo Retarder Medium in warm conditions, fit a moisture trap to your compressor, and wet-mop your workspace floor before airbrushing.