That ugly ridge running down your fuselage doesn’t have to ruin the build. Here’s the complete method to fill seams on any model airplane — correctly diagnosed, expertly executed.
You’ve Seen That Line. Here’s How to Kill It.
You hold your nearly finished P-51D Mustang up under the desk lamp for final inspection — and there it is. A ridge bisects the fuselage like a crack across a sidewalk, completely invisible under the workbench light but unmistakable under any raking beam. One visible seam line, and the build that consumed weeks of careful work suddenly communicates “amateur” regardless of how accurate the markings or how sharp the cockpit detail.
Knowing how to fill seams on a model airplane correctly is the single most important surface-preparation skill a beginning builder can develop. Seam lines are not the result of careless building — they are an unavoidable consequence of the injection molding process that manufactures every polystyrene plastic kit on the market. What separates a competition-quality result from an ordinary shelf piece is not whether seams form, but whether the builder has a reliable, repeatable method for eliminating them.
This guide delivers exactly that: a complete, eight-step process that covers every seam type, every budget, and every skill level — starting with the diagnosis that most beginners skip entirely.
Why Every Plastic Model Airplane Has Seam Lines — And Why You Can’t Ignore Them
Every polystyrene model kit is manufactured by pressing two precisely machined steel mold halves together under very high clamping pressure, then injecting heated, molten plastic into the cavity between them. When the plastic cools and the mold separates, a witness mark — the parting line, or seam — is left along the plane where the two halves met. Because no two mold halves can maintain perfect, zero-tolerance contact across their entire surface, some ridge, step, or gap always results.
Seam severity varies sharply by manufacturer and mold age. A modern Tamiya or Hasegawa release produces near-hairline parting lines across every major assembly joint. An older Revell or Monogram tooling from the 1960s or 1970s can leave visible gaps and step misalignments that demand significant remedial work. Either extreme is fully correctable — but only with the right fix for the right seam type.
The stakes are highest on aircraft receiving metallic or natural metal finishes. Paints like Alclad II, Tamiya Metalizer, and SnJ have very high spectral reflectivity — they reflect directional light rather than diffusing it, which means even a 0.05mm scratch or step creates a visible shadow or highlight. A natural aluminum scheme amplifies every surface irregularity that an olive drab finish might forgive. Thorough seam elimination is a prerequisite, not an option, for any metallic-painted model.
Three distinct seam types require three different fixes: the hairline seam (flush, no gap), the standard gap (visible void, narrow), and the step misalignment (one half measurably higher than the other). Applying the wrong fix to the wrong seam type wastes time, causes unnecessary surface damage, and frequently makes the problem worse.
One point of confusion worth clearing up: flash, seam lines, and step misalignments are related but distinct problems. Flash is thin, feather-edge excess plastic that bleeds out from the parting line — usually translucent and easily removed with a fingernail or a No. 11 blade scrape. A seam line is the visible mark where two kit halves meet. A step misalignment is a dimensional offset where one half sits higher than the other. Applying heavy filler to what is actually a flash problem wastes time and invites unnecessary sanding damage.
What You’ll Need — Tools and Materials Checklist
Gather everything before you start. Mid-project supply runs kill momentum and invite the rushed decisions that cause most seam repair failures.
Fillers and Adhesives
- Thin liquid styrene cement (Tamiya Extra Thin Cement, green-cap bottle; or Testors Liquid Cement) — the first-line tool for hairline seams. Its capillary action draws it into tight joints, dissolving and fusing both plastic surfaces into a single weld.
- Gap-filling cyanoacrylate (CA / super glue) — available in thin (fast-flowing) and medium/gap-filling viscosities. Cures hard, sands exactly like polystyrene, and works fast — especially with a CA accelerator such as Zip Kicker from Pacer Technologies, which cuts curing time to minutes.
- Modeling putty — Tamiya Basic Type Putty and Squadron White Putty for standard gaps — solvent-based; use thin, targeted applications only, as heavy coats can soften the surrounding plastic; Mr. Surfacer 500 (Gunze Sangyo) for shallow seams and hairline cracks, brushed directly from the bottle; Milliput Superfine White two-part epoxy putty for large structural voids — no shrinkage, no solvents that attack plastic.
- Evergreen Scale Models plastic strip stock — the most structurally sound fill method for wide voids; easier to sand and shape than a large blob of putty or CA.
Sanding and Shaping Tools
- Sanding sticks and wet/dry sandpaper in progressive grits: 220, 400, 800, and 1500
- Flexible foam sanding sponges — essential for curved fuselage sections where a rigid sanding block creates flat spots
- X-Acto No. 11 blade — for scraping cured filler, trimming excess strip stock, and removing flash; always use a fresh blade
Checking and Masking Tools
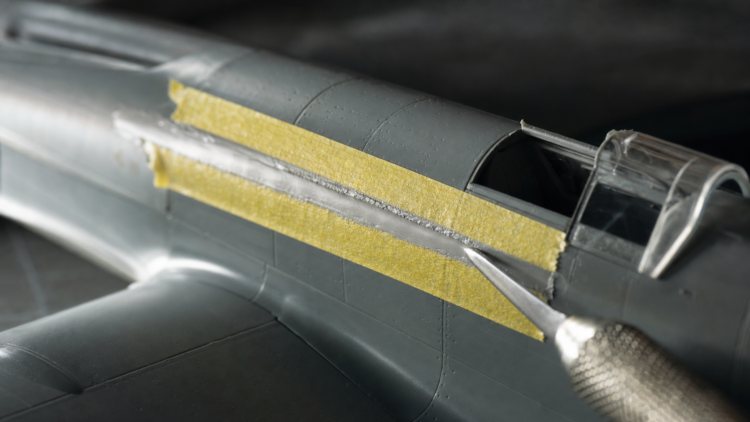
- Tamiya masking tape, 6mm and 10mm widths — the gold standard for scale modeling; 6mm width used as a putty dam along both sides of the seam before filling
- Testors silver enamel — for the seam-reveal test; the metallic surface exposes every remaining flaw
- Tamiya Fine Surface Primer (gray) or Gunze Mr. Surfacer 1200 — the definitive final check; reveals any flaw that survived the silver paint test
The Master Process — Eight Steps to a Seam-Free Surface
Step 1: Dry-Fit First — Find Every Problem Before You Glue
Before any cement touches the model, tape both fuselage halves together with strips of masking tape and hold them under a strong light. Check that every panel line and hatch that crosses the seam aligns precisely — a misaligned panel line is as conspicuous as the seam itself. Identify any gaps, voids, and areas of step misalignment, and note surface detail near the seam that will need re-scribing after sanding. If a locating pin is holding the halves in misalignment, remove it and rely on the tape to control positioning. Mark every problem area on the instruction sheet. Problems found here cost minutes; problems found after gluing cost hours.
Step 2: Glue the Halves and Clamp
Dip a fine wire into Tamiya Extra Thin Cement and run it along the joint between your tape positions, keeping it approximately 1/8 inch back from any tape edges to avoid bonding tape to plastic. Capillary action draws the cement into the joint and softens both mating surfaces until they fuse. A small bead of dissolved styrene appearing at the seam confirms the weld is forming. Press the halves firmly together and apply tape strips as clamps, checking alignment at all panel lines, corners, and shape transitions. Allow a minimum of 30 to 60 minutes of curing time — overnight is the better standard. Sanding over incompletely cured cement reopens the seam and dramatically extends the repair cycle.
Step 3: Diagnose the Seam Type
Once curing is complete, remove the tape and hold the assembly at a low angle under a strong directional lamp so raking light falls across the seam line. Run a fingernail across the joint perpendicularly — even a small step registers by touch before it becomes visible under paint. Identify the seam type: hairline (near-flush, no gap), standard gap (visible void), or step misalignment (one half measurably higher). This single decision determines every subsequent product choice and technique.
Step 4: Apply the Correct Filler for the Seam Type
For hairline seams: Run a second application of thin liquid cement along the seam line, press the halves together, and immediately wipe excess with a soft tissue. The dissolved styrene fills the joint from within, creating a weld that is effectively invisible when sanded.
For standard gaps: Apply 6mm masking tape dams tightly along both sides of the seam first. Then squeeze a small quantity of Tamiya Basic Type Putty or Squadron White Putty onto a piece of scrap paper and use a flat-ended X-Acto blade to press it into the seam in 1- to 2-inch sections, overfilling slightly. For shallow gaps, brush Mr. Surfacer 500 directly into the seam — it flows and levels naturally. Larger quantities of putty are never better; apply the minimum to fill the void. Remove the masking tape while the putty is still moist — not wet, not fully cured — by pulling it back over itself and away from the seam. Removing tape at this stage produces a clean, defined putty line; removing it after full cure risks lifting the filler edges.
For wide gaps and step misalignments: Scrape the high side down using the back edge of a fresh No. 11 blade held at approximately 45 degrees — dragging rather than cutting. Press-fit an Evergreen plastic strip into the void, apply thin CA along both sides to lock it in place, allow to cure fully, then trim the excess with an X-Acto blade and scrape flush before sanding.
Step 5: Mask the Surrounding Detail
Before sanding any filler, re-apply 6mm masking tape tightly along both sides of the seam. The tape acts as a physical dam, protecting adjacent panel lines, rivets, and raised detail from abrasion and keeping every sanding stroke focused on the seam itself. The narrower the unmasked channel, the less detail is lost. Replace the tape as sandpaper abrades its edges rather than letting the paper wander onto unprotected surrounding detail.
Step 6: Sand Progressively Through the Grits
Begin with 220-grit to level the bulk of the filler down to the surrounding plastic surface. Progress to 400-grit to remove the coarse scratches left by 220. Then move to 800-grit, and finish with 1500-grit used wet — soak the sheet in water for several minutes until fully flexible, then work the surface with small strokes while keeping water flowing across the area. Wet sanding prevents heat buildup that can smear and distort polystyrene, extends paper life, and produces a surface finish that accepts primer evenly.
For curved fuselage sections, wrap sandpaper around a flexible foam sanding sponge rather than a rigid block. Rigid backing on a curved surface creates flat spots that deform the fuselage contour. One common trap: after sanding, solvent-based tube putty may appear slightly sunken below the surrounding plastic surface due to solvent evaporation during curing. Apply a second thin coat, allow a full cure — minimum 6 hours for thin fills, 24 hours is the safer standard — and re-sand.
Step 7: The Silver Paint Reveal Test
Clean the model surface with a soft cloth or alcohol-dampened tissue to remove all sanding dust. Brush a thin coat of Testors silver enamel over the entire sanded seam area using a soft, flat brush working in one direction. Hold the model at a low angle under a strong directional lamp — light almost parallel to the surface. The metallic paint catches raking light differently than the surrounding plastic, and any remaining crack, low spot, hairline gap, or sanding scratch appears as a distinct dark line or rough patch against the metallic sheen.
Mark all detected flaws with a pencil, return to Step 4, apply spot filler, re-sand, and repeat the silver paint check. Experienced builders typically require two to three cycles before the surface is completely clean. Before priming, remove all silver paint with mineral spirits or alcohol for Testors silver enamel — primer will not bond to silver paint, and areas left silver-coated will show as uneven color under the finish coat.
Step 8: Prime and Confirm
Apply Tamiya Fine Surface Primer (gray) or Gunze Mr. Surfacer 1200 as a fine mist coat from approximately 8 to 10 inches distance over the entire model or repaired area. Primer performs three functions simultaneously: it reveals any surface flaw the silver paint check missed; it creates an adhesion layer for the finish coat; and it unifies the surface color so the full extent of any remaining texture is visible. If primer reveals any seam remnant or scratch, wet-sand the affected area with 600-grit, apply spot filler, cure fully, re-sand, and re-prime. Finish coats proceed only when the primed surface is completely smooth and unbroken.
Three Scenarios, Three Solutions — Match the Fix to the Seam
Before reaching for any product, consult this quick-reference guide to confirm you have the right approach for your specific seam type.
Scenario A: The Hairline Seam
- Common in: Modern Tamiya and Hasegawa toolings (Tamiya 1/48 P-51D, Tamiya 1/72 Spitfire Mk.I, recent Hasegawa 1/48 releases)
- What it looks like: No visible gap; fingernail slides across with no sensation of ridge or drop; halves are flush
- The fix: Cement-weld only — no filler required. Apply thin liquid cement a second time after initial cure, press the halves together, wipe excess. Wet-sand with 800-grit and 1500-grit.
- Time investment: Minimal — one to two hours including cure time
Scenario B: The Standard Gap
- Common in: Older Revell 1/48 kits, many Airfix releases, Italeri older toolings; complex assembly junctions on any kit (wing-to-fuselage seam)
- What it looks like: Clearly visible void; fingernail catches a definite edge; can see through the joint under light
- The fix: Full 8-step Master Process: masking tape dams, Tamiya Basic Type Putty or Mr. Surfacer 500, progressive sanding (220 → 400 → 800 → 1500), silver paint reveal test, primer confirmation
- Time investment: Moderate — one to two modeling sessions including required cure periods
Scenario C: The Wide Gap or Step Misalignment
- Common in: Older Revell 1/32-scale kits, Monogram re-boxes, some Classic Airframes short-run kits, classic Airfix 1/24-scale kits, 21st Century Toys collectible-origin kits
- What it looks like: Obvious gap or step visible under ordinary lighting; one half measurably higher than the other; fingernail experiences a noticeable bump
- The fix: Scrape high side with back edge of No. 11 blade at 45 degrees; fill low side with Evergreen strip + CA; full progressive sanding sequence; multiple silver paint check iterations; primer confirmation. All gaps are correctable with this methodology.
- Time investment: Substantial — multiple sessions and multiple fill-sand-check cycles
Kit Brand Seam Quality Reference
| Manufacturer | Typical Seam Quality | Notes |
| Tamiya (modern) | Excellent — hairline seams | Best fit in the industry; cement-weld usually sufficient |
| Hasegawa (modern) | Very good — near-hairline | Minor putty work occasionally needed at complex joins |
| Eduard (modern) | Very good | High-accuracy Czech manufacturer; tight tolerances |
| Revell (modern toolings) | Good to moderate | Newer kits excellent; older re-boxes highly variable |
| Airfix (modern toolings) | Good | Significant improvement since 2010; older tools variable |
| Italeri | Moderate | Variable by tooling age; often requires standard putty work |
| Revell (vintage 1960s–1980s) | Poor to moderate | Expect wide gaps and step misalignments |
| Monogram (vintage re-boxes) | Poor to moderate | Similar vintage tooling issues to old Revell |
| Short-run manufacturers (Classic Airframes, Sword) | Variable | Often require significant seam and fit remediation |
Protecting and Restoring Surface Detail
Sanding inevitably abrades the plastic on both sides of the seam, including engraved panel lines, raised detail, and rivet rows that cross or run near the seam. A cement-weld on a hairline seam loses almost nothing; a heavy fill-and-sand on a step misalignment may require re-scribing several prominent panel lines. The masking tape technique in Step 5 is the primary defense — tape dams on both sides of the seam before sanding physically shield adjacent detail from the sandpaper. But when detail loss is inevitable, it is fully restorable.
For re-scribing engraved panel lines: Position a strip of Dymo label tape — the type from older label-making machines, with a sticky backing that conforms to fuselage curves — precisely over the original line location. Using a dedicated carbide scribing tool, make multiple very light passes along the guide edge. Multiple light passes are always superior to a single forceful stroke, which can cause the tool to deviate or gouge. After scribing, run a fine brush loaded with Tamiya Extra Thin Cement along the new line — capillary action flows the cement into the groove, cleans the plastic debris from the edges, and leaves a sharp, crisp line.
For lost rivet rows: Mark the rivet spacing with a soft pencil first, then use a dental pick or dedicated rivet tool to press uniformly spaced small indentations with light, consistent pressure. On 1/72-scale models, fine rivet detail lost to sanding is generally invisible once painted; concentrate restoration effort on the most prominent structural panel lines only.
Five Mistakes That Ruin Seam Repairs — And How to Avoid Them
- Rushing the Cure
Sanding over incompletely cured putty tears the filler, reopens the seam, contaminates the surrounding plastic with filler particles, and extends the repair cycle far beyond what patience would have required. Tamiya Basic Type Putty requires a minimum of 6 hours for thin applications; 24 hours is the safe standard for any visible fill. Putty that feels dry on the surface is not necessarily cured internally — the surface skins over before the interior cross-links. Sanding at this stage compresses the uncured interior, causing the filler to lift, crack, or re-sink.
- Skipping the Dry-Fit
Poor alignment discovered after gluing requires scraping and sanding corrections that are always more destructive and time-consuming than corrections made before cementing. Alignment pins that do not seat properly will hold the halves in misalignment regardless of how much tape is applied afterward. The dry-fit takes ten minutes. The post-glue correction can take hours.
- Over-Applying Putty
Large globs of putty require aggressive sanding with coarse grits that destroys all surrounding detail and may alter the fuselage contour. The correct approach: apply the minimum quantity necessary to fill the specific void, constrained by masking tape dams on both sides. A thin, well-targeted putty line that requires only light sanding is always superior to a thick application that demands aggressive leveling.
- Skipping the Silver Paint Test
Hairline cracks and shallow low spots are nearly invisible on bare plastic but reappear as distinct lines and blemishes under the final paint coat. Discovering seam remnants after painting dramatically reduces the probability of successfully blending any corrective work into the surrounding finish. The silver paint test takes fewer than five minutes and saves the finish coat.
- Using One Sandpaper Grit
Jumping from 220-grit directly to primer leaves sanding scratches on the plastic surface that primer amplifies rather than hides. Each grit in the sequence — 220, 400, 800, 1500 — exists to remove the scratches left by the previous coarser grit. Skipping grits means those scratches survive to the primer stage and beyond.
FAQ: Five Questions Answered
Q1: “How do I step-by-step fill the seam lines on a plastic model airplane fuselage without losing any panel line detail?”
To fill seams on a model airplane fuselage without losing panel line detail, apply masking tape tightly along both sides of the seam before adding any filler, then use the minimum amount of putty or CA necessary and sand progressively through the grits.
- Dry-fit fuselage halves with masking tape; mark all seams and nearby panel lines before gluing
- After full overnight cure, apply 6mm masking tape dams on both sides of the seam, as close to the seam as possible
- Apply the correct filler for the seam type: thin liquid cement for hairline (cement-weld only), tube putty or CA for standard gap, plastic strip + CA for wide gap — overfill slightly
- Allow full cure — minimum 6 hours for Tamiya putty; 24 hours for thicker fills
- Sand progressively: 220 → 400 → 800 → 1500 grit, keeping sandpaper within the masked channel
- Re-scribe any lost panel lines using Dymo tape as a guide and a light-pressure carbide scribing tool
Q2: “What is the best putty or filler to use when I fill seams on a model airplane if I am a complete beginner?”
For complete beginners, Tamiya Basic Type Putty is the most forgiving first-choice filler; Mr. Surfacer 500 is the best upgrade for fine and shallow seams.
- Tamiya Basic Type Putty: Light gray color makes fill depth easy to judge; sands cleanly with standard grit progressions; minor shrinkage makes thin applications essential; applied with an X-Acto blade or cocktail stick
- Surfacer 500 (Gunze): Liquid formula brushed directly into the seam; excellent for shallow gaps, hairline cracks, and ejector pin marks; can be cleaned up with lacquer thinner before full cure
- Gap-filling CA (medium viscosity): Fastest cure, especially with Zip Kicker accelerator; no shrinkage; avoid delaying sanding — CA cures progressively harder and becomes difficult to level if left too long
Avoid two-part epoxy putties (Milliput) as a first product — excellent products for intermediate builders, but the mixing technique and timing awareness are better suited once the basics are established.
Q3: “How do I tell whether my model airplane seam needs putty or just sanding to fix it?”
Diagnose the seam type by examining the cured joint under raking light and running a fingernail across it: a hairline seam needs liquid cement only; a visible gap needs putty or CA; a step misalignment needs scraping plus filling.
- Hairline: No gap visible; fingernail slides across with no ridge sensation → cement weld only, no filler
- Standard gap: Visible void; fingernail catches a definite edge → masking tape dams + putty or Mr. Surfacer 500
- Step misalignment: One half visibly higher; ridge casts a shadow under normal lighting; noticeable bump to the fingernail → scrape high side + fill low side + full progressive sanding sequence
Q4: “What is the exact process for using the silver paint trick to check if I eliminated all the seam lines on my model kit?”
The silver paint seam reveal test works by brushing a thin coat of metallic silver paint over the sanded seam area; the metallic surface catches raking light and makes every remaining flaw highly visible.
- After sanding, clean the model surface with a soft cloth or alcohol-dampened tissue to remove all sanding dust
- Brush a thin coat of Testors silver enamel over the entire sanded area using a soft, flat brush working in one direction
- Hold the model at a low angle under a strong directional lamp — light almost parallel to the surface
- Examine carefully: any remaining crack, low spot, scratch, or seam remnant appears as a dark line or rough patch against the metallic sheen
- Mark detected flaws with a pencil; apply spot filler, re-sand, and repeat the check
- Before priming, remove all silver paint with mineral spirits or alcohol — primer will not bond to silver paint
Q5: “How long should I wait before sanding putty on my model airplane to avoid ruining the repair?”
Wait a minimum of 6 hours before sanding Tamiya Basic Type Putty on thin fills; 24 hours is the safe standard for any visible fill — CA with accelerator is the exception, sandable within minutes.
- Tamiya Basic Type Putty: 6 hours minimum for hairline fills; 24 hours for visible fills
- Squadron White/Green Putty: Similar cure profile; 8 to 24 hours depending on thickness
- Surfacer 500: Touch-dry in 20 to 30 minutes; safe to sand after approximately 1 to 2 hours for single thin coats
- CA with accelerator (Zip Kicker): Surface-cured almost immediately; structurally safe to sand within 2 to 3 minutes. CA without accelerator: 5 to 10 minutes for small amounts; fully cured in 30 to 60 minutes
- Milliput two-part epoxy: 30 minutes workable time; full cure in approximately 4 hours
Safety note: Lacquer-based putties and solvents — including Mr. Surfacer and CA accelerators — produce fumes. Always sand in a well-ventilated area.

Key Takeaways
- Diagnose first: A hairline seam, a standard gap, and a step misalignment each require a different fix — the wrong method wastes time and causes unnecessary surface damage.
- Mask before you fill: Applying 6mm masking tape tightly along both sides of the seam before adding any filler is the single most effective technique for protecting adjacent panel line detail and minimizing sanding scope.
- Never skip the silver paint test: Metallic paint exposes hairline cracks and shallow low spots completely invisible on bare plastic but destructive under the final finish coat.
- Sand every grit: 220 → 400 → 800 → 1500 — skipping grits leaves sanding scratches that primer amplifies rather than hides.
- Patience beats every shortcut: Rushing the cure cycle at any stage — cement, putty, or CA — is the leading cause of seam repair failure and repeat repair cycles.